• User Documentation 
  • Amaryllis Release Notes 
  • For Developers 

  • User Documentation 
  • Amaryllis Release Notes 
  • For Developers 

User Guide

  • folder icon closed folder iconGetting Started
    • Logging In for the First Time
    • System Hierarchy
    • Hierarchy Usage and Summary View
    • Understand Fee and Commission
    • Understanding Reports
    • Making Configuration Easier
  • folder icon closed folder iconSystem Administration
    • Putting It All Together
    • System Setup Flow
    • Platform Account Administration
    • Platform Account Configuration
    • Service Provider Administration
    • Service Provider Configuration
    • Operator and Service Provider Branding Settings
    • Sub-Account Administration
    • Sub-Account Configuration
  • folder icon closed folder iconUser Administration
    • System Users and Functionality
    • Back Office User Administration
    • API User Administration
    • Agent Administration
    • Agent Configuration
  • folder icon closed folder iconReporting
    • Report Menu
    • Account Balance
    • Payouts
    • Payouts Reconciliation
    • Settlements
    • Approval Rate
    • Transaction Summary
    • Transactions
    • Fees Summary
    • Incoming Fees
    • Expected Future Revenue
    • Profitability Analysis Report
    • Reconciliation Summary
    • Reconciliation Records
    • Chargeback Analysis
    • Tokens Report
    • Merchant Statement
    • Management Level Reports (Operator, Service Provider, Agent, Platform)
  • folder icon closed folder iconAlerts Center
    • Rules Management
    • Alerts Management
    • Active Alerts
    • Resolved Alerts
  • folder icon closed folder iconUnderwriting Management
    • Underwriting Templates
    • Underwriting Template Configuration
    • Underwriting Application
    • Underwriting Application Configuration
    • Managing Underwriting Application
    • Sign-Up Summary
  • folder icon closed folder iconDisputes Management
    • Active Disputes
    • Resolved Disputes
  • folder icon closed folder iconTransactions Processing
    • Transaction Types
    • Import Mode
    • Echo Mode
  • folder icon closed folder iconDashboards
    • Financials
    • Management
  1. Home
  2. Docs
  3. User Guide
  4. User Administration
  5. Back Office User Administration
Updated on December 19, 2022

User Guide

  • folder icon closed folder iconGetting Started
    • Logging In for the First Time
    • System Hierarchy
    • Hierarchy Usage and Summary View
    • Understand Fee and Commission
    • Understanding Reports
    • Making Configuration Easier
  • folder icon closed folder iconSystem Administration
    • Putting It All Together
    • System Setup Flow
    • Platform Account Administration
    • Platform Account Configuration
    • Service Provider Administration
    • Service Provider Configuration
    • Operator and Service Provider Branding Settings
    • Sub-Account Administration
    • Sub-Account Configuration
  • folder icon closed folder iconUser Administration
    • System Users and Functionality
    • Back Office User Administration
    • API User Administration
    • Agent Administration
    • Agent Configuration
  • folder icon closed folder iconReporting
    • Report Menu
    • Account Balance
    • Payouts
    • Payouts Reconciliation
    • Settlements
    • Approval Rate
    • Transaction Summary
    • Transactions
    • Fees Summary
    • Incoming Fees
    • Expected Future Revenue
    • Profitability Analysis Report
    • Reconciliation Summary
    • Reconciliation Records
    • Chargeback Analysis
    • Tokens Report
    • Merchant Statement
    • Management Level Reports (Operator, Service Provider, Agent, Platform)
  • folder icon closed folder iconAlerts Center
    • Rules Management
    • Alerts Management
    • Active Alerts
    • Resolved Alerts
  • folder icon closed folder iconUnderwriting Management
    • Underwriting Templates
    • Underwriting Template Configuration
    • Underwriting Application
    • Underwriting Application Configuration
    • Managing Underwriting Application
    • Sign-Up Summary
  • folder icon closed folder iconDisputes Management
    • Active Disputes
    • Resolved Disputes
  • folder icon closed folder iconTransactions Processing
    • Transaction Types
    • Import Mode
    • Echo Mode
  • folder icon closed folder iconDashboards
    • Financials
    • Management

Back Office User Administration

Back-Office User Creating/Editing

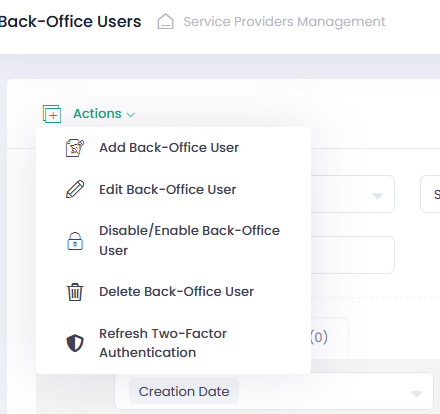
To Add or Edit a Back-Office User

  • Go to the Back-Office Users section under the Service Providers Management tab
  • Click ‘Add Back-Office User’ or select at least one Back-Office User and click ‘Add/Edit Back-Office User’ in the Actions pop-up options list
  • Fill-in the ‘Add/Edit Back-Office User’ form
  • Click Save/Update to create/edit a new Back-Office User or Cancel to return to the list of existing Back-Office Users

The Back-Office User role defines the set of permissions assigned to a user. With the Back-Office User role you can configure Users for the Levels of Service Provider Access, Platform Account Access, Sub-Account Access.

The Back-Office Form contains the following parameters:

NameDescription
Service ProviderSelect Service Provider to which your Back-Office User will be subordinate
User NameEnter User Name of your Back-Office User
PasswordPassword is generated automatically. You can manually edit it
First NameEnter your Back-Office User First Name
Last NameEnter your Back-Office User Last Name
E-mailThis email address is used for confirmation and updates of the Back-Office User
PhoneEnter your Back-Office User contact phone number
User RoleSelect Back-Office User Role, options are based on Service Provider
Platform AccountsSelect Platform Account(s) that your user will get access to. Select All to give Platform User access to all available Platform Accounts
Sub-AccountsSelect at least one Sub-Account for your Platform User. Select All to give Platform User access to all available Sub-Accounts. Enabled in case User Role=Platform User is selected. Disabled in case more than one Platform Account is selected for your Platform User. The number of Sub-Accounts Platform User has access to is displayed in the user details

Use ‘Refresh Two-Factor Authentication’ in the Actions menu to register a new mobile device while using Two-Factor Authentication.

Signing In Using Two-Factor Authentication

If you want to log in to the Back-Office with Two-Factor Authentication, please follow the steps below:

  1. While creating a user or editing an existing one in the Back-Office, mark the “Two-Factor Authentication” box. You will receive a notification on your mobile phone with the Duo Activation link.
  2. Download Duo Mobile on your mobile phone and click on the link provided (or use QR Code) to activate your Duo account.
  3. Enter your login and password in the Back-office. Press the Sign In button.
  4. Approve the notification on your mobile device if requested.

Back-Office User Disabling/Enabling

  • Select at least one Back-Office User in the list of Back-Office Users
  • Click Actions and select ‘Disable/Enable Back-Office User’
  • You can also Disable/Enable Back-Office User via context menu by selecting the appropriate option
  • Select ‘Yes, disable it!’ to disable or ‘Yes, enable it!’ to enable a Back-Office User in the pop-up dialog window
  • The Back-Office User Status changes to Disabled or Active accordingly

Back-Office User Deleting

  • Select at least one Back-Office User
  • Click Actions and select ‘Delete Back-Office User’
  • Click ‘Yes, delete it!’ in the pop-up dialog window to delete a Back-Office User
  • You can also delete Back-Office User by clicking Actions in the last column of the table and selecting the appropriate option
Still stuck? How can we help?
Was this page helpful? Yes No

How can we help?

© Amaryllis Payment Solutions, 2022  All rights reserved.