Welcome to the System User Guide!
This User Guide provides a complete description of the Platforms functionality. It supplies comprehensive user guidance on how to setup the System and on all sections of the Back-Office including all major actions that can be performed.
Back-Office is a Web Application where authorized users have manual access to the System functionality like System Entities onboarding, Users management, underwriting management, transactions processing, reports, alert center.
The system is built on a configurable hierarchy of entities, roles, and users that all come together to provide a flexible payment orchestration platform which will increase operational efficiency by decreasing manual effort on daily tasks. With a strong understanding and knowledge of the system hierarchy in place, you will be able to utilize the platform to maximum effect.
The following section provides background information on the System Hierarchy, Role and User capabilities
Logging in for the first time
Enter the Back-Office log-in credentials you have received in the email “Back-Office User Created” addressed to you. These access credentials are temporary, and you will have to change them upon your first session.
How do I reset my password?
The Back-Office, or portal provides automated password reset functionality via a simple procedure. According to this procedure, in case a user forgets a password, a temporary password can be forwarded to their email address provided in the Reset Password form.
Password retrieval is disabled for all API User roles
Click Forgot Password? in the Login screen to get redirected to the Reset Password screen
Complete your User Name, exact Email address and click Reset Password.
the reset email is sent to the email provided in this step
Go to your email inbox, where you have received the following email “Back-Office password reset request”
Click the link provided in the email to get redirected to the Back-Office login page where you receive the password reset confirmation message.
Return to your email inbox, where you have received an additional message “Back-Office login details have been changed” with a temporary password
Copy the temporary password provided in the email and click the link provided in the email to get redirected to the Change Password screen
Paste the password you have copied from the email. Make sure that you copy the exact password without any additional space at the beginning or end.
Choose your desired password, please consider the following password requirements:
At least 8 characters AND
Must contain digit character (0 through 9) AND
Must contain special character (~!@#$%^&*_-+=`|(){}[]:;'<>,.?;”) AND
Must contain English uppercase character (A through Z)
9.Click Change Password
10. You are redirected and logged in to the Back-Office.
Please make sure that the email address provided (either on the Reset Password form or in the Back-Office Users page) is correct.To make sure you will use the correct temporary password in the Change Password form, we advise you to copy the temporary password from the email and click the link provided in the email to get redirected to the Change Password screen.
What are the password requirements?
Your password requirements are:
At least 8 characters AND
Must contain digit character (0 through 9) AND
Must contain special character (~!@#$%^&*_-+=`|(){}[]:;’,.?;») AND
Must contain English uppercase character (A through Z)
These requirements are also shown when you enter your new password in the password reset page.
You will be asked to Change your access credentials, after the first login with the temporary password.
The User Menu
In the User Menu located in the upper-right corner of the Back-Office screen you can
access this User Guide
switch between languages
change your password
access the Developers’ Portal
Click ? to navigate directly to the User Guide.
System Hierarchy — Hierarchy, Roles and What They Do
Every business operates with its own unique model, and system allows each client to configure a hierarchy of entities, define and enforce roles and then create users to support or enforce the hierarchy.
Top Level – The “Operator”
The Operator is the top-level Entity in the system hierarchy, which can autonomously operate the System, create, and manage other Entities (Service Providers, PlatformAccounts and Sub-Accounts) and Entity Users, all enforced by the role/environment parameters configured.
Operator, as a top-level System Entity. It onboards Service Providers beneath it. It is the “Master” access level and has access to all levels below it, if required.
The standard or default Role is the Operator Manager. Operator Managers create and manage Service Providers and Service Provider Users.
There can only be one Operator, but it has a One-to-Many relationship with the next element below it. It can represent the corporate entity or the ultimate parent entity within a client’s business.
Second Level – The “Service Provider”
The Service Provider, or 2nd level of the system hierarchy can create and manage other Entities (Platform Roles, Platform Accounts and Sub-Accounts) and Entity Users, all enforced by the role/environment parameters configured.
It could be stated that the Service Provider provides a Platform that connects Buyers with Sellers/Merchants for instance. The Service Provider provides this Platform in the form of supplying/configuring Platform Accounts. If the Operator or Corporate Parent had multiple programs, one service provider could represent, a marketplace they board their clients, or a partner who is white labeling their services, such as a SaaS provider, monetizing their solution such as a gym management platform, or franchise operation.
Third Level – The “Platform”
Platform accounts are the third level of the hierarchy, they can represent independent organizations that may have multiple locations, or clients beneath them.
Fourth Level – The “Sub-Account”
Service Providers are the primary entity for collecting and disbursing payments and fees, manage pay-ins and pay-outs via the billing engine. The Sub-Account is the specific location, website, client, it is the 4th level of the hierarchy. To understand it best, this is where the pricing details, the merchant identifier or MID and processing information is configured.
Independent Entity – The “Agent”
The agent is an independent entity, which allows Operators and Service Providers to assign accounts, buy-rates, payout information and access levels to, in order to fulfil specific objectives. It can be used to provide analytics to partners, power residuals and more, all safely and securely enforced by role driven access levels.
Hierarchy Usage and Summary View
A simple example of applying the hierarchy to an E-Commerce marketplace, would resemble something like the following graphic
The Hierarchy Level is in Green, and a role description is in Black
Let us break it down, The System Owner or Operator is a corporate entity who provides payment services, billing services, and various marketplace driven services to its clients. It must provide its clients with the ability to board accounts, configure pricing and services, process transactions, facilitate payments, facilitate reconciliation and potentially payout residuals.
Each Client, in this case is a Service Provider (SaaS platform or Sales Channel) who configures and maintains their own clients, who may use their own acquirers, payout and residual models, with different billing models, all while ultimately interacting with their own unique customer base. This is what the system platform does best. Now that we have a fundamental understanding of the structure, and how it might apply to your business, let us answer your questions!
Understand Fee and Commission/Residual Configuration
Commissions and Residuals Flow
The combination of parameters that should be used for a Fee, Commission or Residual is configured in Service Provider section of the Back-Office. Fees created in the Service Provider section will be transferred as default billing settings to Agent, Platform Accounts and Sub-Accounts that subsequently will be created under this Service Provider.
The actual (individual) fee values are configured at the entity level paying the fee (Fee Source): sub-account, platform account, agent, or service provider.
Fee, Fee Group and Fee Type Administration
A Fee can be configured either as a Stand-Alone Fee or Fee Group, and a Fee has a specific Fee Type.
What is a Fee Group?
A Fee Group is a group of Fees, each with its own Fee Name and Fee Parameters, joined under the same Fee Group. In case a Fee Group is configured, a Platform user will only see the Fee Group Name and the total Fee Group amount. He cannot not see the individual fees and their amounts belonging to the Fee Group.
Fees belonging to the same Fee Group need to be of the same Fee Type.
Which Fee Types are there (link to the definitions)?
There are three fee types you can use as well for Stand-Alone Fees as for Fee Groups:
Per-Transaction Fees – a fee calculated as a fixed amount and/or a percentage amount per each transaction
Scheduled Fees — a fee with a preset amount calculation, a specific interval and duration
Scale Range Fees – a fee configured based on the transactions count range(s)
In addition
Fee On Top Of Fee is a fee type that can be used as Stand-Alone Fee only. This type of fee allows creating a fee on top of another fee.
You can assign your own unique name to each fee and fee group
Per-Transaction Fee and Scale Range Fee
Per Transaction Fees are fees that are calculated as a fixed amount and/or percentage calculated for each transaction.
A Scale Range Fee is a Fee based on the transaction volumes and counts.
To configure per-transaction and scale range fees you need to specify values for certain parameters. For each parameter, a dropdown list of all possible values is available, from which you can choose on or more values:
Transaction Type: e.g. charge, capture, partial capture, refund, partial refund, cancel, void etc.
Transaction Status: Processed or Declined
Payment Method: e.g., ACH, American Express, Discover, Visa, MasterCard, Interac etc.
Entry Mode: this code indicates the method by which the credit card payment was entered, if left empty all available options will apply
Scheduled Fee
A Scheduled Feeis a fee with fixed amount, that will be (re)occur in the time interval specified.
Fee on top of Fee
Fee On Top Of Fee is a stand-alone fee that is applied on top of another fee. For Fee on Top Of Fee you need to specify:
Fee Name – the name of the parent Fee you want the Fee On Top Of Fee to apply to
IC regions – available interchange regions if applicable
Furthermore, Fee On Top Of Fee has the following constraints:
Can Override is disabled
Fee Group is disabled
Fee On Top Of Fee always applies to the Fee Source the fee has been created for
Fee On Top Of Fee inherits the parent fee Due Time, if parent fee is configured with billing delay.
Fee Configuration Details
Fee Behavior Options
Can Override: enables the ability to change the default billing configuration (override fee) on a transaction level. This option is not available for Scale Range Fees
Mark as Tax: this will identify the Fee Category as Tax, enabling to filter various Fee Reports on this Category value
Configure Buyrate; enables the possibility to configure a Buyrate Fee value of the Total Fee value for a Buyrate Target on a sub-account level
Mark as External Cost: if enabled, fees processed as costs will be displayed in the Profitability Analysis Report of the Fee Target under Transaction Cost Amount and will affect the overall Profit Amount.
Fee Source and Fee Target
Fee Source
Fee Source is the entity from which the Fee will be deducted. Fee Source is a required parameter.
Fee Source can be Service Provider, Agent, Platform Account, Sub-Account.
Fee Target
Fee Target is a required parameter. Fee Target is the recipient entity for the Fee. Configured Fee Target entities are not visible on a Sub-Account level, on Sub-Account level Fee Targets are all named anonymous ‘Outgoing’.
Fee Target available options are based on the selected Fee Source
Fee Target
Reserve Balance
Platform Account
Service Provider
Operator
Agent
Fee Source
Sub-Account
V
V
V
V
V
PlatformAccount
V
V
V
Agent
V
V
V
ServiceProvider
V
V
In case Override is enabled for the Fee, for transactions on Sub-Account level you will have the possibility to override the Fee Source and/or Target.
Understanding Reports
What are the Reports Available?
System provides a standard set of reporting functionality that is available at each level of the hierarchy in place. Each report can access the current level data and all the subsequent levels of data depending on the access levels of the user:
See the specific Reports section of each of these entities for more information on these reports.
Back-Office users get access to individual reports based on their permissions (e.g., a user may have access to the Payouts report but unable to take actions on individual payouts or may have rights to certain Sub-Accounts).
Making Configuration Easier
What is a Template Account?
A Template Account is a Platform Account acting as a container for Sub-Accounts created with a default configuration and values. These Sub-Accounts are used to copy their pre-determined configuration to other new Sub-Accounts. This is especially useful in case of the same parameters and values being used for multiple Sub-Accounts, thus reducing the time to set up new sub-accounts to less than a minute. A Template Account is usually disabled since it is only used for copying purposes and not for processing.
What Does a Platform Account Template Do?
A Template Platform Account acts as a container for Template Sub-Accounts.
Creating a Template Account for a Platform Account
A Template Platform Account is created as any other Platform account (see Platform Account Onboarding Wizard), only usually it is named Templates to easily identify it.
What Does a Sub-Account Template Do?
When using a Sub-Account Template when setting up a new account in the Sub-Account wizard, all configuration data and values of the Template Sub-Account are copied to the new Sub-Account:
Processing Values
Fees and their values
Payout configuration
Of course, each of these values can be changed according to your need when you are going through the sub-account wizard.
When using a Template please make sure that sub-account specific data (which values are also copied from the Template) is correct/changed:
MID
Processor Details
Sub-Account Payout Bank Details
Creating a Template Account for a Sub-Account
A Template Sub- Account is created as any other Sub-Account (see Sub-Account Onboarding Wizard), however is it usually named with a name related to the template it represents, so it can be easily identified for copying purposes.
Please note, that the system supports the following browsers:, Google Chrome, Firefox and Microsoft Edge
Putting it all together
Operator Manager Usage and Functionality
Operator Managers create and manage Service Providers and Service Provider Users. One Operator can have more than one Service Provider.
Service Provider Admin Usage and Functionality
Service Provider is a System Entity that is subordinate to Operator. Service Provider provides a Platform to connect Buyers with Sellers, Merchants using Platform Accounts with Sub-Accounts.
Service Providers also collect and disburse payments and fees, manage pay-ins and pay-outs. A Service Provider user is called Service Provider Admin.
Although the Service Provider Admin user is initially created and configured by the Operator Manager, the Service Provider Admin can Edit his own Service Provider configurations, as well creating additional Service Provider Admin user. Service Provider Admin can also create and manageAgents, Platform Accounts, Sub-Accounts and their Users.
Service Provider Admin has access to all the available reports and dashboards.
Platform Admin Usage and Functionality
Platform Account is an Entity in the System Hierarchy that is subordinate to Service Provider. Platform Account can be perceived as a virtual container, enclosing Sub-Accounts.
The Platform user is called Platform Admin. The Platform Admin can create, edit and manage Sub-Accounts and their Users, and can also edit relevant Platform Accounts.
Collection of Business Data
Branding
This information unit serves to brand the Back-Office according to the Service Provider requirements. The following data can be used for branding:
Company Name
Footer Text
Company URL
Dev Portal URL
Language
Theme Color
FAV Icon
Logo
The Operator Manager will use this information when creating a new Service Provider – Step 1 of the Service Provider Onboarding Wizard.
Processing
In this step the Operator Manager determines the Service Provider transactions processing configurations, such as credit card, ACH and payout processors, cut-off time and underwriting requirement. For more information see Step 2 of the Service Provider Onboarding Wizard.
Billing
The Operator (System Owner) collects all the information from the Service Provider about their business model applicable Fees & Residuals and Interchange Fees. For more information see Step 3 (Interchange Fees), 4 (Fees & Residuals) and 6 (Billing) of the Service Provider Onboarding Wizard.
Funding (payout banks)
The funding information is required for the System to process payouts instructions.
The Operator (System Owner) collects the information required to set up and configure collecting bank account(s) (Payout Bank) for Service Providers.
Service Provider as a business entity collects and manages all the funding (pay-ins and pay-outs) via the Payout Bank account.
One Service Provider may have more than one Payout Bank account, but just one for each currency type.
The Payout Bank used for payouts to Platform Accounts, Sub-Accounts and Agents is determined automatically based on the Service Provider settings and the currency type.
For more information about the Service Provider payout bank setup see Step 5 of the Service Provider Onboarding Wizard.
Business Information
The business information is required to create alerts and notifications for a Service Provider. Alerts can be configured on any level (from Sub-Account to Operator).
System Setup Flow
Follow the suggested setup flow to configure the System:
Collection of Business Data — collect all the necessary Service Provider business data
With the data from step 1 create and configure at least one Service Provider
Create and configure a Service Provider Admin
Create and configure a Template Platform Account
Create and configure a Template Sub-Account
Start creating your merchant/seller Sub-Accounts using the Template Sub-Account(s)
Service Provider Branding
The System Branding features provides a complete set of options to customize the application User Interface. Default Branding settings are applied and only overwritten when the users create their own custom branding changes.The following User Interface elements can be customized
Standard User Interface elements such as controls (buttons, checkboxes etc), icons, links, notifications etc
Menus (fonts, colors, links)
Tables (fonts, colors, controls)
Pop-ups (fonts, colors, controls)
Wizards (fonts, colors, controls)
Additional Branding elements (logos, icons etc)
Default Branding settings have been propagated under the Operator and Service Provider levels .Service Provider Branding is available to the Users with specific permission assignedBranding is available in the “Actions Menu” in the Service Providers view. The User can override default system settings as well as reset customization to the default state
Branding Options available
Branding provides the ability to change the appearance for every specific element in the System including colors of specific elements as well as font styleControls set includes
Color Pickers
Font Type Selectors (Type, Color, Background Color, Size, Style)
Logo and icon upload
The Service Provider Onboarding Wizard
Service Provider Onboarding Wizard is a seven-step procedure that allows to Create and/or Edit Service Providers Entities.
The procedure consists of the following steps:
General Information
Processing Information
Interchange Fees
Fees and Residuals
Payout Banks
Billing
Payouts Configurations
Available Actions
Save and Continue — save settings and proceed to the next step
Back — return to the previous step without saving
Cancel — abort onboarding without saving
Submit — save and complete the onboarding procedure
Information Requirements
Before setting up your Service Provider you should have the following information of the Service Provider available:
Service Provider Color scheme, Icon, and Logo
Processors to be used
Credit Card Types
Applicable Interchange Fees
Fee Structure and Fee Names and — Amounts
Payout Bank Details (for Payouts to the other entities)
Service Provider Payout Bank (for receiving payouts)
You can always edit your Service Provider configuration, but please note that any changes made will only be applicable from the moment they are uploaded, they will not apply retro-actively.
Add/Edit a Service Provider
Configuring General Information Details
In this step, General, you will provide all the general information that will determine the way your Service Provider Entity will be displayed in the System. Information that you provide in this step will be used to create a white label (custom) interface for your Service Provider Entity (color, logo etc.).
Operator
Select a corresponding Operator from the drop-down list
Required
Service Provider Name
Service Provider Company Name that will be displayed in the Back-Office
Required
Contact Email
Service Provider contact Email address
Required
Company Name
Service Provider Company name that will appear in the page footer.
Required
Footer Text
Activate Hide Text to hide footer text entirely. Users can edit footer text before and/or after the Company Name. In case omitted, values are inherited from the parent system entity or default settings apply.
Not Required
Company URL
Service Provider Company URL, that will appear in the page footer.
Not Required
Back-Office URL
Service Provider Back-Office URL. This URL is provided in the registration email with the user credentials, that is send to users upon their registration. In case not populated, the default Back-Office URL applies.
Not Required
Back-Office Guide URL
Service Provider Back-Office Guide URL. This URL is provided in the registration email with the user credentials, that is send to users upon their registration. In case specified, the provided values replace: URL that is sent to users by default in the registration email Back-Office help icon hyperlink value In case not populated, the default Back-Office User Guide URL applies.
Not Required
Developer Portal URL
Service Provider Developer Portal URL. The Developer Portal URL is located in the User profile section
Not Required
Sender Email Address
Email address that will be used for sending emails. In case not populated, the default Operator Sender Email address applies.
Not Required
Language
Select the interface language from the list of available languages
Required
Color
Theme color used for Back-Office display
Required
Icon
Service Provider Theme FAV Icon used for Back-Office display
Not Required
Logo
Service Provider Theme Logo used for Back-Office display
Not Required
Copy Settings From
Select a source Service Provider to copy configuration settings to a new target Service Provider. Select None to disable all templates. Enabled for Add Service Provider form only.
Required
Copy Alerts From
Select a source Service Provider to copy alerts settings to a new target Service Provider. Select None to disable all templates. Enabled for Add Service Provider form only.
Required
Configuring Processing Details
In this step you set your Service Provider transactions processing configurations and determine
Credit card processors
ACH processors
Card On File processors for negative payouts for Sub-Accounts Payout processors
The selected processors will be in the available options for Platform Accounts and Sub-Account that will be created under this Service Provider.
Click each text area to show all the available options. You can select more than one option in each field.
Configuring Credit Card Processing Options
In this section you determine your Supported Credit Card(s).
You can select more than one credit card type. The Credit Card Types you select here will be displayed as available Credit Card options for your Sub-Accounts configurations and for your Reports.
Cut-off time administration
Auto Cut-Off Trigger enables to configure the Cut-Off time based on a specific trigger. Currently it is possible to trigger on cut-off time, with available time steps of 1 hour.
Cut-Off Inheritance Logic
A Cut-Off time can be set for each entity individually. However, if no cut-off time is set the entity will inherit the cut-off time settings of its parent entity, e.g., a Sub-Account will inherit the settings of a Platform Account.
In case parent entity cut-off value is not set, thenthe cut-off time is set at 12:00 AM
Underwriting Settings
Underwriting Configuration
In this section you can configure Underwriting settings for subordinate Sub-Accounts:
Require Underwriting — set yes to enable underwriting when onboarding Sub-Accounts
Can override —activate to enable Sub-Account overriding underwriting settings
Underwriting iframe Branding — in this section you can set the following application branding details:
Header Text
Left Logo
Right Logo
Underwriting Merchant Notification
In this section you can select triggering event for receiving notifications about applications:
Application Submitted
Request Updated
Request Approved
Request Declined
Request Resubmitted
Merchant Statement Configuration
Use Merchant Statement Processor selector to choose your Service Provider merchant statement processor.
Available statements are displayed in and can be downloaded from the Merchant Statement Report. Users have access to Merchant Report based on their permissions level.
There are three Merchant Statement Processor options:
None — no additional logic is implemented
External — user is given an option to select a statement issuer from the list of available processors. In this case the merchant statement report is supplied by the third party
Internal — user can configure a merchant statement report using a list of provided parameters — see below.
User can select only one of the available options
In case Internal merchant statement issuer has been selected, user can configure the report output details using parameters below:
Statement Issuer
Statement Day of Month
Statement Language
Statement Color
Statement Logo
Statement Issuer Name
Statement Issuer Address
Statement Issuer City
Statement Issuer ZIP
Statement Issuer County
Statement Issuer Phone
Statement Issuer Email
Statement Glossary Terms
Configured merchant statement report parameters are available for preview in the Service Provider Details/Processing Settings tab.
Interchange Configuration
Interchange Fees is an Optional step. If you want to skip this step, do not activate any Interchange Fees and click Save and Continue to proceed to the next step.
All available Interchange Regions are displayed in this section.
Expand each region to preview all the configured fees for this region.
Activating Interchange Fee’s
To Activate Interchange Fee:
use toggle to activate the Interchange Fees Region(s) that you require from the list of available Interchange Fees Regions
the Interchange Fee will be identified by the System Id (Id).
If you want to use your own ID you can do so by using the External Id field:
Use filter to search for the Interchange Fees you want to configure, enter fee name if you know it, and/or choose Debit or Credit fee type
Enter your own Id in the External Id field for the relevant Interchange Fees.
Interchange Functionality
You can perform the following actions on active interchange regions:
Select Fee Target from the drop-down to assign the entity that will receive the Interchange Fee.
Reserve Balance and Agents are not available as Fee Target.
Select Billing Date Delay to set a billing date delay for the Interchange Fee.
Mark the Interchange Fee as External Cost. See ‘Mark as Cost’ in the ‘Fees Configuration Details’ section for more information.
Creating Fee Groups and Fees
In this step Fees and Fee Groups are configured. This step only defines the combination of parameters that should be used for each fee. The actual individual fees values will be configured at the sub-account level individually based on the settings that you create in this step.
In this section you can create:
Fee Groups — to split fees between multiple recipients
Fees – Stand-alone (individual) fees
When using Fee Group, the merchant (Sub-Account) will only see the Fee Group Name and the total fee amount for that Fee Group. The merchant (Sub-Account) will NOT see the various recipients and will NOT see their split within the Fee Group.
Creating or Deleting a Fee Group
Click Add (+)
Enter a Fee Group Name. This is the name of the Fee that will be displayed on Sub-Account level.
Select one of the Fee Types. Please note, once a fee group has been created you cannot change Fee Type parameter for this fee group.
If applicable, enable Mark as Tax. As a result all Fees in this group will be Marked as Tax
Please note, that Fee Type and Mark as Tax parameters are disabled when editing if at at least one fee has been created for the Fee Group. If you want to edit these parameters, you first have to delete all fees that belong to the specific Fee Group.
5.Click Remove to discard the Fee Group
You cannot remove a fee group when at least one fee has been created for a group. Delete all fees belonging to the Fee Group to delete or edit a Fee Group.
Creating or Editing a Fee
Select a Fee Source and click Add (+) to add a new fee section
Navigate to the newly created Fee section.
Enter a Fee Name. This is the name of the Fee that will be displayed in the Back-Office. In case the fee is part of a Group, on Sub-Account level the Fee Group name will be displayed.
Select Fee Type from the list. Please note, once a fee has been created you cannot change the Fee Type parameter for this specific fee.
Select Stand-Alone Fee for a single fee or one of the Fee Groups that you have created in the previous section for a fee belonging to a group fee.
Select one or more Transaction Type(s) from the list of available transaction types. Not relevant for Scheduled Fee and Fee on Top of Fee.
Select Transaction Status – create fees for both successful and/or declined transactions. Not relevant for Scheduled Fee and Fee on Top of Fee.
Select one or more Payment Method(s) from the list of available payments methods, if left empty the fee will apply to all payment methods. Not relevant for Scheduled Fee and Fee on Top of Fee.
Select Entry Mode from the available list of entry modes, if left empty the fee will apply to all entry methods.Not relevant for Scheduled Fee and Fee on Top of Fee.
Select Billing Date Delay to delay the execution of the fee to a future date and specify fee delay parameters, otherwise choose Real-Time to execute the Fee in real time.
Not relevant for Scheduled Fee
Enable Can override to allow overriding the fee values on a sub-account level
Enable Mark as Tax to identify the fee category as Tax. Skip to identify fee category as Fee.
Click Remove to Discard the Fee
You cannot remove a fee that has already been used
Reserve Configuration
Reserve Release Date Delay
Reserve Release Date Delay enables you to customize your reserve balance release settings. This option is only enabled in case the Fee Target = Reserve Balance.
Reserve Balance Limit
Reserve Balance Limit enables you to limit the total amount of Reserve Balance you will keep. If Reserve Balance is selected as Fee Target, the Reserve Balance Limit input field will appear so you can specify the limit amount for that fee.
In case a limit indeed is set, the system will check the reserve balance before applying the reserve fee. If the reserve balance is greater or equals the preset limit value, the system will not apply the reserve fee.
Reserve Balance Limit is specified per reserve fee and per Service Provider and does not depend on currency.
The limit value can be different for different reserve fees.
This option is only enabled in case the Fee Target = Reserve Balance.
Billing Delay
Billing Date Delay enables you to delay billing of your fee, instead of real-time (immediate) billing. In the Billing Date Delay settings, you can specify the delay time span.
Values provided in this step will be available as default billing date delay settings for relevant Sub-Accounts billing settings and will not be displayed in the Sub-Account Billing Onboarding step.
Billing Date Delay is enabled for Per-Transaction, Scale Range, Fee On Top Of Fee and Interchange Fee Types.
Days
Enter Number Of Days value to determine a fee daily billing delay time span
Weeks
Enter Number Of Weeks value to determine a fee weekly billing delay time span and On value to select a billing weekday
Months
Enter Number Of Months value to determine a fee monthly billing delay time span and Day Number value to select a billing sequential calendar day
Years
Enter On value to determine a fee billing month and Day Number value to select a billing sequential calendar day
Real-Time
Select for real-time billing
Buyrate Configuration
Buyrate enables you to configure for a Fee a Buyrate portion for a Buyrate Target.
Note that in case Buyrate is configured the Buyrate portion will apply first before any other fee portion calculations will be made.
Buyrate option can be enabled for Per-Transaction fees, Fee On Top Of Fee fees, Sliding Scale fees. Conditionsfor using Buyrate:
Fee Source = Sub-Account
Fee Target options: Sub-Account, Agent, Platform, Service Provider. Operator and Reserve Balance cannot be targets for Buyrate.
In case enabled, users on a Sub-Account level can configure a Buyrate fee value for a Buyrate Target and a Total fee value.
Payout Banks Configuration
Payout Bank Details
You can create one payout bank for each currency type
In this step you can create Payout Bank(s) for your Service Provider. Payout Banks are banks that will be used to make payouts for all System Entities.
Service Provider is the System Entity that manages all the pay-ins and pay-outs.
You can create one payout bank for each currency type
Payout Banks for Platform Accounts and Sub-Accounts are determined automatically based on the Service Provider settings and the currency type configured for each Sub-Account.
Specific payout instructions for Platform Account and Sub-Accounts are stipulated in the relevant sections.
Configuring a Payout Bank
Click Add to add a new Payout Bank
Click Edit to edit a Payout Bank Name
Fill in the Payout Bank form and click Submit to complete the Service Provider onboarding process
Click OK to confirm new Service Provider onboarding
Add/Edit Payout Bank Form Details
New Bank Name
The name of the Payout Bank as it will appear in the Back-Office
Bank id
Created by the System automatically after you create a Payout Bank
Bank Code
A Bank Code is a unique identification code for a particular bank
SWIFT
SWIFT is an 8- or 11-digit code that identifies your country, city, bank, and (11-digit only) branch
IBAN
IBAN (International Bank Account Number) is an international bank account number used to identify bank accounts. The number starts with a two-digit country code, then two numbers, followed by several more alphanumeric characters.
Bank Address
Enter the official address of your payout bank
Account Number
Enter a full bank account number
Routing Number
A nine-digit number used to identify a financial institution in a transaction
Account Type
Select Checking or Savings account type
Beneficiary Name
The name of a person or a company receiving the funds
Beneficiary Address
The address of a person or a company receiving the funds
Sort Code
A six-digit number that identifies both the bank and the branch where the bank account is held.
Branch Code
A six-digit number. Identifies both the bank and the branch where the account is held
Currency
Select a currency type from the drop-down list
Service Provider Billing Configuration
Fees created in the Fees and Residuals step with Fee Source=Service Provider appear in the Billing step. In this Billing step the specific values for these fees are configured.
Service Provider Fees follow the same logic as Sub-Account Fees with a few exceptions:
(See Sub-Account/Billing Wizard section for details about configuring fees and their parameter values)
Fee Target = Operator or Agent
Fees are always Stand-Alone Fees; Group Fees are not available
Buyrate cannot be configured for Service Provider Fees
Priority levels are not available for Service Provider Fees
Option to choose ‘Include Own Transactions’:
If Include Own Transactions is marked, the Service Provider’s own transactions and it’s subordinate transactions will trigger the fees
If Include Own Transactions is not marked, only transactions processed by the Service Provider’s subordinates will trigger the fees.
Scale Range Fees, Scheduled Fees, and Fee On Top Of Fee always Include Own Transactions. Per-Transaction Fees can be configured as both.
In case no Fees with Fee Source=Service Provider have been created, the user will see a corresponding warning message.
Disable/Re-enable a Service Provider
Select at least one Service Provider in the list of Service Providers
Click Actions and select Disable/Enable Service Provider
You can also Disable/Enable Service Provider by clicking Actions in the last column of the table and selecting the appropriate option
Select Yes, disable it! to disable or Yes, enable it! to enable a Service Provider in the pop-up dialog window
The Service Provider Status changes to Disabled OR Active accordingly
In case you Disable/Enable a Service Provider, all Platform Accounts, Sub-Accounts and Users assigned to it will change their statuses accordingly.
Delete a Service Provider
Select at least one Service Provider
Click Actions and select Delete Service Provider
Click Yes, delete it! in the pop-up dialog window to delete a Service Provider
You can also Delete Service Provider by clicking Actions in the last column of the table and selecting the appropriate option
You can only delete a Service Provider that has no Platform Accounts, Sub-Accounts or Users assigned to it.
The Platform Account Onboarding Wizard
Information Required
Add/Edit a Platform Account
Configuring General Platform Details
In this step you connect a Platform Account with the specific Service Provider and specify basic details.
Service Provider
Select a Service Provider you create a Platform Account for
Required
Platform Account Name
Enter your Platform Account name to be displayed in the System
Required
Contact Email
Enter your Platform Account contact Email address
Required
Auto Cut-Off Trigger
Service auto cut-off trigger options.
Cut-Off Time Default Value
Cut-Off Time
Cut-off time picker.
Optional
Configuring Platform Billing Details
In this step you configure specific values for Platform Account fees. Fees created on the Service Provider level with Fee Source=Platform Account appear in the Billing step. Such fees have Operator and Service Provider as fee target available options. In case no such fees have been created on the Service Provider level, user will see a corresponding warning message.
Use Include Own Transactions flag to configure fees triggering transactions:
If Include Own Transactions -= True, the the entity’s own and subordinate entity’s transactions trigger fees
In case Include Own Transactions = False, transactions processed by subordinate entities trigger fees
Scale Range, Fee On Top Of Fee and Scheduled fees have always Include Own Transactions = True. Per-Transaction fees can be configured as both.
See Sub-Account/Billing Wizard for details as for configuration of different types of fees and their parameters.
Platform Account Billing wizard follows the Sub-Account wizard logic for the exception that it creates fees for Platform Accounts and priority levels are not available for these fees.
Configuring Platform Payout Details
In this step you configure payouts instructions for your Platform Account.
Payout Bank is determined automatically based on the Service Provider and the currency type
Payouts instructions are split into two sections
Payouts Configuration
Payouts: consisting of Payout Bank Details and Payout Schedule
Payout Configuration Details Explained
In this section you can choose to use manual or automated payout options, payout processor and specify external payouts processor parameters.
Payouts Configuration Details
Payout Processor
Select a Payout processor from the drop-down list or select None to enable manual payouts. Available options are based on the selected Service Provider. External payouts processor is disabled if manual payout (None) option is selected. Manual payouts are manually approved in the Back-Office Payouts report.
Processor Parameters
Parameters are pre-populated individually for each Payout processor
Balance Management
Balance Management allows configuring payout actions based on the balance value
Check Account Balance
Select to enable account balance check prior the payout. In case enabled, negative payouts are disabled.
Ignore Account Balance
Select to ignore account balance value for processing payouts. Required to enable negative payouts.
Perform Negative Payout (Withdrawal) if Account Balance is Negative
In case selected together with Ignore Account Balance and the returned account balance calculated amount is negative – negative payout transaction is processed
Configuring Payouts for a Platform Account
In this section you can create and configure individual payout instructions for your Platform Account. You can create payouts, following your business requirements.
Available Actions
Add Payout: use to add an additional payout
Edit Payout Method Name: use to edit an existing payout name
Hide/Show: use to hide/show a payout configuration
Remove: use to delete a payout configuration
Payout Bank details
The System allows creating almost endless variety of payout cases based on your business logic.
It is possible to create one payout configuration per currency type.
Payout Schedule
In this section you can create a payout instruction. You can preset payout amount calculation mode and time range to create a rolling reserve according to your risk management policy.
Payout Method
Select a Payout Method for the payout from the drop-down list. Select None to skip creating a payout instruction for a specific currency. Select ACH to create a payout instruction for a specific currency.
ACH Details All fields are required. Displayed in case ACH is selected
Account Number — ACH account number
Account Type — ACH account type (Checking/Savings)
Until Date – Select End date in the date picker box
Number of occurrences – Enter number of occurrences in the Occurrences quantity text box
Never — Select to enable an endless payout option
Payout and Reserve Management Payout Amount Calculation Methods
Fixed — Set a fixed payout amount
Percentage — Rolling Reserve Payout amount is calculated as a percentage from the Account Balance
Past Date — The payout amount is calculated as an Account Balance on a specific date, considering the preset reserve capacity
Past Interval — Payout amount is calculated from the total amount of daily settlements, incoming fees, adjustments, reserve balance release, on-demand payouts and cancelled payouts transactions for the specified time range
Two-Step
Select to enable an additional manual payout confirmation via the Back-Office.
approval(semi-automated payout)
Use to add a manual payout approval for automated payouts processed with an external processor or to add an additional manual approval for manual payouts.
Payout Time
Time picker to set the payout timing.
Configuring Two-Step Approval
Enable Two-Step approval to have an option to manually approve or decline suspicious payout transactions.
Disable/Enable a Platform Account
Go to Platform Accounts section under Platform Management tab
Select at least one Platform Account
Select Disable/Enable Platform Account in the Actions pop-up options list
Select Yes, disable it! to disable or Yes, enable it! to enable a Platform Account in the pop-up dialog window
The Platform Account status changes to Disabled and Active accordingly
Delete a Platform Account
Select at least one Platform Account
Click Actions and select Delete Platform Account
Click Yes, delete it! in the pop-up dialog window to delete a Platform Account
Platform Administration
Platform Account is an Entity in the System Hierarchy that is subordinate to Service Provider. In the Platform Management Back-Office section Back-Office users may Preview, Add and/or Edit Platform Accounts and Sub-Accounts. A Platform Account can be perceived as a virtual container, enclosing Sub-Accounts.
Sub-Account Administration
In the System HierarchySub-Accounts are subordinate Entities to Platform Accounts.
A Sub-Account as a System Entity may perform various business functions:
Sub-Account may represent a set of configurations for a specific Platform Account required to process transactions and use System services. A Platform Account in this case may have more than one Sub-Account with different settings (e.g., different payout settings)
Sub-Accounts may as well represent a business entity like a Sub-Merchant. In this case a Platform Account (Merchant) may have more than one Sub-Merchant represented by an individual Sub-Account with individual processing, billing and other settings.
The Sub-Account Onboarding Wizard
Sub-Accounts can be created via the Back-Office Sub-Account Onboarding Wizard or Management API.
Sub-Account Onboarding Wizard is a five-step procedure that allows to Configure and/or Edit Sub-Account parameters.
The procedure consists of the following steps:
General Sub-Account
Transactions Processing
Billing
Payouts
Confirmation of the data entered
Steps Billing and Payouts are optional and can be skipped and edited later. Default processing billing, interchange and payout bank configurations are determined by the relevant Service Provider.
Available Actions
Save and Continue — save settings and proceed to the next step
Back — return to the previous step without saving
Cancel — abort onboarding without saving
Submit — save and complete the onboarding procedure
Remove and Continue — skip and proceed
Information Required
Add/Edit a Sub-Account
Go to Sub-Accounts section under the Platform Management tab
Click Add Sub-Account
Follow the five-step Sub-Account Onboarding Wizard to create a new Sub-Account
OR
Select at least one Sub-Account
Select Add/Edit Sub-Account in the Actions pop-up options list
Follow the five-step Sub-Account Onboarding Wizard to Add/Edit a new Sub-Account
Configuring General Sub-Account Details
In this first step, you set general Sub-Account parameters and you have an option to determine a template Sub-Account to copy setting from.
Service Provider
Select a Service Provider from the list of automatically pre-loaded Service Providers
Required
Platform Account
The list of available Platform Accounts is pre-loaded automatically, based on your choice of the Service Provider
Required
Sub-Account Name
Enter the Sub-Account Name to be displayed in the System
Required
Copy Settings From
The list of available Sub-Account templates to copy settings from is preloaded automatically based on your Service Provider selection. To skip selecting a template Sub-Account select None in the Copy Settings From drop-down list. Enabled for Edit form only.
Not Required
MID
Merchant Identification number.
Not Required
External Id
Merchant external identifier.
Not Required
MCC
Merchant Category Code.
Not Required
Require Underwriting
Activate to enable underwriting for Sub-Account onboarding. Available in case enabled by the related Service Provider. May be configurable or not, depending on the related Service Provider settings.
Not Required
Underwriting Application
In case disabled, you can see just unlinked applications for your Service Provider. Activate to see all linked and approved applications under your Service Provider. Enter application name in the text box or select from the list. Payment details from the underwriting application are always pre-populated in the Sub- Account payout configurations in case an underwriting template has been selected.
Optional
While onboarding a Sub-Account, it is an option to choose a template Sub-Account to copy your Sub-Account settings from. If you decide to select a template Sub-Account, the source Sub-Account parameters will be applied to the target Sub-Account. You can change them during the onboarding process or any time later.
Merchant Statement Processor Details
Please note, that is case an Internal merchant statement report issuer has been configured for a related Service Provider, Sub-Account General information offers extra parameters to set Merchant Statement report delivery.
In case the option of automated delivery of the report is activated, specify the following delivery parameters:
Target email address
Specify additional merchant identification parameters for reports:
Merchant number
Merchant name
Merchant DBA
Configuring Sub-Account Processing Details
In the second step you can configure Sub-Account transactions processing options like credit card, ACH, gift cards, transaction processing mode and enable functions such as recurring billing, auto capturing and fraud detection. The System allows to choose in-house transaction processing gateway or use an available external processor.
All the pre-populated values are based on the selected Sub-Account template and the relevant Service Provider. Change values you wish to override. Unchanged values will be inherited from the selected template in the first step of the Sub-Account Onboarding Wizard.
Transactions Mode
Select the desired transactions processing mode Processing — enables transactions processing using regular System transactions processing gateway Import — enables transactions Import service to import transactions data from the external processors Echo — use this option in case you process transactions with any external processor and require the transactions data to use System services like Payouts, Billing, Reconciliation or other. Go to Transactions Processing for more information
Required
Currency
Select a transactions processing currency for your Sub-Account from the dropdown list
Required
Allow Credit Cards
A Boolean value allowing to enable credit cards processing payment method. It is required to select either Allow Credit Cards and/or Allow ACH payment method.
Optional
Supported Credit Cards
Required if the previous option is enabled. Choose at least one credit card type. Available credit card types are determined by the Service Provider.
Optional
Allow Gift Cards
Activate to enable gift cards processing. Enabled for Echo and Import Transaction Modes. Requires Allow Credit Cards to be enabled. Corresponds to a Gift Card payment method. See Transactions Report Advanced Filter Payment Method drop-down.
Tokenization
Choose between Internal and External tokenization options or select both
Credit Card Processor
Required if credit card processing is enabled. Choose one processor from the list. Available options are determined by the Service Provider.
Optional
Processor Parameters
Preset individually for each processor and are based on the selected template Sub- Account
Auto Capture
A Boolean value allowing to enable the automated Capturing service. In case selected, Authorization transactions are deposited automatically every two hours.
Allow ACH
A Boolean value allowing to enable ACH payment method It is required to select either Allow Credit Cards and/or Allow ACH payment method.
Optional
ACH Processor
Required if ACH processing is enabled. Choose one processor from the list. Available options are based on the selected Service Provider.
Optional
Processor Parameters
Preset individually for each ACH processor and are based on the selected template Sub-Account
Allow Recurring Billing
A Boolean value allowing to enable recurring transactions processing. Choose at least one of the options below: Manage Subscriptions —Allows creating recurring billing plans if enabled. Process Plans — Allows processing recurring transactions if enabled. Auto-renew Plans — Enables recurring payments subscription auto renewal service. If enabled, requires Manage Subscriptions to be also enabled.
Allow Fraud Prevention
Enables Fraud Detection Service, if activated
Auto Cut-Off Trigger
Enable service auto cut-off. Cut-Off Time — default value.
Cut-Off Time
Cut-off time picker
Configuring Sub-Account Billing Details
Billing is an optional step where you can configure commissions and fees for your Sub-Account based on your Service Provider settings.
In this step you can configure regular and interchange fees, that have been preconfigured on the corresponding Service Provider level with Fee Source=Sub-Account.
In case no such fees have been created on the Service Provider level, user will see a corresponding warning message.
Fee types and names are preset by your Service Provider configuration.
You can disable fees and configure fees values for the following fee types (in case enabled by the Service Provider):
All the available fees options are taken from your Service Provider Billing Configurations. In case of pre-populated values, these values are inherited from the selected template Sub-Account.
Enabling a Service Provider Fee on a Sub-Account
Interchange Fees
Available Interchange Fees are determined by the Service Provider.
This step is optional. Activate required Interchange Fee(s) by selecting the relevant checkbox. Skip to disable processing of Interchange Fees.
Reversal of Interchange Fees:
Fee Reversal allows reversal of the interchange fees if the selected Reversal On transaction type has been processed. Set Fees reversal for the selected Interchange Fees regions, select one or more options from the Reversal On drop down list.
Override of Interchange Fees
In the Billing step you can override original Interchange Fees source/target, determined by the related Service Provider.
Select one of the available interchange fees
Check Override Source/Target to enable
You can select interchange Source/Target you wish to override from the drop-down list
In case an Interchange Fee is enabled for a Sub-Account, transactions will be displayed in the system with max 2 days delay
Interchange Fees activated for a Sub-Account will be displayed in the Onboarding Confirmation step in the Billing tab.
Per TRX Amount and/or PercentagePer-Transaction Fees are fees that are calculated as a fixed and/or a percentage amount calculated for each transaction.
Fee names and types are preset by the Service Provider. In the Billing section of the Sub-Account Onboarding Wizard, you configure just fees values and other parameters.
Per-Transaction Fee Parameters
Per Trx Amount
Fixed fee amount calculated for each transaction
Per Trx Percentage
Fee as a percentage of the transaction amount
Per Transaction Fees Actions
Remove — Used to remove a particular fee type from the Sub-Account billing settings
Fees Reversal
Select one of the options (Cancel, Refund, Partial Refund, Reserve Balance or Void) in the Reversal on drop down to reverse per-transaction fees.
You can enable fee reversal even for a disabled fee. In this case disabled fee is treated as enabled.
Reversal is disabled for fees with Fee Target = Reserve Balance in case there is no Release Date set for such fees.
Per-Transaction fees are applied to relevant processed transactions and can be displayed in the Applied Fees in the Transaction Details in the Transactions Report.
Priority Levels Fee Priority Level can be set for Per-Transaction fee types. Priority levels are available from None, Level 1st till Level 10th
Level None does not affect other priority levels and is not affected by other priority levels.
Priority Level
Priority Levels allow assigning priority levels to individual fees.
Priority Levels follow the principle of hierarchy: superior levels determine what share of the total amount of applicable fees is to be assigned to subordinate levels.
Other Applicable Principles:
Multiple fees on the same level do not affect each other.
Fixed amount fees are excluded from the priority calculation, but affect the overall fee amount — see example below.
Fee Reversals are not affected by this functionality.
Each Priority Level cannot have more than 100% of the total fee amount
There can be a Level 2 priority even If Level 1 has 100% — In this case Level 2 will not have any affect.
Each fee target can be assigned just ones to the same Priority Level, but different Fee Targets can be on the same Priority Level.
A specific Fee Value can be split unlimited number of times but only up to 10 Priority Levels.
In case of a Partial Refund, the partial contra is set based on the relative amount.
Example
Transaction amount is $100
Fee Level None — 5% -> Fee amount is USD 5
Fee Level 1 — 7% -> Fee amount is USD 7
Fee Level 2 — 10% -> Fee amount is USD 9.3 (10% of 93(=100-7))
Fee Level 3 — 3% and $5 -> Fee amount is USD 7.511 (3% of 83.7(100-7-9.3)=2.511 + 5)
Fee Level 4 — 10% -> Fee amount is USD 7.6189 USD (10 % of 76.189(100-7-9.3-7.511=)
Fee Level 4 — 20% -> Fee amount is USD 15.2378 USD (20 % of 76.189(100-7-9.3-7.511)
Fee Level 5 — 10% -> Fee amount is USD 5.33323 USD (10 % from 53.3323(100-7-9.3-7.511-7.6189 -15.2378)
Fees Priority Levels are as well displayed in the Sub-Account Billing Summary in the Confirmation Step 5 of the Sub-Account Onboarding Wizard. Fees Priority Levels can also be displayed in the Sub-Account Details on the main Sub-Accounts Management screen.
Billing Amount parameter is included in the Back-Office reports to determine transaction billing amount.
This parameter indicates base calculation amount for fees:
Reversal OnBuyrate
Use Buyrate to configure Buyrate fee value for a Buyrate Target and a Total fee value.
If Buyrate is configured, the Fee Target receives the delta ([total]-[buy-rate]).
Example
A Fee is set to 5% and a Buyrate is set to 3%.
In this case, the Fee Target will get 2% and the Buyrate Target will get 3% of the Fee amount value.
Buyrate functionality is available for Per-Transaction fees, Fee On Top Of Fees, Sliding Scale fees.
This feature is enabled in case activated on a Service Provider level
To Create a Buyrate
Enable Buyrate for a specfic Fee; Buyrate is available for Per Transaction fees, FeeOnTopOfFee fee, and Sliding Scale fees. Buyrate Is disabled for Scheduled Fees.
Specify Buyrate Amount or Buyrate Percentage.
Select Buyrate Target from the list of available targets — depends on your specific configuration.
Seasonal Fee
Use Seasonal Fee option to set active and inactive period for individual fees.
Activate Seasonal Fee checkbox for a specific fee you wish to enable this option for
Use Date Picker to set Active Date Range
Use Date Picker to set Off-Season Months — selected months must be within the set Active Date Range
Seasonal Fee option is enabled for all fee types, including interchange fees.
This feature is optional and in case skipped, fees are always active.
Seasonal Fees settings are displayed in the Sub-Account Billing Details in the Onboarding Confirmation step and in Sub-Account Details in the main Sub-Account screen.
Override Source and Override Target
Override Source/Target allows overriding default Fee Source and Fee Target for all types of fees.
Set values can be viewed in the Sub-Account Billing Details.
Available Fee Source and Fee Target options depend on your specific configuration.
This feature is disabled in case Fee Target = Reserve Balance has been configured on a Service Provider/Fees and Residuals level for a specific Sub-Account fee.
Split Fee
When Split Fee option is selected, the Fee amount can be divided between multiple targets and even based on priority levels.
Split Fee functionality is enabled for Per-Transactions fees, Fee On Top Of Fee, and Sliding Scale fees.
Split Fee is NOT available for Scheduled Fee and Fees with Target Fee Reserve Balance.
To Split a Fee Amount:
Activate Split Fee for the specific fee. The set Fee Target value Is displayed as the default Split Fee Target on the First Priority Level.
Set Percentage Amount for the First Level. Priority Levels and Fee targets are disabled on the First Level, the default Fee Target applies for this level.
Click Add icon to add another split level. You can add more than one split level.
On each new split level set Percentage Amount, select Fee Target and Priority Level. Fee Target available options depend on your specific configurations.
Click Remove icon to remove a specific level.
In case Split Fee has been activated, the billing amount for the reports is the Fee Amount based on the Priority Level and the Percentage Amount also based on the Priority Level.
Split Fee details are displayed in Sub-Account Billing details and Confirmation Onboarding step.
Scheduled Fee
Scheduled Fees allow configuring a fee with a preset amount calculation, a specific interval and duration.
You can configure amount, interval, and a fee expiration.
Scheduled Fee Parameters
Fixed Amount
Fixed fee amount calculated for each transaction
Scheduled Fees Interval
Daily — Enter a day sequential number in the Fee willreoccur every text box
Weekly — Enter a week sequential number in the Fee willreoccur every text box and select a weekdayfrom the drop-down list
Monthly — Enter a fee day in the Fee will reoccur everyand a month sequential number in the day of every text box
Yearly — Enter a fee year, month and day in the Fee will reoccur every, Onand Day Number text box, respectively
Scheduled Fees Expiration
Until Date – Select End date in the date picker box
Number of occurrences – Enter number of occurrences in the Occurrences quantity text box
Never — Select to enable an endless fee expiration option
Displayed fees names (and linked transaction types) are determined by the Service Provider, values are taken from the selected template Sub-Account
Scale Range Fee
Scale Range Fees allow configuring the amount of fees based on the transaction volumes and counts.
You can preset several scale ranges to determine fees amounts.
Scale Range Fee Parameters
Minimum
Enter a minimum transaction count
Maximum
Enter a maximum transaction count
Per Trx Amount
Enter a Fee amount per transaction
Per Trx Percentage
Fee as a percentage of the transaction amount
Displayed fees names (and linked transaction types) are inherited from the selected Service Provider, values are taken from the selected template Sub-Account.
Scale Range Fee Counter
Fee Counter is available for a Scale Range fee type.
Fee Counter determines when to reset Scale Range transactions counter.
To enable Fee Counter set Period and Number: e.g., Week 2 — the transactions counter will be reset every two weeks.
The counter resets in the last day of the selected period (Week, Month, Year).
Scale Range Fee Counter Reset Parameters
Week
Select for a weekly counter reset. Enter number of weeks.
Month
Select for a monthly counter reset. Enter number of months.
Year
Select for an annual counter reset. Enter number of years.
Infinite
Select to enable an endless counter.
Fees Reversal
Select one of the options (Cancel, Refund, Partial Refund, Reserve Balance or Void) in the Reversal on drop down to reverse a Scale Range Fee.
You can enable fee reversal even for a disabled fee.
In this case disabled fee is treated as enabled.
Reversal is disabled for fees with Fee Target=Reserve Balance in case there is no Release date set for such fee.
Configuring Sub-Account Payout Details
Payouts is an optional step where you can configure your Sub-Account payout instructions.
Payout Bank is determined automatically based on the Service Provider and the currency type
Payout Configuration Details Explained
The Payout details section is split in several sections:
Payout Configuration
Card-On-File Configuration
Payout (ACH Bank) Details
Payout Scheduler
Payout and Reserve Management
Click Skip and Continue to move to the next step. You can Add/Edit your Sub-Account payouts instructions any time later.
Payout Configuration
In this section you can configure manual and automated payout options, payout processor and the payout processor parameters.
Use Balance management to configure Negative Payouts.
Payouts Configuration Details
Payout Processor
Select a Payout processor from the drop-down list or select None to enable manual payouts. Available options are based on the selected Service Provider. External payouts processor is disabled if manual payout (None) option is selected. Manual payouts are manually approved in the Back-Office Payouts report.
Processor Parameters
Populated individually for each Payout processor and are based on the selected template Sub- Account
Balance Management
Balance Management allows configuring payout actions based on the balance value
Check Account Balance
Select to enable account balance check prior the payout. In case enabled, negative payouts are disabled.
Ignore Account Balance
Select to ignore account balance value for processing payouts. Required to enable negative payouts.
Perform Negative Payout (Withdrawal) if Account Balance is Negative
In case selected together with Ignore Account Balance and the returned account balance calculated amount is negative – negative payout transaction is processed
Use Card On File
In case selected, negative payouts for this Sub-Account will be processed according to the configured Card On File instructions in the first place. In case of a failure of such operation, negative payout is processed via ACH as usual.
Select Processor
Select a processor for Card On File negative payout instructions. Choices are based on your Service Provider settings.
In case Negative Payouts are enabled for a Sub-Account, it will be displayed in the Confirmation Onboarding step in the Payout Settings tab.
Card-On-File Configuration
Use Card On File to process negative payouts using the provided credit card instead of the default ACH payment method.
Card On File is optional and in case activated and configured together with negative payouts, Payout Tool processes negative payouts based on provided in Card On File instructions and the negative payout payment method changes to Credit Card; otherwise, payment method is ACH and Payout Tool processes negative payouts the usual way.
To Create Card On File Instruction for Negative Payouts
In Payout Configuration select Ignore Account Balance and Perform Negative Payout (Withdrawal) if Account Balance is Negative
In Payout Configuration Activate Use Card On File and select a Card On File Processor
At the bottom of the page click Add Card On File to create a new Card On File Instruction:
Payment Method is Credit Card by default and disabled for editing — required
Credit card number — required
Credit card expiration date — required
CVV/CVC number — required
Name On Card — required
You can create card-on-file instructions even for Sub-Accounts without payout configurations, negative payouts and/or account balance management being enabled. In this case, once credit card details are entered and submitted, system performs credit card pre-authorization and tokenization. This allows using preauthorized credit cards for making on-demand payouts.
Payout (ACH Bank) Details
It is possible to create one payout configuration per currency type.
Available Actions
Add Payout: use to add an additional payout
Edit Payout Method Name: use to edit an existing payout name
Hide/Show: use to hide/show a payout configuration
Remove: use to delete a payout configuration
Payment Method
Select a Payment Method for the payout from the drop-down list
ACH Details All fields are required. Displayed in case ACH is selected
Account Number — ACH account number
Account Type — ACH account type (Checking/Savings)
Routing Number — ACH bank routing number
Entity Type — ACH entity type (Personal/Business)
Name on Account — Account name
Payout Scheduler
The Payout Scheduler enables you to configure the Time Schedule for Payouts you want to apply to your sub-account.
Until Date – Select End date in the date picker box
Number of occurrences – Enter number of occurrences in the Occurrences quantity text box
Never — Select to enable an endless payout option
Payout and Reserve Management
You can preset payout amount calculation mode and time range to create a rolling reserve according to your risk management policy.
There are 4 Payout Types you can choose from:
Fixed — Set a fixed payout amount
Percentage — Rolling Reserve Payout amount is calculated as a percentage from the Account Balance
Past Date — The payout amount is calculated as an Account Balance on a specific date, considering the preset reserve capacity
Past Interval — Payout amount is calculated from the total amount of daily settlements, incoming fees, adjustments, reserve balance release, on-demand payouts and cancelled payouts transactions for the specified time range
Configuring Two-Step Approval for Payouts
Enable Two-step approval to have an option to manually approve or decline suspicious payout transactions.
Two-Step approval (semi-automated payout)
Select to enable an additional manual payout confirmation via the Back-Office. Use to add a manual payout approval for automated payouts processed with an external processor or to add an additional manual approval for manual payouts.
Disable/Enable a Sub-Account
To Disable or Enable a Sub-Account take the following steps:
Select at least one Sub-Account
Click Actions and select Disable/Enable Sub-Account
Select Yes, disable it! to disable or Yes, enable it! to enable a Sub-Account in the pop-up dialog window
The Sub-Account Status changes to Active and Disabled accordingly.
Delete a Sub-Account Account
To Delete a Sub-Account, take the following steps
Select at least one Sub-Account
Click Actions and select Delete Sub-Account
Click Yes, delete it! in the pop-up dialog window to delete a Sub-Account
User Administration
System Users and Functionality
What User Roles are Available for Configuration?
There are multiple types of Users, a System User – which is potentially a merchant, a member of the internal staff or a resource who would have access and the responsibility to do actions based on that data such as refunds, troubleshooting, research and more.
The other User is the agent user, who might have ‘read only’ access or wish to reconcile their payouts.
The Service Provider Admin creates Users for Platform Accounts/Sub-Accounts/Agents (Sellers/Merchants/Sub-Merchants/Agents). It grants users roles or permissions based on the categories created.
There are two main User Roles categories: Base User Roles and Custom User Roles.
Base User Roles are general system user roles:
Back-Office users are created for each System Entity to access the System functionality via the Back-Office application
The API is driven by specific users (Operator API Management, Processing and Reports, Service Provider Management and Platform Management) API Users are intended to access the System functionality via the collection of APIs. API user roles match main Back-Office user roles in their permissions scope. Passwords of API users are set to never expire. API users do not have access to Back-Office.
There are a set of default configuration options such as:
Users access the System functionality based on the permissions level assigned by the superior Entity Users.
Users’ hierarchy follows the System Entities hierarchy, where permissions descend from top to bottom.
Custom User Roles may be created based on any Base User Role with a unique name and Id.
Custom User Roles may have different permission requirements than your standard users. This functionality is used to apply specific criteria for unique situations. They can be configured to have an individual set of permissions, different from the standard ones.
Custom User Roles are created and configured by the system administrator. While creating a new system user (Back-Office user or API user), you have an option to assign a new user one of the Base User Roles or a Custom User Role, based on your Service Provider settings.
Please note, that a Service Provider Admin can only Edit relevant Service Providers Entities. Service Provider Admin is not authorized to Add/Remove Service Providers Entities. Same logic applies to Platform Admins — can only edit relevant Platform Accounts Entities.
Back Office User Administration
How do I Create or Modify a User?
To Add or Edit a back-Office User:
In the Back-Office Users section authorized Users can Preview, Add/Edit other subordinate Back-Office Users based on their permissions level.
Go to Back-Office Users section under Service Providers Management tab
Click Add Back-Office User or select at least one Back-Office User and click Add/Edit Back-Office User in the Actions pop-up options list
Fill-in the Add/Edit Back-Office User form
Click Save/Update to create/edit a new Back-Office User or Cancel to return to the list of existing Back-Office Users
The User Role defines the set of permissions assigned to a user. With the User Role you can configure Users for Level of Service Provider Access, Platform Account Access, Sub-Account Access.
The Back-Office Form is broken down as such:
Service Provider
Select the Service Provider you create a user for
User Name
Enter your user User Name
Password
Password is generated automatically
First Name
Enter your user First Name
Last Name
Enter your user Last Name
E-mail
This email address is used for confirmation and updates of the User
Password
Phone
Enter your user contact phone number
User Role
Select User Role. Based on Service Provider.
Platform Accounts
Select Platform Account(s) that your user will get access to.Select All to give Platform User access to all available Platform Accounts.
Sub-Accounts
Select at least one Sub-Account for your Platform User.Select All to give Platform User access to all available Sub-Accounts.Enabled in case UserRole=Platform User is selected.Disabled in case more than one Platform Account is selected for your Platform User. The number of Sub-Accounts Platform User has access to is displayed in the user details.
How do I Enable or Disable a User?
Go to Back-Office Users section under Service Providers Management tab
Select at least one User Name you want to enable/disable
Click Actions and select Disable/Enable User
You can also Disable/Enable User by clicking Actions in the last column of the table and selecting the appropriate option
A message pops up Are you sure you want to enable/disable User Name? Click Yes
The User Status changes to Disabled and Active accordingly
You are returned to the list of existing Back-Office Users
API User Administration
In the Back-Office API Users section Operator Manager and Service Provider Admin can Preview, Add and/or Edit API Users.
API Users access the System functionality via the System API based on the specific API User Role permissions level API Users do not have access to the Back-Office
API User Roles Available
Operator API Management
Permissions level corresponds to Operator Manager user role
Processing And Reports
API User gets access to transactions processing and reports
Service Provider Management
API User permissions correspond to the ones of a Service Provider Admin
Platform(s) Management
API User permissions correspond to the ones of a Platform Admin
Create or Edit an API User
Go to API Users section under Service Providers Management tab
Click Add API User or select an API User and click Add/Edit API User in the Actions pop-up options list
Fill-in the Add/Edit API User form
Click Save to submit a new API User or Back to return to the list of existing API Users
Add/Edit API User Form Details
Service Provider
Select the Service Provider you create a user for
User Name
Enter your API user User Name
Password
You can manually edit your API user password
First Name
Enter your user First Name
Last Name
Enter your user Last Name
E-mail
This email address is used for confirmation and updates of the User Password
Phone
Enter your user contact phone number
User Role
Select one of the available User Roles for your API User
Platform Accounts
You can make more than one selection from the list of available Platform Accounts your API User will get access to. Select All to give your API user access to all available Platform Accounts and Sub-Accounts based on Service Provider.
How do I Disable/Enable an existing API User?
Select at least one API User in the list of API Users
Click Actions and select Disable/Enable API User
You can also Disable/Enable API User by clicking Actions in the last column of the table and selecting the appropriate option
Select Yes, disable it! to disable or Yes, enable it! to enable a API User in the pop-up dialog window.
The API User Status changes to Disabled and Active accordingly
How do I delete an API User?
Select at least one API User
Click Actions and select Delete API User
Click Yes, delete it! in the pop-up dialog window to delete a API User
You can also Delete API User by clicking Actions in the last column of the table and selecting the appropriate option
Agent User Administration
Agent is a system entity and a system user at the same time.
Agents can be used as a system entity that is standing aside from the main system hierarchy.
Agents are created for specific Service Providers.
Information Requirements
Agent Information
Agent Entity:
Agents get access to a set of reports — see Agents Reports section.
Agents can serve both as Fee Source and Fee Target for other system entities.
Agent User
Users for Agents are created while onboarding the Agent itself — see Agent Wizard.
At the login, Agent’s user has access to specific set of screens and sections based on individual level of permissions.
Agent User Roles
Agent user roles determine access permissions.
Agent user may have one of four basic roles assigned:
External Agent — similar to Platform User but without permissions to access accounts.
Sub-Accounts Agent — similar to Platform User.
Platform Agent — similar to Platform Admin.
Service Provider Agent — similar to Service Provider Admin.
Roles may be added/edited by system admins.
Contact your admin for more information.
Platform Account List
You can give access to more than one or all Accounts your agent will have access to.
Sub Account List
You can give access to more than one Sub-Account under different Accounts. Available options depend on the selected Service Provider and Account(s).
The Agent Onboarding Wizard
General
Use Agent Onboarding Wizard to create/configure Agent Entity and Agent User parameters.
In the General step set basic information, contact details and optional parent entity for an Agent/Agent User.
The below form applies for both Add and Edit operations, with the exception of Copy Settings From parameter (enabled for Add Agent form only).
Service Provider
Select a corresponding Service Provider from the dropdown list. Agents are created for a specific existing Service Provider.
Required
Agent Name
Your agent Name to be displayed in the system
Required
User Name
Your agent user Username
Required
Password
Your agent user Password
Required
First Name
Your agent user First Name
Required
Last Name
Your agent user Last Name
Required
Email
Agent contact Email address
Required
Phone
Agent contact Phone Number
Required
Agent Role
Select a Role for agent user. Available options depend on the selected Service Provider.
Required
Platform Accounts
Select Accounts your agent will have access to. Select All to give access to all the available Accounts. Available options depend on the selected Service Provider.
Required
Sub-Accounts
You can give access to more than one Sub-Account under different Accounts in case you have selected more than one Account in the previous step. Select All to give access to all the available SubAccounts. Available options depend on the selected Service Provider and Account(s).
Required
Copy Settings From
Select a Source agent to copy configuration settings to a new Target agent. Select None to disable all templates. Enabled for Add Agent form only.
Optional
Billing
Use Billing Onboarding section to enable and configure Agent entity fees.
This step is Optional, Save and Continue to skip and proceed to the next step.
In case there have been no fees configured for the specific Agent, user will see a notice:
Warning! No fees configured for your Agent.
In the main grid expand Agent Details to view all Billing settings of the selected Agent entity.
Fee with Fee Source=Agent must be created on a Service Provider level for them to become available in the Agents Billing section
Go to Fees Section for more information of different type of fees and fees settings.
Payouts
Use Payouts Onboarding section to create and configure Regular and Negative Payouts Instructions for Agents.
A specific payout instruction can be created for each of the system currencies.
Payouts is an optional step where you can configure your Agent payout instructions.
Payout Bank is determined automatically based on the Service Provider and the currency type
Payout Configuration Details Explained
The Payout details section is split in several sections:
Payout Configuration
Card-On-File Configuration
Payout (ACH Bank) Details
Payout Scheduler
Payout and Reserve Management
Click Skip and Continue to move to the next step. You can Add/Edit your Agent payouts instructions any time later.
Payout Configuration
In this section you can configure manual and automated payout options, payout processor and the payout processor parameters.
Use Balance management to configure Negative Payouts.
Payouts Configuration Details
Payout Processor
Select a Payout processor from the drop-down list or select None to enable manual payouts. Available options are based on the selected Service Provider. External payouts processor is disabled if manual payout (None) option is selected. Manual payouts are manually approved in the Back-Office Payouts report.
Processor Parameters
Populated individually for each Payout processor and are based on the selected template Sub- Account
Balance Management
Balance Management allows configuring payout actions based on the balance value
Check Account Balance
Select to enable account balance check prior the payout. In case enabled, negative payouts are disabled.
Ignore Account Balance
Select to ignore account balance value for processing payouts. Required to enable negative payouts.
Perform Negative Payout (Withdrawal) if Account Balance is Negative
In case selected together with Ignore Account Balance and the returned account balance calculated amount is negative – negative payout transaction is processed
Use Card On File
In case selected, negative payouts for this Sub-Account will be processed according to the configured Card On File instructions in the first place. In case of a failure of such operation, negative payout is processed via ACH as usual.
Select Processor
Select a processor for Card On File negative payout instructions. Choices are based on your Service Provider settings.
In case Negative Payouts are enabled for a Agent, it will be displayed in the Confirmation Onboarding step in the Payout Settings tab.
Card-On-File Configuration
Use Card On File to process negative payouts using the provided credit card instead of the default ACH payment method.
Card On File is optional and in case activated and configured together with negative payouts, Payout Tool processes negative payouts based on provided in Card On File instructions and the negative payout payment method changes to Credit Card; otherwise, payment method is ACH and Payout Tool processes negative payouts the usual way.
To Create Card On File Instruction for Negative Payouts
In Payout Configuration select Ignore Account Balance and Perform Negative Payout (Withdrawal) if Account Balance is Negative
In Payout Configuration Activate Use Card On File and select a Card On File Processor
At the bottom of the page click Add Card On File to create a new Card On File Instruction:
Payment Method is Credit Card by default and disabled for editing — required
Credit card number — required
Credit card expiration date — required
CVV/CVC number — required
Name On Card — required
You can create card-on-file instructions even for Agents without payout configurations, negative payouts and/or account balance management being enabled. In this case, once credit card details are entered and submitted, system performs credit card pre-authorization and tokenization. This allows using preauthorized credit cards for making on-demand payouts.
Payout (ACH Bank) Details
It is possible to create one payout configuration per currency type. Available Actions
Add Payout: use to add an additional payout
Edit Payout Method Name: use to edit an existing payout name
Hide/Show: use to hide/show a payout configuration
Remove: use to delete a payout configuration
Payment Method
Select a Payment Method for the payout from the drop-down list
ACH Details All fields are required. Displayed in case ACH is selected
Account Number — ACH account number
Account Type — ACH account type (Checking/Savings)
Routing Number — ACH bank routing number
Entity Type — ACH entity type (Personal/Business)
Name on Account — Account name
Payout Scheduler
The Payout Scheduler enables you to configure the Time Schedule for Payouts you want to apply to your sub-account.
Until Date – Select End date in the date picker box
Number of occurrences – Enter number of occurrences in the Occurrences quantity text box
Never — Select to enable an endless payout option
Payout and Reserve Management
You can preset payout amount calculation mode and time range to create a rolling reserve according to your risk management policy. There are 4 Payout Types you can choose from:
Fixed — Set a fixed payout amount
Percentage — Rolling Reserve Payout amount is calculated as a percentage from the Account Balance
Past Date — The payout amount is calculated as an Account Balance on a specific date, considering the preset reserve capacity
Past Interval — Payout amount is calculated from the total amount of daily settlements, incoming fees, adjustments, reserve balance release, on-demand payouts and cancelled payouts transactions for the specified time range
Configuring Two-Step Approval for Payouts
Enable Two-step approval to have an option to manually approve or decline suspicious payout transactions.
Two-Step approval (semi-automated payout)
Select to enable an additional manual payout confirmation via the Back-Office. Use to add a manual payout approval for automated payouts processed with an external processor or to add an additional manual approval for manual payouts.
Agent Administration Interface
On the Agents screen authorized system users may view all existing agents and agent’s details, create new agents and edit existing agents.
Use filter to query Agents in relation to a specific Operator, Service Provider, Platform Account or simply by the existing Agent name.
To start search, fill-in some of the filter parameters and click Search button
Click Reset Filters to drop all filter entries
Create an Agent
Click either Actions/Add Agent or Add Agent button to start the Onboarding Wizard
Follow 3-step Agent Onboarding Wizard to configure a new Agent entity and Agent User
Upon a successful onboarding, new Agent is displayed on the main Agents screen
Edit an Agent
Select a specific Agent entity on the main Agents screen and click Actions/Edit Agent to invoke the Agents Onboarding Wizard
In the Agent Onboarding Wizard configure/edit the required parameters
On the main Agents screen, expand Agents Details to preview Agent configuration details
Delete an Agent
Select a specific Agent in the main screen and click Actions/Delete Agent to completely remove a specific Agent form the system
Enable/Disable an Agent
Select a specific Agent in the main screen and click Expand icon in the first grid column to view Agent’s details
General Details — general Agent Entity and Agent User details
Billing Details — fees configured on a Service Provider level with Fee Source = Agent
Payouts Details — payouts configuration details for the selected Agent
Sub-Accounts — a list of Sub-Account and their details Agent has access to; based on Agent Role permissions.
Reporting
The Report Menu
System provides a standard set of reporting functionality that is available at each level of the hierarchy in place. Each report can access the current level data and all the subsequent levels of data depending on the access levels of the user
Account Balance
Payouts
Payouts Reconciliation
Settlements
Approval Rate
Transactions
Transactions Summary
Fees Summary
Incoming Fees
Expected Future Revenue
Profitability Analysis Report
Reconciliation Summary
Reconciliation Records
Chargeback Analysis
Tokens
Merchant Statement
In addition to the standard set of reporting there are also five dedicated reports available for higher entity levels (Platform, Service Provider, Operator, Agent):
Account Balance Report
Payouts Report
Commissions and Fees Report
Expected Future Revenue Report
Profitability Analysis Report
Back-Office users get access to individual reports based on their permissions (e.g. a user may have access to the Payouts report but unable to take actions on individual payouts or may have rights to certain Sub-Accounts).
How do I export Data with the Report menu?
Back-Office users get access to individual reports based on their permissions (e.g. a user may have access to the Payouts report but unable to take actions on individual payouts or may have rights to certain Sub-Accounts). When a report is run, you can easily export the data into multiple formats using the export button.
Use the Export option available on each report to export data in excel or csv formats, for easy manipulation.
When exporting reports, a warning message appears in case the exported report number of rows exceeds 100 000 rows. Cancel or Proceed upon your consideration.
Use Reset Filters to drop all filter settings. Set filter first and then click Search to generate a report based on your filter settings.
Search and Export functions are disabled in case report search request parameters fail validation. E.g.: invalid parameter has been entered in the report filter
Use embedded hyperlinks to navigate between reports.
All reports are set to display output for last two days by default.
How do reporting filters work?
Use report filter to narrow down your search parameters.
To display the report for a specific Sub-Account select Service Provider, Platform Account and Sub-Account.
The prior selection determines the latter available options.
Use Date filter parameters to generate a report for a specific date or a date range.
Understanding System Date
System Date is the date and time the transaction or action was entered into the System.
Understanding Merchant Date
Merchant Date is the date and time specified by the merchant and provided a parameter within the transaction or action.
Understanding Settlement Date
Settlement Date is the date that a transaction was settled within the system.
Transaction Processing Functionality Available Via Back-Office Reports
Select a specific transaction and click Actions in the upper-left report filter area to see what actions you are authorized to perform on the selected transaction or a set of transactions in case you have selected more than one transaction.
The following Actions might be available, available actions depend on Parent Transaction.
(Partial) Void – is send on an Authorization transaction and is the (partial release) of the amount reserved by the Authorization transaction
(Partial) Capture – is send on a successful Authorization transaction and settles the (partial) transaction amount
(Partial) Refund) – is send on a (partial) capture or charge transaction and returns funds from the seller to the buyer
Chargeback – is send on a (partial) capture or charge transaction and is a transaction reversal made to dispute a credit card transaction and secure a refund for the purchase
Dispute – opens a Dispute for Chargebacks that were processed by processors that support Dispute functionality
Edit – enables to edit certain transaction parameters.
Go to the Transaction Processing section in the DevPortal to learn more about processing actions.
Account Balance
Account Balance
Account Balance displays the current Sub-Account balance amount:
Account Balance = Settlements – Processed Payouts – Fees
In this section you can also display Reserve Balance Released transactions.
Such transactions have positive amount values and a corresponding description.
Cross-Report Navigation
You can use hyperlinks embedded in the report to navigate to relevant reports:
Click Reference in the Pending Actions Balance tab to navigate to the Payouts Report.
Use Payouts Report to display payout details and perform actions on your payouts.
Click Reference in the Account Balance tab to navigate to the Settlements Report.
Use Settlements Report to display the detailed settlement breakdown for the specific date.
Report Filter Use report filter to narrow down your search parameters.
To display the report for a specific Sub-Account select Service Provider, Platform Account and Sub-Account. The prior selection determines the latter available options.
Use Date filter parameters to generate a report for a specific date or a date range.
System Date filter settings will not affect Account Balance and Pending Actions Balance values. Use Pagination controls to navigate between Sub-Accounts
Reserve Balance
Reserve Balance tab allows to display Reserve Balance values, summary, release date and reserve balance status for the specific date.
In Actions you can perform Reserve Balance Release.
Release of Scheduled Fees
You can perform immediate (prior to scheduled release date) release for reserve balance fees with scheduled release date.
Click Actions In the last column of the report grid for any fee with the specified Release Date
Click Release to open a Release on Today wizard
Check all the Information and click Confirm to submit and release the fee.
Released fee record appears in the Account Balance report tab with Reserve Balance note in the Description
Release of Unscheduled Fees You can perform manual release for reserve balance fees without scheduled release date.
Click ActionsIn the last column of the report grid for any fee without the specified Release Date
Click Release to open a Release Reserve Balance wizard
Check all the Information and specify the Release amount
Click Confirm to submit and release the amount.
Released fee record appears in the Account Balance report tab with Reserve Balance note in the Description
Applied reserve balance released fees with amount < 0 are also displayed in the transaction details Applied Fees section in the Transactions Report and Reconciliation Records Report with the following parameters:
{Fee Name} – Released
Amount<0
FeeTarget = Reserve Balance
Pending Actions Balance
Pending Actions Balance displays the total amount of pending approval payouts.
From this tab you can navigate (click Reference in the report grid) to each pending payout and perform a required action on it in the Payouts Report (e.g. approve or reject a pending payout).
Payouts
Payouts report provides access to all your Sub-Account payouts history and allows to perform actions on payouts all in one place based on your user’s permissions.
Query payouts for a specific Sub-Account, view payout parameters and perform a set of manual actions: accept, reject, approve, cancel and reprocess. Click Arrow next to the Payout Name in the report grid to display a Payout Information and click Plus to unfold a Payout details.
Payouts Report Filter
Use report filter to narrow down your search parameters.
To display the report for a specific Sub-Account select Service Provider, Platform Account and Sub-Account.
The prior selection determines the latter available options.
Use Date filter to set Creation or Modification date for the report.
In the Payout Details section, you can choose a payout Status (accepted, processed, rejected, canceled, pending), Payout Id and a Payout Name for your query.
Use Advanced Filters to set:
Payout Method – ACH for regular payouts and Credit Card for Negative Payouts processed with Card On File instructions.
Payout Type – see section Payout Type for more details.
Amount limits set payout amount range for the report
Currency – filter by specific system currency(s)
Understanding Payouts
Available actions depend on the payout status type.
Select at least one payout checkbox and click Actions in the upper-left search filter area to see what actions you can perform on selected payouts.
The available actions will be highlighted in the pop-up list of actions.
You can also open available actions menu by clicking the Actions icon in the last column of the report grid.
Statuses
Status
Description
Actions
Pending Approval
Manual approval for a manual/automated payout
Approve/Decline
Pending Processing
Approved and pending processing payouts
Approve/Decline
Processed
Payout has been processed
Mark as Rejected
Declined by User
Pending Payout has been declined by the User
Reprocess
Rejected by Processor
Payout has been rejected by the processor
Reprocess
Declined by Processor
Payout has been declined by the processor
N/A
Payout Types
Payout Type is determined by the payout amount calculation type.
Type
Description
Fixed Amount
Payout amount is taken as a fixed amount from the Account Balance
Percentage
Rolling Reserve Payout. Payout amount is calculated as a percentage from the available Account Balance
Past Date
Payout amount is calculated as an Account Balance on a certain date in the past, considering a pre-set reserve capacity
Past Interval
Payout amount is calculated from the total amount of daily settlements, incoming fees, adjustments, reserve balance release, on-demand payouts and cancelled payouts transactions for the specified time range
Payout on Demand
On-demand payout
Payout Validation
In case payout payment details (e.g. ACH details) have been changed for already existing and pending payout, the system notifies user at each attempt of manual payout confirmation in the Pending Actions Balance report (1st approval and 2nd approval actions).
The same validation has been implemented for reprocessing payouts.
This functionality has been implemented in a form of a pop-up dialog window, which appears with each users attempt to approve and/or reprocess a pending payout with updated target details. In the pop-up window user gets notified of changed payout payment details and has three options:
Proceed with new payment details
Cancel operation
Process with current payment details
Negative Payouts
In case a negative payout has been processed using Card On File instructions, report grid displays payment method Credit Card for such payouts.
Payment Method in the advanced report filter allows searching for payouts processed with Credit Card payment method.
See Sub-Accounts Payouts for more information on Card on File instructions for processing negative payouts
Payout On Demand
Use Payout on Demand to perform a single payout operation.
It is possible to automatically check the available account balance right within the On-Demand Payout form in case Check Account Balance option has been selected in the relevant Sub-Account Payouts Settings.
On-Demand Payout wizard loads target Sub-Account details when selecting the Sub-Account or the currency of the entity.
Click Payout on Demand in the Payouts report upper right header or select Payout on Demand in the Actions menu 2.
Fill in the form and click Submit to process payout
Check your payout in the Payouts report with Payout on Demand payout type
Using Card-On-File
In case a Sub-Account has card-on-file instructions enabled and configured, On-Demand payouts form offers credit card payment method for making negative payouts.
In case credit card payment method is selected, form auto-populates credit card details from card-on-file instructions.
Click Payout on Demand in the Payouts report upper right header or select Payout on Demand in the Actions menu
Select a Sub-Account that has enabled and configured card-on-file instructions
Activate Negative Payout (Withdrawal)
In the Payment Method drop down list select Credit Card
Check that credit card details are pre-populated with card-on-file instructions
The Form Details
All fields are mandatory
Description
Operator
Select your Operator from the drop down list of available Operators
Service Provider
Select your Service Provider from the drop down list of available Service Providers
Platform Account
Select your Platform Account from the drop down list of available Platform Accounts
Sub-Account
Select your Sub-Account from the drop down list of available Sub-Accounts
Payout Amount
Enter payout amount
Currency
Select currency from the drop down list
Negative Payout (Withdrawal)
Activate to ignore negative account balance to process a negative payout. In case configured for a specific Sub-Account, the system uses Card on File instructions to process a negative payout. In case such action fails, the system processes a regular ACH payout.
Two-step approval
Activate to enable an additional manual payout approval step
Payout Method
Select a payout method from the drop down list of available methods
Account number/Token
Enter a target bank account number or a payment token
Account Type
Select between Checking and Savings target bank account types
Entity Type
Select between Personal and Business entity types
Name on Account
Enter a name of a target bank account owner
Routing Number
Enter a recipient bank routing number
Payouts Reconciliation
Payouts Reconciliation report displays detailed Payout information allowing clients to have an additional view when attempting to reconcile the funds paid out, to the transactions they apply to. . The Report includes the summary and detailed data pertaining to the following sections in relation to a specific Payout.
Settlements
Reserve Releases
Balance Adjustments
Payout Adjustments
The following payout types represented in the report
Past interval payout (including negative payouts)
Percentage payout (including negative payouts)
Payout on demand
Click Arrow next to the Payout Name in the report grid to display Payout Information.
Daily Settlements
The Daily Settlements section represents settlements that have been used in relation to specific payout calculations.For information about the settlement report parameters please refer to the Settlement Report.
Reserve Releases
Reserve Releases section represents reserve balance that is included in the payout calculation.There are two types of Reserve Releases
Scheduled
Manual
Balance Adjustments
Balance Adjustments section displays:
Processed Payout on Demand
Rejected Payouts
Pending Payouts (only for “Percentage” payout).
Manual Adjustments
Previous Balance (only for “Percentage” payout) – The balance of the account after the last scheduled payout
Payout Adjustments
The Payouts Adjustments section represents the actions, or logic that took place during a Payout. For example, an Amount could be due to a percentage value in the case of a “Percentage” payout type
Payouts Reconciliation Report Filter
Use report filter to narrow down your search parameters.To display the report for a specific Sub-Account select Service Provider, Platform Account and Sub-Account.The prior selection determines the latter available options.Use Date filter to set Process Date or Reject/Return Date for the report.In the Payout Details section, you can choose a payout Status (processed, rejected), Payout Id and a Payout Name for your query.Use Advanced Filters to set:
Payout Method – ACH for regular payouts and Credit Card for Negative Payouts processed with Card On File instructions.
Payout Type – see section Payout Type for more details.
Amount limits set payout amount range for the report
Currency – filter by specific system currency(s)
Transaction Id filters out grid with Transaction Id that I present under Daily Settlements, Balance Adjustments and included in the Payout calculation
Display related transactions check box appears once you start entering your Transaction Id. Related transactions affect the search result the same parent transaction Id
Merchant Transaction Id filters out grid with Transaction Id that I present under Daily Settlements, Balance Adjustments and included in the Payout calculation
Payout Types
Payout Type is determined by the payout amount calculation type.
Type
Description
PastInterval
Payout amount is calculated from the total amount of daily settlements, incoming fees, adjustments, reserve balance release, on-demand payouts and cancelled payouts transactions for the specified time range
Percentage
Payout amount is calculated as a percentage from the available Account Balance
Payout onDemand
On-demand payout
Settlements
Settlement is the net calculated transfer amount from Buyers to Merchants (Sellers).
Sales (Charges, Captures, Partial Captures), Incoming Fees, Reversals generate a positive settlement balance.
Credits (Credits, Refunds, Partial Refunds, Cancels), Chargebacks and Outgoing Fees generate a negative settlement balance.
In case Sale and Cancel do not belong to the same Settlement, Sale transaction is included in Number Of Sales and Amount of Sales and Cancel transaction is included in Number Of Credits and Amount of Credits Incoming Fees are Fees the Merchant (Sub-Account) receives from other entities, Outgoing Fees are Fees the Merchant (Sub-Account) has to pay to other entities.
Settlement Report Filter
Use report filter to narrow down your search parameters. To display the report for a specific Sub-Account select Service Provider, Platform Account and Sub-Account.
The prior selection determines the latter available options.
Use Date filter to get a report for a specific date.
Settlements report is based on the configured Cut-Off time.
All Sale transactions canceled BEFORE the Cut-off are not included in Number Of Sales and Amount of Sales.
Use Settlements Details filter to filter by the external Processor, set the report periodicity and filter by Currency. period.
Cross-Report Navigation
You can use embedded in the report hyperlinks to navigate to relevant reports:
Click Amount of Sales, Number of Sales, Number of Credits, Number of Chargebacks, Amount of Chargebacks in the report grid to navigate to the Transactions Report.
Use Transactions Report to display transactions details and perform actions on your processed transactions.
Click Outgoing Fees in the report header to navigate to the Fees Summary Report
Click Interchange Fees in the report header to navigate to the Fees Summary Report
Click Reserve Fees in the report header to navigate to the Fees Summary Report
Click Incoming Fees in the report header to navigate to the Incoming Fees Report
Use Fees Summary Report to display the detailed breakdown of the processed fees.
Settlement Balance
Settlement report provides your Sub-Account settlement balance breakdown:
Settlement Balance = Sales – Credits – Chargebacks – Fees
You can use it to determine whether your Sub-Account has a positive or negative trade balance on a specific date.
Settlement balance shows the Sub-Account net liquidity balance.
Approval Rate
The Approval Rate Report provides count and volumes of successful Sales (Charges, Captures, Partial Captures) transactions and approval rates for a selected period.
Each report record can be expanded to view statistics for all Credit, Sales and Authorization transactions for the selected period and system entity.
User can expand each section to preview all transactions and navigate directly to the Transaction Report for further investigation.
Click Total in the Date column summary to get redirected to the Transactions report filtered by the selected in the Approval Rate Report time range.
Approval Rate Report Filter
Use Summary Details filter: User can build the report based both on the System Date and Merchant Date.
Processor – to filter by specific processor
Currency – to filter by specific system currencies
Range – to generate a Daily or Monthly Summary
Number/Amount of Successful/Declined Transactions
The Number resp. Amount of Successful Transactions display the Number resp. Amount of all approvedauthorizations and charges.
The Number resp. Amount of Declined Transactions display the Number and Amount of all declinedauthorizations and charges
Approval Rate
The Approval Rate by Number resp. Amount displays the percentage of the approvedtransactions as a ratio from the sum of the approved and declined transactions.
Transaction Summary
Transactions Summary Report provides Sales, Credits and Chargebacks transaction summary and payment method details for the selected time range and system entity.
Amount of Chargebacks – Amount of Chargebacks – Amount of Reversals.
Total Amount – Sales – Credits – Chargebacks. Can have both positive and negative values.
Transaction Summary Report Filter
Use Date filer to generate report based on both Settlement, System and Merchant date. Summary Details filter:
Processor – to filter by specific processor
Currency – to filter by specific system currencies
Range – to generate a Daily or Monthly Summary
Number/Amount of Sales, Credits and Chargeback Transactions
The Number resp. Amount of Sales transactions display the Number resp. Amount of all approved (Processed) charges, captures and partial captures.
The Number resp. Amount of Credits transactions display the Number resp. Amount of all approved (Processed) Refund, Partial Refunds, Credits and Cancels.
The Number resp. Amount of Chargeback transactions display the Number resp. Amount of allChargeback and Reversals.
Total Amount
The Total Amount In the Transaction Summary Report is the total Amount of Sales minus Amount of Credits minus Amount of Chargebacks
Transactions
Transactions Report provides detailed information on real-time and history transactions per Sub-Account.
Transactions report displays standard transaction parameters like identifiers, dates, payment methods, amount, transaction status and other.
In addition, you can perform basic manual actions on your transactions like cancel transaction, capture or refund based on your user permissions.
Transactions Report Filter
Use report filter to narrow down your search parameters.
To display the report for a specific Sub-Account select Service Provider, Platform Account and Sub-Account.
The prior selection determines the latter available options.
Use Date filter to generate a report based on either System Date or Merchant Date.
Use Settlement Date option to search transactions by the cut-off sum-up time and date. Use Transactions Details filter to specify transaction and merchant transaction identifiers together with the transaction status.
Display related transactions check box appears once you start entering your Transaction Id.
Use Processor Details filter specify the relevant Processor name, Processor Transaction Id and the processor Authorization Code.
Available processors are based on the Service Provider settings.
Advanced Filters
Use Advanced Filters to set additional parameters:
Field
Description
Payment Method
Select between ACH or credit card brand from the list of available cards.
Transaction Type
In the drop down list you can specify transaction types to display in the report.
Min Amount/Max Amount
Define the transaction amount range
CC/Account Name
Enter the cardholders name or the name on the bank account in case of ACH.
Account number/Token
Enter the bank account number in case of ACH or payment token for the credit card.
Bin
First 6 digits of the credit card number.
Last 4 Digits
Last 4 digits of the credit card number.
Payment Type
Select between One Off (single) and Recurring payment type.
Currency
Use currency filter to sort out transactions by the selected currency(s). In case a specific Sub-Account is selected, this parameter is auto-populated with the Sub-Account’s currency.
Entry Mode
Choose between available transactions entry modes
Transaction Report Available Actions
Select a specific transaction and click Actions in the upper-left report filter area to see what actions you are authorized to perform on the selected transaction or a set of transactions in case you have selected more than one transaction.
Go to the Transactions Processing section in our DevPortal to learn more about processing actions.
Transaction Details
For each transaction record you may unfold the transaction record to display:
Transaction Details
Processor Details (Clearing Information)
Credit Card/ ACH Account Details
Credit Card/ ACH Owner Details
Applied Fees
Related Transactions
Applied reserve balance released fees with amount<0 are also displayed in the transaction details Applied Fees section with the following parameters:
Fee Name = Released
Amount <0
Fee Target = Reserve Balance
Fees Summary
Fees Summary report provides a complete overview of all the incoming and outgoing fees that have been processed on a specific Sub-Account.
Fees Summary Report Filter
Use report filter to narrow down your search parameters.
To display the report for a specific Sub-Account select Service Provider, Platform Account and Sub-Account.
The prior selection determines the latter available options.
Use Date filter to generate a report for a specific date or a date range.
Use Fee Details filter to set a specific Fee Name, Fee Group Name and Fee Type. In the Advanced Filters section, you can set (all parameters are multi-select):
Processor(s) – filter by specific processors (available options are determined by the relevant Service Provider)
FeeTarget(s) – filer by a Fee Target (recipient of a fee), which may be any system entity.
Currency – filter by specific system currency(s) Fee Category – search for fee or tax
Fee Target options
For merchants (Platform User role) Select Fee Target(s) drop down displays two options: Reserve Balance and Outgoing (all fees except Reserve)
Full view (for administrators) displays all Fee Target options, which are: Reserve Balance, Sub-Account, Platform Account, Service Provider, Operator
You can also display relevant transactions details for which fees have been calculated by unfolding each specific record in the report grid.
Fees Summary Report displays incoming via own account fees with a negative amount value. Such transactions are processed by the same sub-Account as the fee target Sub-Account.
Cancel Fee
Cancel Fee operation is enabled for Scheduled Fee types.
Select Scheduled Fee type in the report filter to display Scheduled Fees
Open transaction details (click arrow next to the System Date in the report grid)
Click Cancel in the Actions column and click Yes in the dialog box to cancel a Scheduled Fee
The canceled fee amount will be deducted from the total Amount of Fees and reflected in the Settlements Report on the next day after the transaction processing.
In the Fees Summary Report cancelled fees are displayed in the fee details grid with the negative Amount value and the transaction type Cancelled.
Incoming Fees
What are Incoming Fees?
Incoming Fees report provides a complete overview of all the fees that have been received by a specific Sub-Account.
You can also display relevant transactions details for which fees have been calculated by unfolding each specific record in the report grid.
Incoming Fees Report Filter
Use report filter to narrow down your search parameters.
To display the report for a specific Sub-Account select Service Provider, Platform Account and Sub-Account. The prior selection determines the latter available options.
Use Fee Details filter to set the specific Fee Name, Fee Group Name and Fee Type.
Using Advanced Filters
In the Advanced Filterssection, you can set (all parameters are multi-select):
Processor(s) – filter by specific processors (available options are determined by the relevant Service Provider)
Fees Source(s) – filter by a Fee Source (payer of a fee), which may be any system entity.
Currency – filter by specific system currency(s). In case a Sub-Account is selected, currency is auto-populated with the Sub-Account’s currency.
Expected Future Revenue report provides overview of all due fees, fees with billing delay and fees before the Cut-off. Expand each report record to view underlying transaction details.
Expected Future Revenue Report Filter
Use Due Date filtering options to set the report time range.
Note, that in comparison with the Commissions and Fees report, where the report date is System Date, the Expected Future Revenue report date is Due Date, because this report provides overview of fees that are due.
There is an option to select a specific Operator, Service Provider, Platform and a Sub-Account in the report filter to specify your report output.
You can additionally specify a specific Fee Name, Fee Group Name and a Fee Type in dedicated drop-downs. Choose one or more options in each drop-down list.
Using Advanced Filters
In the Advanced filter you can specify the following search parameters:
Processor– specify processor
Fees Source– search by a specific Fee Source
Currency – multi-select option allowing to filter based on specific currencies. Drop down list offers all available system currencies.
Fee Category – search for Fee or Tax
Profitability Analysis Report
Profitability Analysis report allows to view incoming fees (fees received by entity), outgoing fees and external costs (external outgoing fees) and to display a Profit Amount.
Incoming Fees Amount – all fees collected for the relevant entity from the relevant source on the selected System Date.
Transactions Cost Amount – the cost for all the relevant transactions (for the entity).
Outgoing Fees Amount – fees paid by the entity of the report in relation to selected transactions.
Profit Amount = [Incoming Fees Amount] – [Transactions Cost Amount] – [Outgoing Fees Amount], the value is green/red for positive/negative respectively.
Fees with Fee Target = Reserve Balance are ignored in this report
Profitability Analysis Report Filter
Use report filter to narrow down your search parameters. To display the report for a specific Sub-Account select Service Provider, Platform Account and Sub-Account. The prior selection determines the latter available options. Use SystemDate filter to get a report for a specific date.
Profitability Details allows to specify one or several transactions processing Processors and a report periodicity.
Using Advanced Filters
In the Advanced Filters section, you can specify additional parameters to narrow down your search:
Payment Method – ACH or credit card
Transaction Type – generate report for specific transaction type(s)
Transaction Status – generate report for specific transaction status(es)
Transaction Source – search by Sub-Accounts that processed transactions
Reconciliation Summary
Use Reconciliation Summary Report to access a specific Sub-Account transactions matching statistics for a specific date.
This report allows you to select a specific Processor, Payment Method and Date range to display the information on all transactions that have been matched, not matched and/or pending and navigate directly to the Reconciliation Records Report to get all in depth transactions details.
Cross-Report Navigation
Embedded hyperlinks in the report hyperlinks will take you to the Reconciliation Records Report where you can get all the details on the relevant transactions.
Reconciliation Summary Report Filter
Use report filter to narrow down your search parameters.
To display the report for a specific Sub-Account select Service Provider, Platform Account and Sub-Account.
The prior selection determines the latter available options.
Use Date filter to generate report based on either System Date or the Reconciliation date.
Use a drop-down to choose a preset time range option or a calendar to manually input a required time range for the report.
You can additionally specify:
Currency – multi-select option allowing to filter based on specific currencies. In case a Sub-Account is selected, currency is auto-populated with the Sub-Account’s
Processor – specify processor(s)
Payment Method – filter by a specific payment method(s)
Range – set the report periodicity
Reconciliation Records
Reconciliation Records Report Filter Use report filter to narrow down your search parameters.
To display the report for a specific Sub-Account select Service Provider, Platform Account and Sub-Account.
The prior selection determines the latter available options.
Use Date filter to generate report based on System Date, Merchant Date or the Reconciliation Date.
Use a drop-down to choose a preset time range option or a calendar to manually input a required time range for the report.
Use Transaction Details filter to specify:
Reconciliation Status
Transaction Id
Merchant Transaction Id
Reconciliation Status
Reconciliation Status
Description
Pending
Transaction reconciliation with the external processor is pending
Matching
Transaction processing status has been matched with the external processor
Mismatch
Reconciliation with the external processor failed
Use Processor Details filter to additionally specify a Processor name and the Processor Transaction Identifier.
You can select more than one processor. Available options are based on the Service Provider processing settings.
Use Advanced Filters to query by:
Payment Method
Transaction Type
Payment Type– choose between One Off (single) and Recurring payment types
Currency – filter by currencies. In case a Sub-Account is selected, currency is auto-populated with the Sub-Account’s currency.
Entry Mode – search by one of the available transactions entry modes
It is possible to make more than one selection in each box.
Available options are based on the Service Provider processing settings.
Getting Reconciliation Details for Specific Transactions
Use the Reconciliation Records Report to get reconciliation details for specific transactions.
Here you can also check transactions reconciliation statuses and edit transactions reconciliation records.
Edit Reconciliation Record
To Edit a specific transaction Reconciliation Record:
Click Actions in the last report column and select Edit
Fill in the Edit Reconciliation Record form
Transaction Details For each transaction record you may unfold transaction details to display:
Transaction Details
Processor Details
Credit Card information
Applied Fees
Information on related transactions
Applied Reserve Balance released fees with amount <0 are also displayed in the transaction details Applied Fees section with the following parameters:
Fee Name = Released
Amount<0
Fee Target= Reserve Balance
Chargeback Analysis
What is the Chargeback Analysis Report?
Chargeback Analysis report offers a complete set of data and statistics on a specific Sub-Account chargeback rates and volumes for a specified date.
Chargeback Analysis Report Filter
Use report filter to narrow down your search parameters.
To display the report for a specific Sub-Account select Service Provider, Platform Account and Sub-Account.
The prior selection determines the latter available options.
Set the Date parameters to get a Chargeback Analysis report for a specific date or a date range.
Use Date filter to generate a report based on the System Date or the Processor Date.
Use Additional Filters to query by:
Payment Method
Processor
Payment Type– choose between One Off (single) and Recurring payment types
Currency – filter by currencies. In case a Sub-Account is selected, currency is auto-populated with the Sub-Account’s currency.
Available options are determined by your Service Provider settings.
Tokens Report
Use Tokens Report to display all tokens issued for specific credit cards per Sub-Account.
Tokens Report Filter
Use report filter to narrow down your search parameters.
To display the report for a specific Sub-Account select Service Provider, Platform Account and Sub-Account.
The prior selection determines the latter available options.
Set the Tokens Creation Date using a drop-down with preset values or calendar to make a manual date range selection.
Use Token Details filter to query by
specific token
credit card first and last four digits credit card type
In the Advanced filter you can enter a Credit Card Holder Name and/or credit card Expiration Date.
Merchant Statement Report
Use Merchant Statement Report to display and download available merchant statement reports.
Available options are determined by your Service Provider External Merchant Statement Processor settings.
Disabled in case your Service Provider has disabled External Merchant Statement Processor option.
Check with your Service Provider.
Merchant Statement Report Filter
Use report filter to narrow down your search parameters.
To display the report for a specific Sub-Account select Service Provider, Platform Account and Sub-Account.
The prior selection determines the latter available options. Download Report
You can download a report of your choice by clicking a Download icon in the relevant report column.
Management Level Reports (Operator, Service Provider, Agent, Platform)
There are five dedicated report available for all management levels (Operator, Service Provider, Agent, Platform):
Account Balance Report
Account Balance report displays the total balance of all the incoming fees the Entity received for a selected time range per currency and Entity.
See Account Balance Report for information about this report.
Payouts Report
This report displays information about payouts of a specific entity. You can perform a number of manual operations on your payouts.
Currency filter available values depend on the selected Entity.
Use Payout On Demand button to perform regular and negative on-demand payouts. In case payout payment details (e.g., ACH details) have been changed for already existing and pending payout, the system notifies user at each attempt of manual payout confirmation in the Pending Actions Balance report (1st approval and 2nd approval actions).
The same validation has been implemented for reprocessing payouts.
This functionality has been implemented in a form of a pop-up dialog window, which appears with each users attempt to approve and/or reprocess a pending payout with updated target details.
In the pop-up window user gets notified of changed payout payment details and has three options:
Proceed with new payment details
Cancel operation
Process with current payment details
See Payouts Report for more information about this report.
Commissions and Fees Report
Commissions and Fees report is like the Sub-Account Incoming Fees report. The Commissions and Fees report displays specific incoming fees (with positive fee amount value) and outgoing fees (with negative fee amount value) details and related transactions data for the selected entity.
Currency filter available values depend on the selected Entity.
You can additionally specify a specific Fee Name, Fee Group Name and a Fee Type in dedicated dropdowns.
Choose one or more options in each drop-down list.
For more information go to the Incoming Fees Report.
Expected Future Revenue Report
Expected Future Revenuereport provides overview of all due fees, fees with billing delay and fees before the Cut-off.Expand each report record to view underlying transaction details.Report FilterUseDue Datefiltering options to set the report time range.Note, that in comparison with the Commissions and Fees report, where the report date is System Date, the Expected Future Revenue report date is Due Date, because this report provides overview of fees that are due.There is an option to select a specific Operator, Service Provider, and a Currency in the report filter to specify your report output.You can additionally specify a specific Fee Name, Fee Group Name, and a Fee Type in dedicated dropdowns. Choose one or more options in each drop-down list.SeeExpected Future RevenueReport for information about this report.
Profitability Analysis Report
Profitability Analysisreport allows to viewincoming fees(fees received by entity),outgoing feesandexternal costs(external outgoing fees) and to display a Profit Amount.
Incoming Fees Amount – all fees collected for the relevant entity from the relevant source on the selected System Date.
Transactions Cost Amount – the cost for all the relevant transactions (for the entity).
Outgoing Fees Amount – fees paid by the entity of the report in relation to selected transactions.
Profit Amount = [Incoming Fees Amount] – [Transactions Cost Amount] – [Outgoing Fees Amount], the value is green/red for positive/negative respectively.
Each report record can be expanded to view all transactions for each System Date.Report FilterUseEntity Filterto generate report for specific Operator, Service Provider, Platform and for a specific currency.System Dateallows to set a report time range.Profitability Detailsallows to specify one or several transactions processing Processors and a report periodicity.In theAdvanced Filterssection, you can specify additional parameters to narrow down your search:
Payment Method – ACH or credit card
Transaction Type – generate report for specific transaction type(s)
Transaction Status – generate report for specific transaction status(es)
Transaction Source – search by Sub-Accounts that processed transactions
Alert Center
The Alert Center provides permission-based functionality to set up and manage custom event notifications and enables system admins to monitor any system activity by getting notifications. All Alert rules are configured per Sub-Account for relevant Operator/Service Provider/Platform.
System Administrators create alert templates and the collection of possible alerts that determine available alert rules for Service Providers.
Service Provider admins use available templates on the Alerts Management screen to configure specific alerts per Sub-Account.
Operators admins monitor the system by getting notifications based on the configured alerts.
Authorized users have access to Active Alerts and Resolved Alerts screen to perform actions on alerts.
The Alert Center offers the following screens:
Rules Management
Alerts Management
Active Alerts
Resolved Alerts
Alert Center Interface
Rules Management
Rules Managementscreen allows viewing and sorting, adding, enabling/disabling, deleting, and editing alert rules that have been configured per system entity.Search rules per category, Operator and/or Service Provider system entity.Click any specific item in the grid to display available actions inActionsmenu.
Rules Management screen is enabled for system users with Operator, Service Provider Admin and/or System Admins permission levels
How do I Edit/Enable/Delete a Rule?
Click any specific item in the grid to display available actions inActionsmenu
ClickEdit/Enable/Deletein accordance to your need.
Alert Management
How do I Configure an Alert?
Use filter to display alert categories for the specific Operator/Service Provider/Platform Account/Sub-Account
Click any alert category to unfold the main grid with all the available alerts for this category listed per Sub-Account
Click any Sub-Account line to unfold all the alerts configured for this specific Sub-Account
Specify Contact details for event notifications and clickSaveicon to apply changes. Contact details apply to all alerts in this category for the selected Sub-Account.
Configure alert parameters for each specific alert you wish to activate and set statusActiveto activate each specific alert.
How do I Enable/Disable an Alert?
Use filter to display alert categories for the specific Operator/Service Provider/Platform Account/Sub-Account
Click any alert category to unfold the main grid with all the available alerts for this category listed per Sub-Account
Click any Sub-Account line to unfold all the alerts configured for this specific Sub-Account
ClickEnableto activate all alerts for this Sub-Account in this alerts category orDisableto disable alerts for this Sub-Account.
Available Actions in Alerts Categories
Enable– use to activate all active alerts for a specific Sub-Account in the specific alerts category
Disable – use to deactivate all alerts for a specific Sub-Account in the specific alerts category
View Active Alerts
This screen displays all currently un-resolved alerts with statusNew,Under ReviewandRe-Opened.This screen is available to Back-Office users based on their permissions level.Information displayed on this screen depends on the Service Provider user belongs to.
Alert Categories
Use screen filter to display alert categories for the specific Operator/Service Provider/Platform Account/Sub-Account.
Alert Details
Click any alert to display details:
Description and link to the relevant Back-Office section for investigation
Actions History – the list of all actions and their details performed on this alert
Alert Actions
ClickActionsin each category for each alert:
Review– assign the alert ticket to your user.
Alert status changes toUnder Review.
Assign– assign the alert ticket to another userResolve– resolve the alert.
Moves the alert to theResolved Alertsscreen.
Alert status changes toResolved.
Viewing Resolved Alerts
This screen displays all resolved alerts with statusResolvedfor the specific Operator/Service Provider/Platform Account/Sub-Account. Alert DetailsClick any alert to display details:
Description and link to the relevant Back-Office section for investigation
Actions History – the list of all actions and their details performed on this alert
Alert Actions
ClickActionsin each category for each alert:
Re-Open– use to re-open the alert ticket to your user.
Moves the alert to theActive Alertsscreen. Alert status changes toRe-Opened.
Underwriting Management
Underwriting is a part of merchants onboarding and is intended for the evaluation of merchant compliance with business, risk and other rules and policies. Integrations with External Validation services are responsible for validating information submitted from the application and automating application status provisioning. Underwriting can be enabled and configured on a Service Provider level for relevant Sub-Accounts.The Underwriting Management section has two screens:
Templates – this screen allows Operator Managers, Service Provider Admins and/or custom user roles with corresponding permissions to create templates for underwriting applications.
Applications – this screen allows Operator Managers, Service Provider Admins and/or custom user roles with corresponding permissions to create underwriting applications based on existing templates
Underwriting Templates
On theTemplatesscreen authorized users can view, add/edit and manage existing underwriting applications templates. You can create templates for various purposes and subsequently assign them to different Service Providers.Application Template Wizard allows configuring a wide range of information categories for merchant underwriting:
General Information: relevant Service Provider, template name, copy settings from
External Validation: external entities and bank validation
Business Details: business legal information, bank requisites, registration documents and more.
Contact Information: business and business owner contact details and copies of identification documents and more.
Merchant Risk Profile Details: business industry and category, policies, compliance certificates and more.Merchant Risk Assessment: business processing history and projections, bankruptcy details and other.
Template details can be viewed on the main screen in the view mode.
The Underwriting Template Wizard
TinCheck Validation
User can enable external validation services within specific templates for their Applications. When the Application is submitted then TinCheck service verifies a request with specific company information. The service validates each submission per company by passing 51 validation checks, and provides a response in realtime. The response can determine if the application submitted is success by applying the appropriate logic and leveraging the TinCheck response received.
PLAID Validation
PLAID validation is intended to verify all provided information relating to Banking Accounts. Bank Account validation is vital in reducing the risk of invalid accounts being used when boarding clients. Authenticating a user’s bank account is performed via Plaid’s authentication interface that is now integrated into Application wizard within the second step.
Another function of PLAID validation is to retrieve and analyze various accountholder elements including: account holder name, email, phone number, and address. The implementation compares owner Name from PLAID with “First Name”+ “Last Name” of the Owner by leveraging the information passed in the application, which is configured within the Template. The logic is then used within the flow, providing the validation requirements has been configured during setup.
Using the Application Wizard
Application template wizard allows configuring a set of information categories. Each category consists of multiple fields. Any field may be set as:
visible– will be displayed in the underwriting form
hidden– will not be displayed in the underwriting form
required– will be displayed as required in the underwriting form
There are three field types:
Text Entry– requires manual text entry
Documents– requires uploading a document
Flag– use to make the entire sub-set of fields required
Information Required
Business Details
Business Details and Documents
Banking Details and Documents
Contact Details
Contact Details
Owner Details and Documents
Risk Profile
Business Profile and Documents
Risk Assessment
Business Financials
Business Processing History
Configuring Applications
What is an Application?
Applications, if enabled, are used for merchant underwriting. They are forms used to gather data while applying logical operators to validate entry and ensure accuracy.
Each application is created for a specific Service Provider and can be enabled on a Sub-Account level. Applications are created based on pre-configured templates.
Available in the application categories and information fields are determined by the selected template.
When merchant submits a new application, it can be viewed and managed by admins on the Applications screen. On the Applications screen authorized users can perform a variety of actions on the selected applications: create, edit, approve, decline, re-open, delete, request resubmission, link Sub-Accounts to applications and create new Sub-Accounts.
Reviewing Applications
On the main screen, authorized users can browse through applications and perform actions on the entire application and/or approve/decline specific fields/documents in the details view of the selected application.Actions on specific fields do not affect the application general status.
Application Resubmission
Authorized users can re-enter declined fields of the selected Application by initiating “Request Resubmission” action from actions and context menu. “Request Resubmission” action is available only for Applications that have one of the following statuses: “Declined“, “Under Review“, “Pending Resubmission” and at least one declined field.
Once the “Request Resubmission“ action is selected, user can choose to send a direct email with a link to the UMS resubmission page to the contact email address or to copy a link from pop-up. The link to the UMS resubmission page has unlimited life-time but will work only 1 time and require a new resubmission request after its expiration when the authorized user submits the form.
UMS Resubmission page
The new UMS Resubmission page is displayed when a User initiates a UMS Application Resubmission when re-entering declined Application fields is necessary. UMS Resubmission page is opened/displayed in a separate page depending on the Service Provider settings.
Application Status
Underwriting application may acquire different statuses throughout their lifecycle:
Under Review – new and not approved applications
Approved – applications approved by authorized users
Declined – applications declined by authorized users
Under Validation – application is under external validation
Pending Resubmission – request resubmission action was initiated
Application Notification
Notifications can be configured for underwriting applications. Receiving email is set in the application. Sender email is a Service Provider/Operator email. Events that trigger notifications are set on the Service Provider level:
When the application gets submitted
When the application request is updated
When the application request/any application field is approved
When the application request/any application field is declined
When the application request requires an update
Application statuses are checked daily.
Using the Embedded Form
Underwriting form can be embedded as HTML in application custom component in external applications with branding according to Service Provider’s underwriting iFrame branding settings (colors, logos, header text etc.) and fields according to the relevant template settings.
Adding Sub-Accounts
It is possible to create a new Sub-Account right from the Application screen and automatically enable a specific application for this new Sub-Account. UseAdd Sub-Accountscommand in the Actions Menu to open Sub-Account Onboarding Wizard. The overall flow is identical to the one described in the Sub-Accounts Management section. The only difference is that Sub-Account gets this specific application automatically attached and underwriting enabled.To Add Sub-Account
Select any approved application on the main dashboard and clickAdd Sub-Accountsin the Actions menu
Follow the Sub-Account Onboarding Wizard
General
Service Provider– the selection determines available template options. Selected Service Provider will later condition available Platform and Sub-Account options when linking Sub-Accounts to this application.
Application Name– create a unique and meaningful name for your application
Contact Email– receiving email address for notifications
Business Details
Business Detailssection may include business legal information, bank requisites, registration documents and more. See Templates section for more details.In the case where external bank validation was set to PLAID, authorized users can use PLAID to support entering their bank account credentials. It provides authorized users with a secure request / response which the system can save and use for sub-accounts during onboarding providing the highest level of security handling these details.
Contacts
Contactssection may include business and business owner contact details and copies of identification documents and more. See Templates section for more details.
Risk Profile
Risk Profilesection may include business industry and category, policies, compliance certificates and more. See Templates section for more details.
Risk Assessment
Risk Assessmentsection may include business processing history and projections, bankruptcy details and other. See Templates section for more details.
Confirmation
In the last step you can preview and check all the provided information and submit application.It is possible to create a new Sub-Account right from the Application screen and automatically enable a specific application for this new Sub-Account. Use Add Sub-Accounts command in the Actions Menu to open Sub-Account Onboarding Wizard. The overall flow is identical to the one described in the Sub-Accounts Management section. The only difference is that Sub-Account gets this specific application automatically attached and underwriting enabled.To Add Sub-Account
Select any approved application on the main dashboard and click Add Sub-Accounts in the Actions menu
Follow the Sub-Account Onboarding Wizard
Sign-up Summary
Use Sign-up Summary report to view the UMS life cycle from a UMS boarding request all the way through to an active Sub-Account.The following steps of the UMS activities are supported by statistics and can be reviewed on daily basis:
Application Sign-up data
Applications Under Validation
Applications Under Review
Applications Pending Resubmission
Declined Applications
Approved Applications
Boarded Sub-Account
Active Sub-Account
Disabled Sub-Account
Sign-up Summary Report Filter
Use report filter to narrow down your search parameters. To display the report for a specific Sub-Account select Service Provider, Platform Account and Sub-Account. The prior selection determines the latter available options. Use Date filter parameters to generate a report for a specific date or a date range.
Dispute Management
Dispute Management functionality:
Providing a clients payment processor with necessary documentation to respond to a dispute.
Revise and update dispute status checks related to various transactions in regards to their state
Users can transition to the data on a Dispute or Chargeback via the Transaction report. It gives the ability for merchants to respond to disputes and process these responses using the data stored within the platform and then facilitate the transmission of the “collateral” to their processor. On the Dispute page, users can add notes when starting a response, and upload files containing additional collateral information if desired.The Dispute Management section has two screens:
Active Disputes – this screen allows Operator Managers, Service Provider Admins and/or custom user roles with corresponding permissions to view disputes details in status “Under Review” and “Submitted”.
Resolved Disputes – this screen allows Operator Managers, Service Provider Admins and/or custom user roles with corresponding permissions to view disputes details in status “Successful”, “Closed” and “Failed”
Active Disputes
On the Active Disputes screen users can check the status of the existing Active Disputes and attach additional documents to an existing dispute via “Actions” or “context menu”.
Active Dispute Filter
Use report filter to narrow down your search parameters. To display the report for a specific Sub-Account select Service Provider, Platform Account and Sub-Account. The prior selection determines the latter available options. Use Date filter to generate report based on Dispute Creation Date, Dispute Modification Date, Transaction System Date or the Transaction Processor Date. Use a drop-down to choose a preset time range option or a calendar to manually input a required time range for the report. Use Dispute Details filter to specify Status. Active Dispute Status:
Under Review – A new dispute is automatically set as “Under Review”
Submitted
Use Transaction Details filter to specify:
Transaction Id
Min Amount
Max Amount
Currency
Terminal Id
Use Processor Details filter to specify:
Processor Transaction Id
Processor
Use CC/Account Details filter to specify Payment Method.
Upload Document page
User can attach additional documents to an opened dispute on new ‘Upload Document’ page. User can upload 1 document at a time but unlimited number of timesThe details of the uploaded file are displayed in the sub-grid on Active Disputes page.
Resolved Disputes
On Resolved Disputes page user has the ability to review the status of their Resolved Disputes and verify or check the documents attached to a previously submitted Dispute response.Resolved Disputes have a similar layout as the Active Disputes, with two minor differences:
Resolved Disputes do not have “available actions”.
There is no “Actions” or “context menu”
Resolved Disputes display only the disputes with statuses ‘Successful’, ‘Closed’ or ’Failed’
Transactions Processing Functionality Available Via Reports?
The System supports three transactions modes:
Processing Mode – processing transactions via the System Gateway
Import Mode – transactions processed via an external processor
Echo Mode – transactions processed via an external processor
Capture, Partial Capture, Refund, Partial Refund, Void, Partial Void actions are disabled for all transactions processed in Echo/Import mode.You can select aTransaction Modewhile creating and/or configuring a Sub-Account (Step 2 – Processing)
Processing Mode
SelectProcessing Modeto process transactions via the System Gateway. You can process transactions via the standardGateway APIand/or manually via the Back-Office.
Transactions Processing via the Back-Office
Back-Office Transactions report allows to perform manual actions on the transactions processed via the System Gateway on your Platform Account/Sub-Account.
Available Actions
User can perform a different set of actions on each transaction type. There are two ways to check what actions are enabled for a specific transaction type:
Check the specific transaction and clickActions. All the enabled actions are highlighted.
OR
Click Actions In the last column of the table:
Transaction Details
ClickRight Arrownext to theTransaction Idto display all the transaction details.
Category
Description
Transaction Details
General transaction information. Matches Transaction report columns
Processor Details
The details of the processor assigned to process this type of transactions
CC/Account Details
Credit card information. Bank account number – for ACH transactions.
CC/Account OwnerDetails
Information about the credit card holder. Bank account owner information – for ACH transactions.
Applied Fees
Billing settings applied to this transaction type
Related Transactions
All transactions that are related to this specific transaction are displayed in this section. Regular(Authorization, Credit, Charge, Verify) transaction type does not have any related transactions. Submit(Void, Refund, Capture, Chargeback) transaction type will have related transactions displayed in this
Use to validate a credit card and generate a token without an actual charge
Authorization
Use to validate payment method and to make an authorization amount reservation
Void/Partial Void
Use to cancel an Authorization transaction
Capture/Partial Capture
Use to deposit funds after the successful Authorization
Charge
Use to make a direct deposit without an Authorization
Refund/Partial Refund
Use to return deposited funds back to the buyer
Credit
Use to make a direct credit transaction
Chargeback
Use to process a chargeback transaction on a deposit transaction
Transaction Status
After processing a specific transaction type, the transaction status changes accordingly in the Transactions report:
Transaction Status
Description
Processed
Successfully processed transaction
Declined
Declined transaction
Reversal Chargeback transaction type
Transaction counter to a chargeback
Arbitration Chargeback transaction type
Chargeback evidence request
Representment Chargeback transaction type
Representment letter transfer
Credited Chargeback transaction type
Chargeback transaction on the Deposit that has already been Refunded
AUTHORIZATION
Authorization transactionserves to verify the payment information and to reserve a security amount on the credit card balance until the actual charge is executed. Authorization is aRegularrequest transaction type – not based on any previous transactions. Authorization transaction can be followed by Void, Partial Void, Capture or Partial Capture transactions – see Available Actions below. Authorizations help reduce the risk of fraudulent transactions and credit card misuse.
Visit theTransactions Processingsection of the Developers Portal for more information on transactions processing
Available Actions
In the Back-Office user can perform the following actions on credit cardAuthorizationtransactions.
Action
Description
Void
Cancel the authorization transaction amount in full
Partial Void
Cancel a part of the authorization transaction amount.Disabled for ACH transactions.
Capture
Deposit (capture) the authorization transaction amount in full
Partial Capture
Deposit (capture) a part of the authorization transaction amount.Disabled for ACH transactions.
Edit
Edit transaction details
VOID (CANCEL AUTHORIZATION)
VoidandPartial Voidtransactions followAuthorizationtransactions, which is a parent transaction in relation to them. In this type of transaction, the amount reserved by the Authorization transaction is released back to the credit card balance. Void (Cancel Authorization)is aSubmitrequest transaction type – meaning that it follows the parent (original) Authorization transaction. Partial Void(Partial Cancel Authorization) transaction is also a Submit request transaction type. This transaction performs a partial release of the amount reserved by the Authorization transaction.
Visit theTransactions Processingsection of the Developers Portal for more information on transactions processing
Available Actions
In the Back-Office user can perform the following actions on credit cardVoidtransactions.
Action
Description
Edit
Edit transaction details
CAPTURE
In aDeposittransaction, funds are transferred from the buyer’s bank account to the seller’s bank account after the order/service is completely fulfilled.Deposit Transaction TypesCapture(Submit Deposit) – follows the parent (original) Authorization transaction. Charge(Regular Deposit) – a direct funds transferwithouta prior (parent) Authorization transaction. Partial Captureoccurs when only a part of the authorization transaction amount has to be deposited. Partial Capturemay be followed by aPartial Void(Cancel Authorization), where the funds that have not been deposited are to be released back to the buyer (upon Merchant’s consideration).
Visit theTransactions Processingsection of the Developers Portal for more information on transactions processing
Available Actions
In the Back-Office user can perform the following actions on credit cardCapturetransactions.
Action
Description
Refund
Refund a full Capture transaction amount
Partial Refund
Refund a part of the Capture transaction amount.Disabled for ACH transactions.
Chargeback
Get a Chargeback on the captured transaction.Disabled for ACH transactions.
Edit
Edit transaction details
CHARGE
In aDeposittransaction, funds are transferred from the buyer’s bank account to the seller’s bank account after the order/service is completely fulfilled.Deposit Transaction TypesCapture(Submit Deposit) – follows a parent (original) Authorization transaction. Charge(Regular Deposit) – a direct funds transferwithouta prior (parent) Authorization transaction.
Visit theTransactions Processingsection of the Developers Portal for more information on transactions processing
Available Actions
In the Back-Office user can perform the following actions on credit cardChargetransactions.
Action
Description
Refund
Refund a full Capture transaction amount
Partial Refund
Refund a part of a Capture transaction amount
Chargeback
Get a Chargeback on the captured transaction
Edit
Edit transaction details
REFUND
Refundtransaction follows Capture, Partial Capture or Charge transactions.Refundtransaction returns funds from the Merchant to the Buyer upon the Buyer’s request. Refund is aSubmitrequest transaction type – meaning that it derives from the parent (original) Deposit (Capture) transaction. Refund transaction can beFullorPartial, depending on the agreement between the involved parties.
Visit theTransactions Processingsection of the Developers Portal for more information on transactions processing
Available Actions
In the Back-Office user can perform the following actions on credit cardRefundtransactions.
Action
Description
Edit
Edit transaction details
CREDIT
The difference betweenRefundandCredittransaction types, is that Refund is aSubmitrequest transaction type and is based on a previous (parent) transaction (e.g.Capture or Charge). Credittransaction is aRegularrequest transaction type and is not based on any previous (parent) transaction. Credit transaction in use:
Money transfers between credit cards
Money transfers in gaming industry
Money-Back operations
Visit theTransactions Processingsection of the Developers Portal for more information on transactions processing
Available Actions
In the Back-Office user can perform the following actions on credit cardCredittransactions.
Action
Description
Edit
Edit transaction details
VERIFY
Verify(Check Payment Method) is aRegularrequest transaction type – meaning that it is not based on any parent (original) transaction.Verify (Check Payment Method) transaction can serve two purposes:
To check the validity of the payment method provided, e.g. the credit card data validation
To generate a credit card payment token without processing an actual Authorization or Deposit transaction
Visit theTransactions Processingsection of the Developers Portal for more information on transactions processing
Available Actions
In the Back-Office user can perform the following actions on credit cardVerifytransactions.
Action
Description
Edit
Edit transaction details
CHARGEBACK
Chargeback definition:chargeback is a process initiated by the cardholder or the card issuing bank to reverse the payment transaction that has already been settled.As a result the funds are being returned to the buyer.Chargebacktransaction is aDebitrequest transaction type and follows previous Capture, Partial Capture or Charge transactions.To Process a Chargeback for Capture/Charge Transactions:
ClickActionsand selectChargeback
2. Complete the Chargeback form and clickExecuteto process a Chargeback transaction.
In the Chargeback form select Operation Type = Debit to process a Chargeback transaction based on a previous Capture or Charge transaction.
Available Actions
In the Back-Office user can perform the following actions on credit cardChargebacktransactions.
Action
Description
Edit
Edit transaction details
EDIT
User can manuallyEdittransactions error and deposit matching information.
Data
Description
External Error
Transaction external error message
Internal Error
Transaction internal error message
Clearing Error
Transaction clearing processor error message
Clearing Success
A Boolean value indicating a transaction processing status Yes– success No– failed
Deposit Matching Reason
Transactions deposit matching reasons for unmatched transactions
Deposit Matching Status
Transactions deposit matching status No– unmatched Yes– matched Empty– did not go thought the matching process
Resend Transaction to Billing
Activate to resend the transaction to billing
Import Mode
Select this Transaction Mode in case transactions are processed via theexternal processor. Transactions data is thenimportedto the System via the external API (or SFTP) to perform Billing, Reconciliation and Payout operations.
Echo Mode
Select this Transaction Mode in case transactions are processed via theexternal processor. Transactions data is theninjectedinto the System by the Merchant/Seller via the System Echo API in real time to perform Billing, Reconciliation and Payout operations.Go to Echo Transaction section in the Developers Portal for more information about Echo transactions processing via the Echo API.
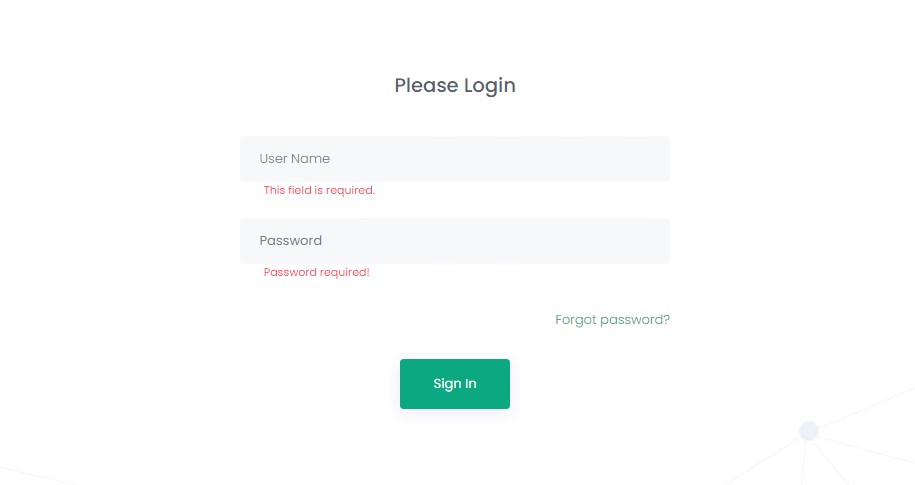
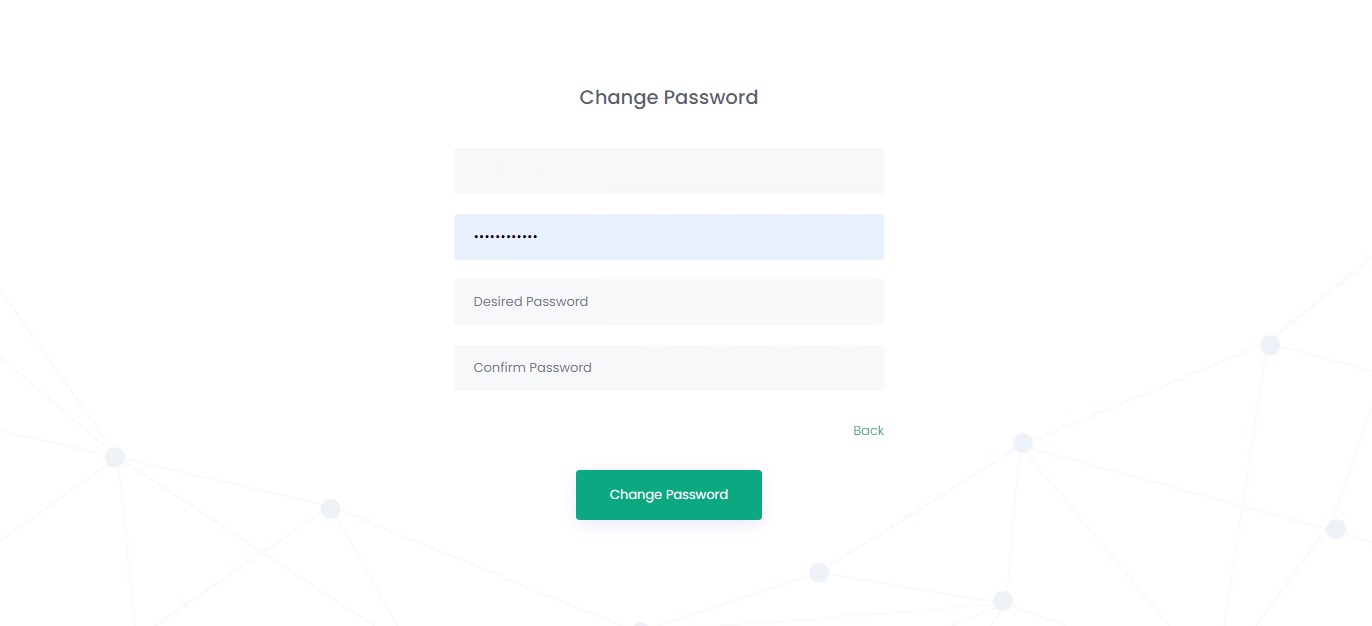
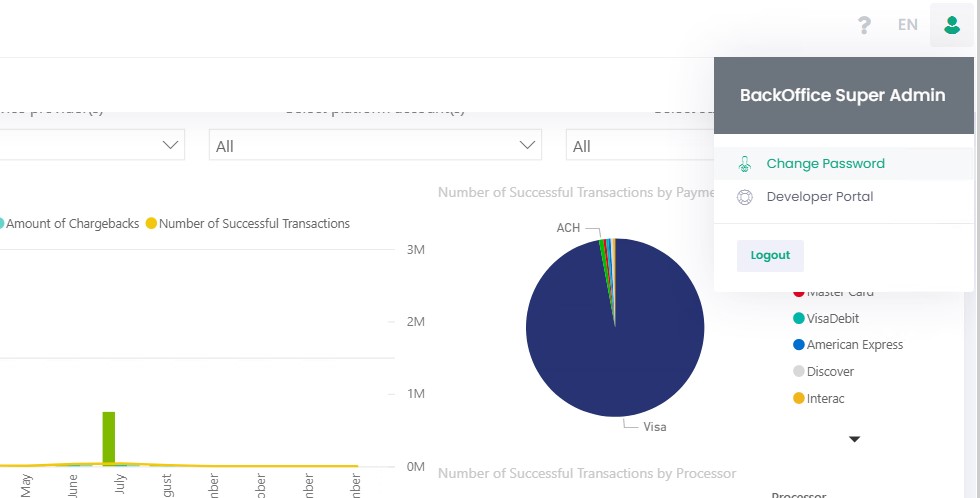
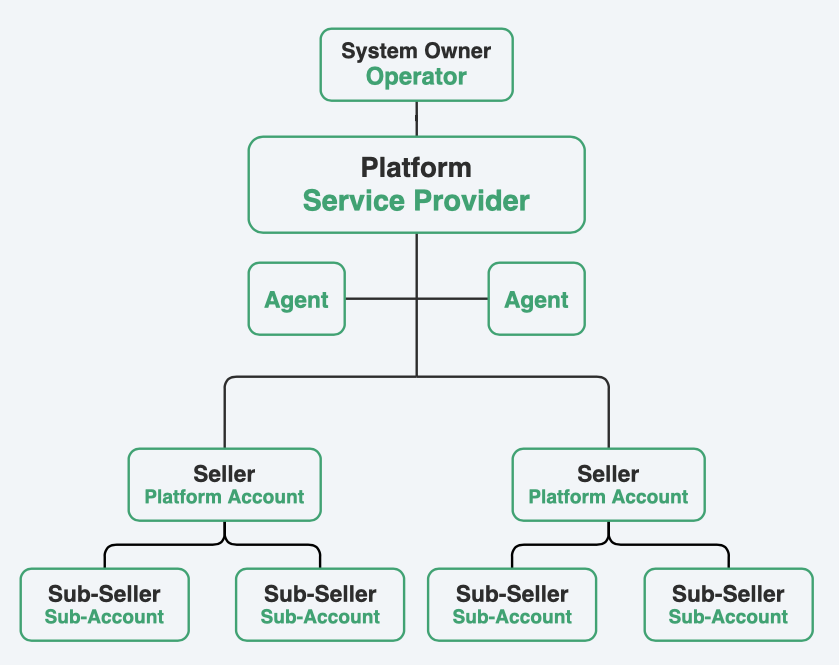
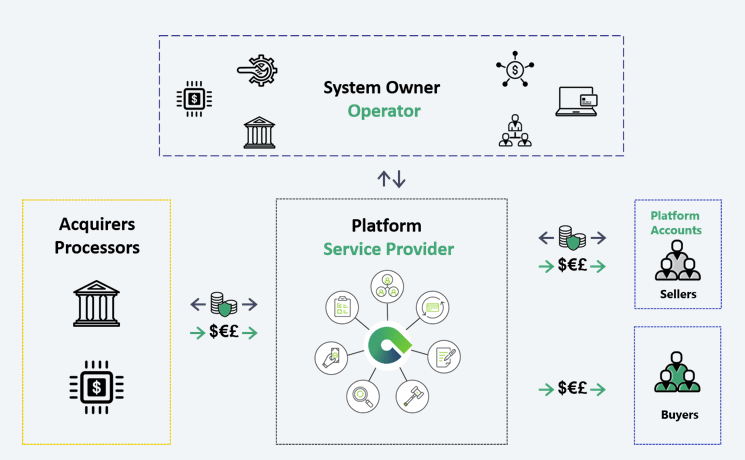
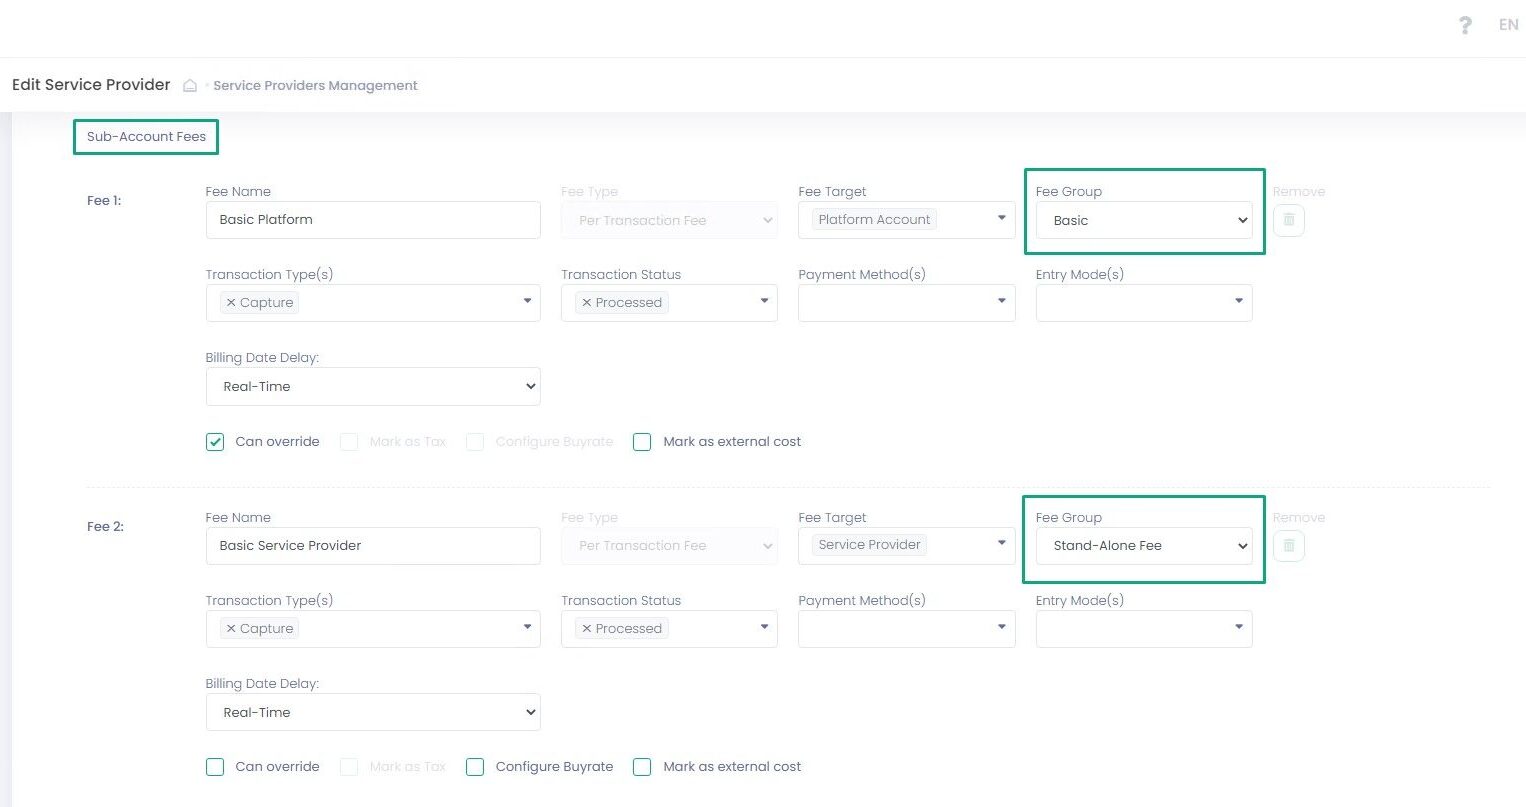

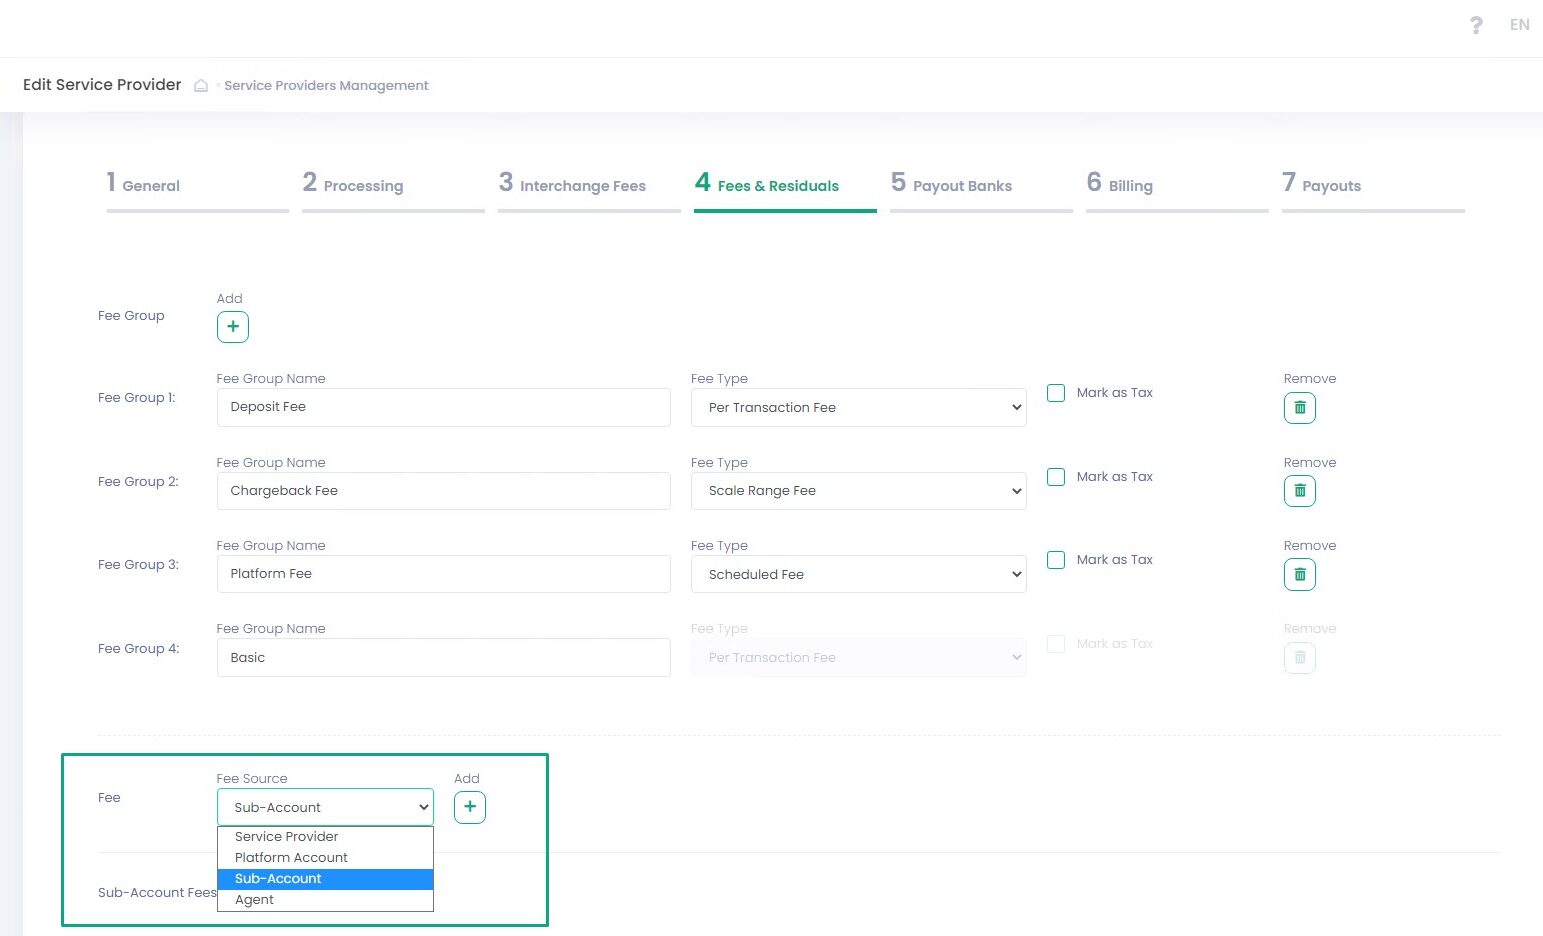


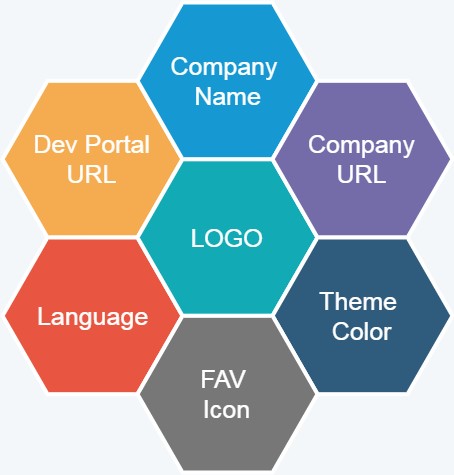 The Operator Manager will use this information when creating a new Service Provider – Step 1 of the Service Provider Onboarding Wizard.
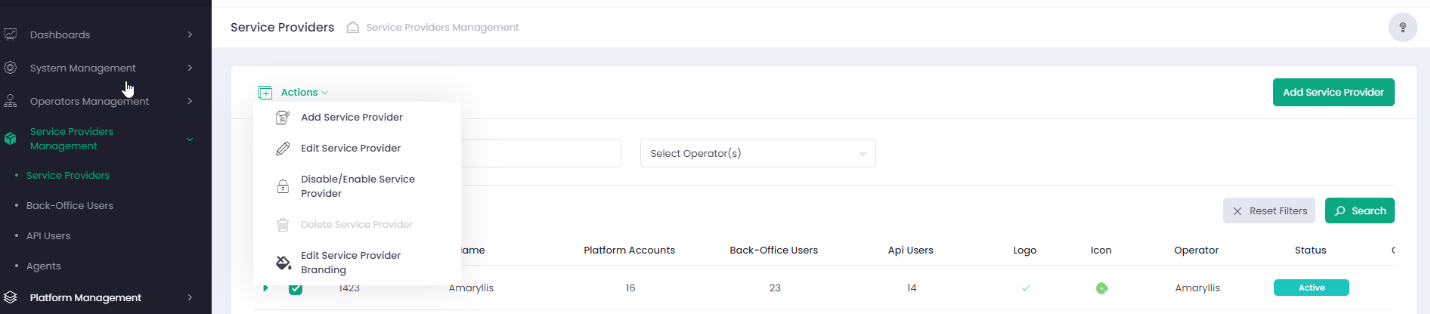 The User can override default system settings as well as reset customization to the default state

 Controls set includes


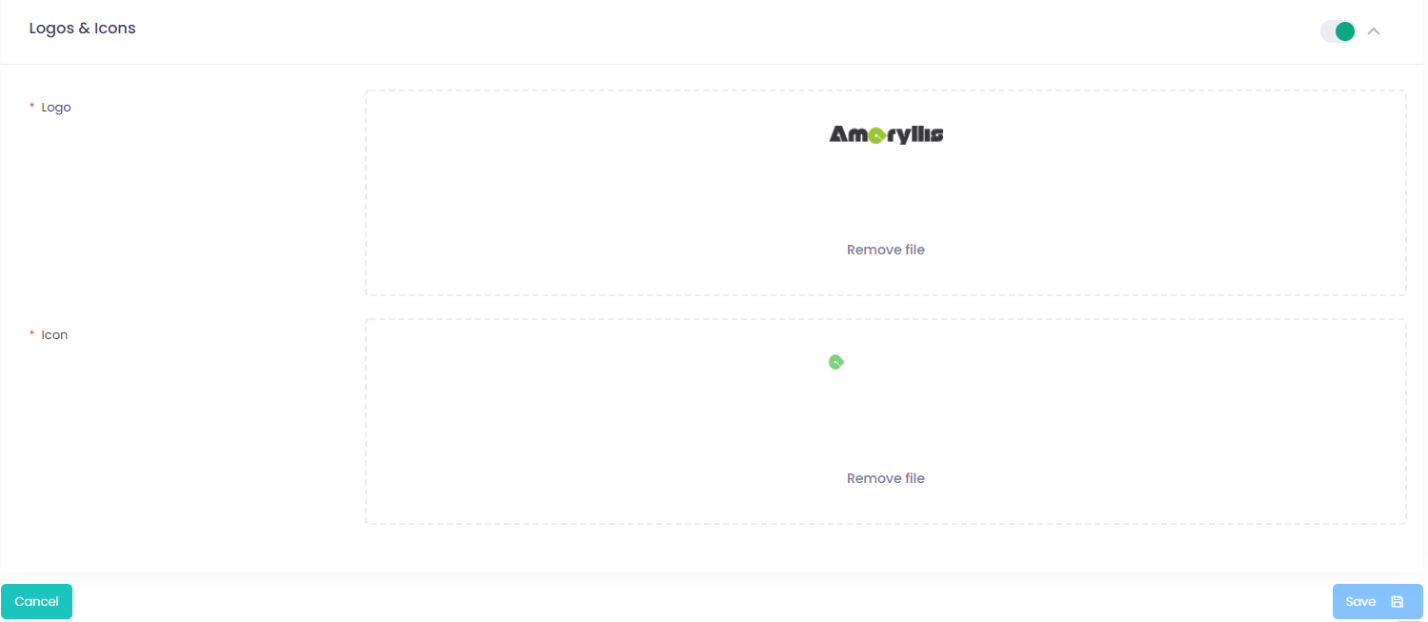


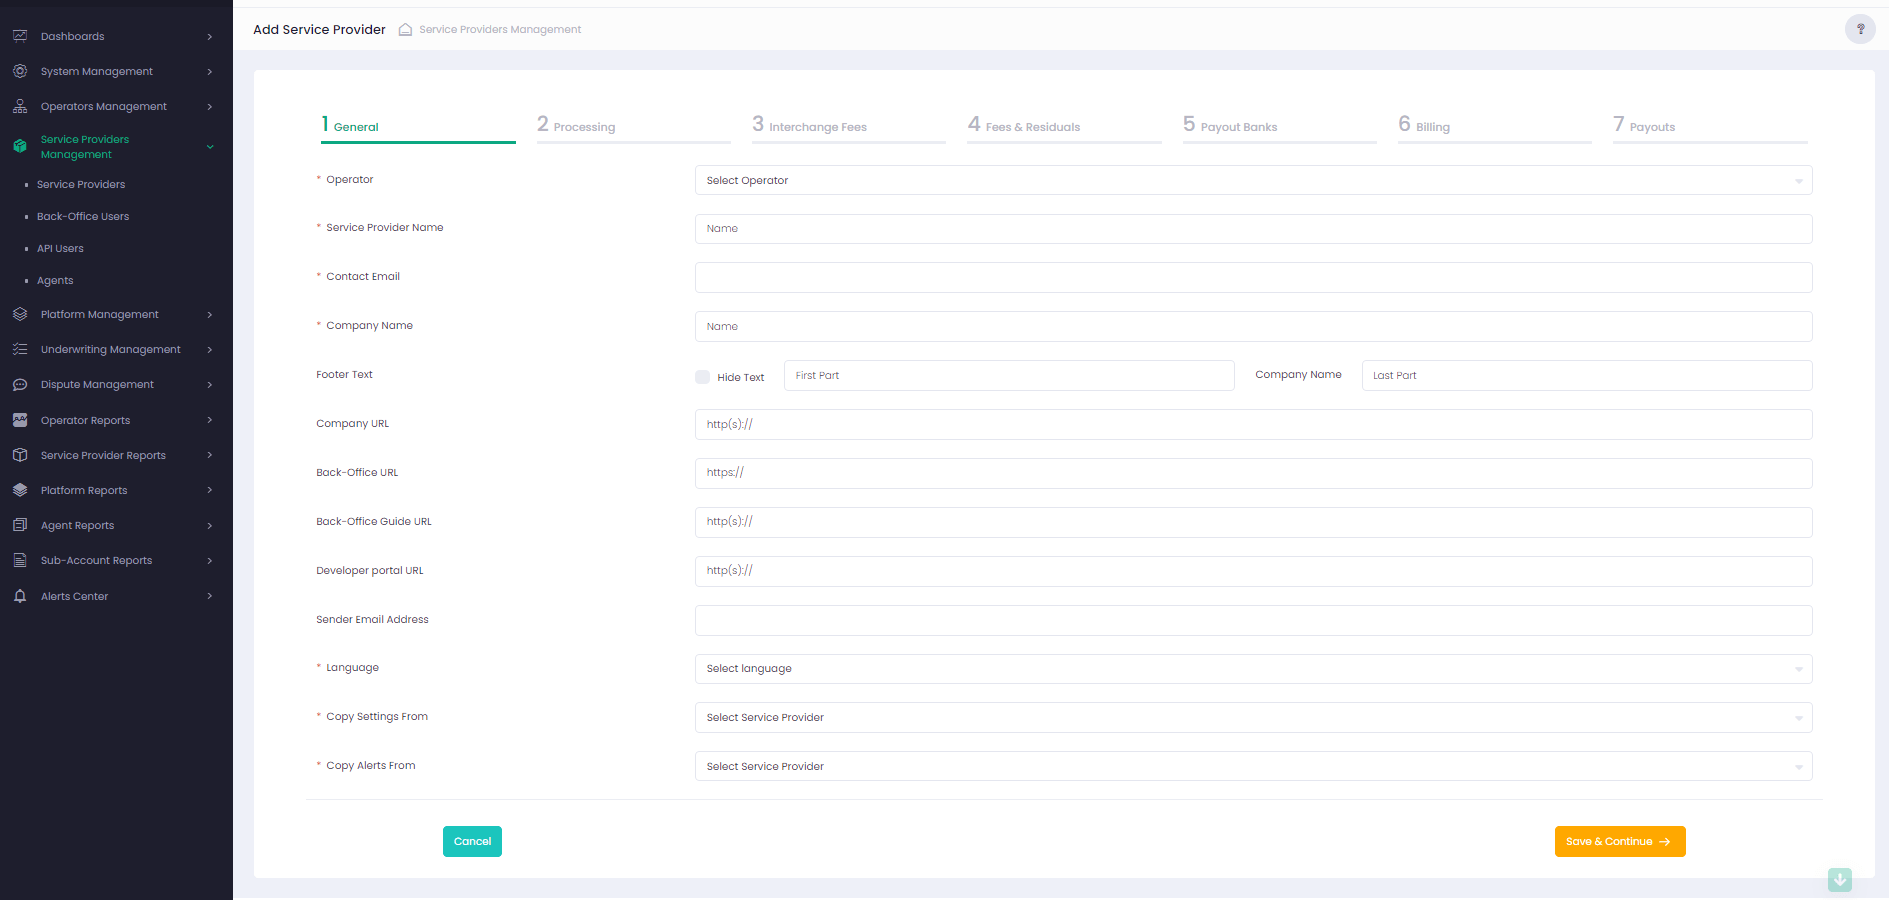

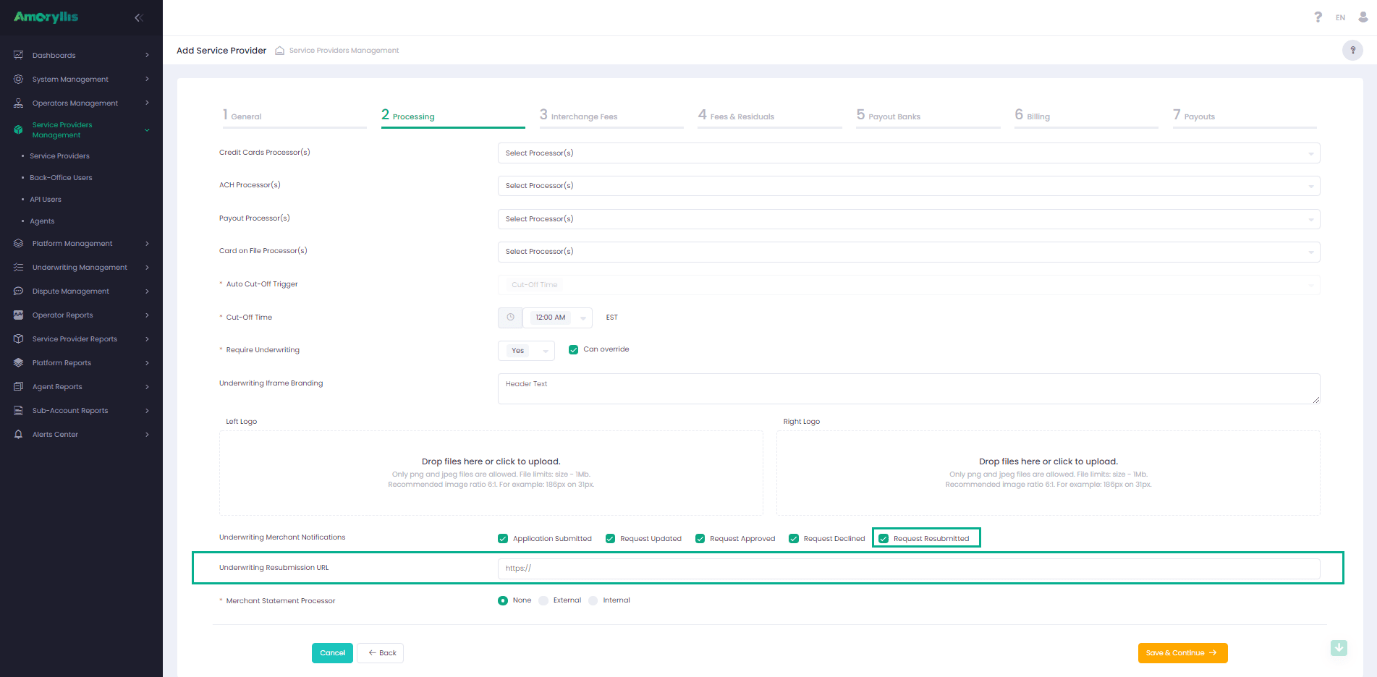
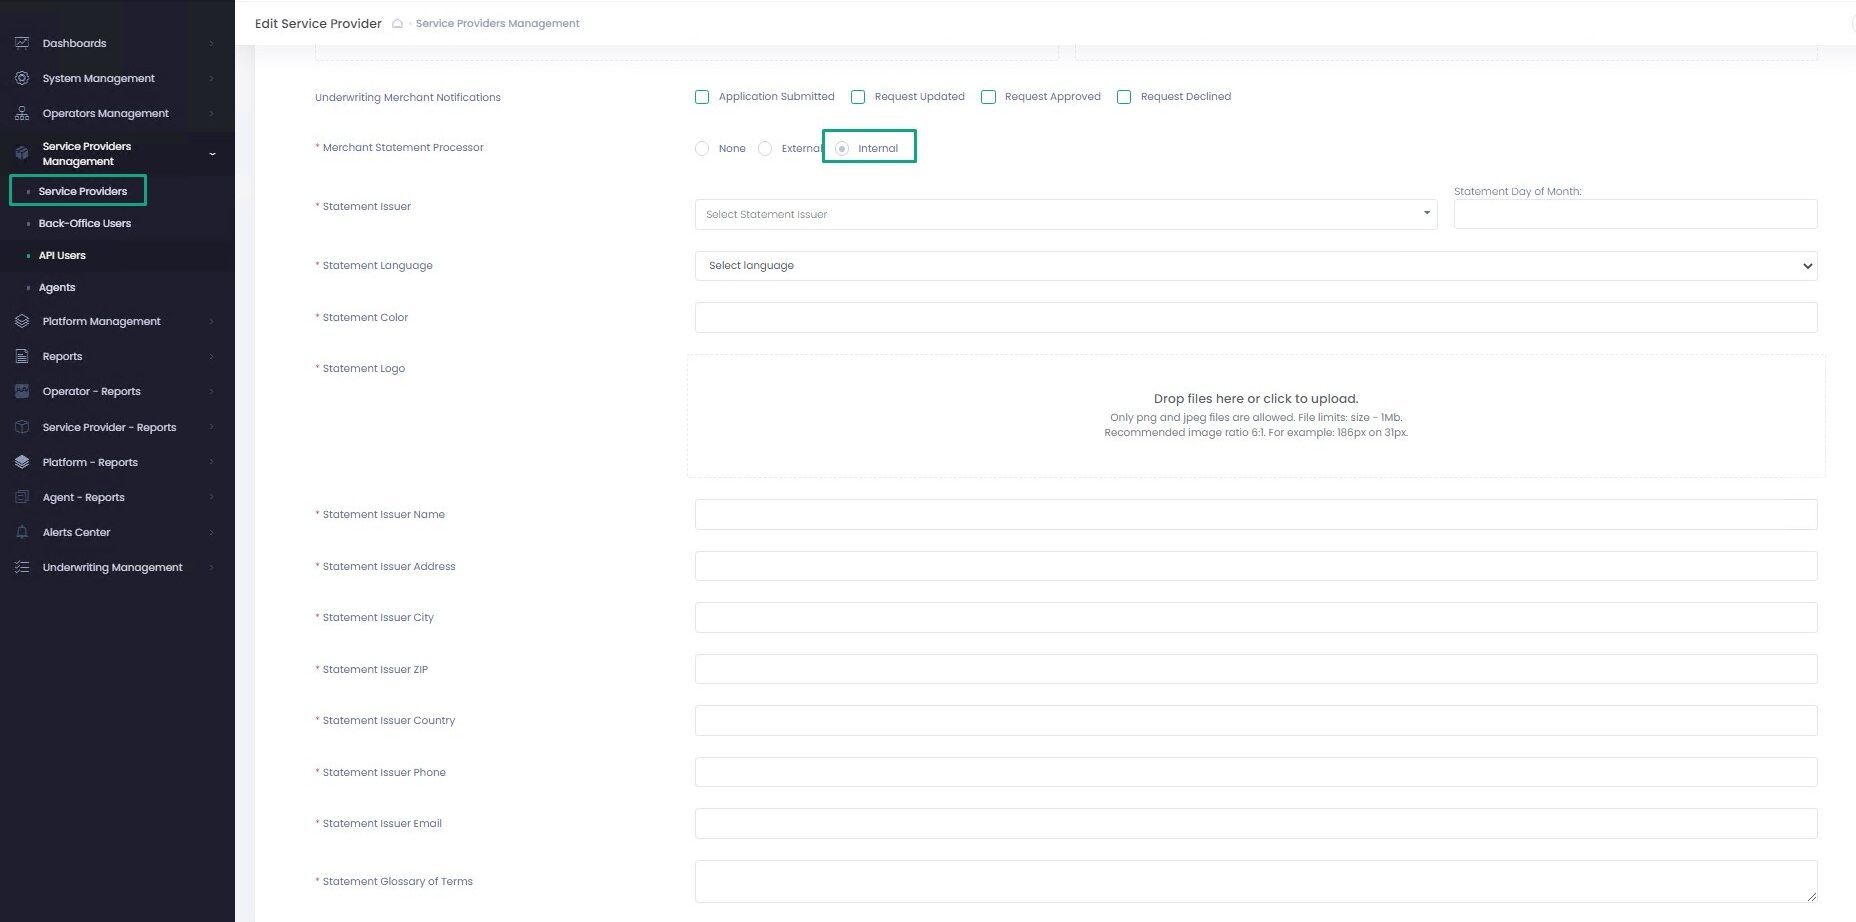


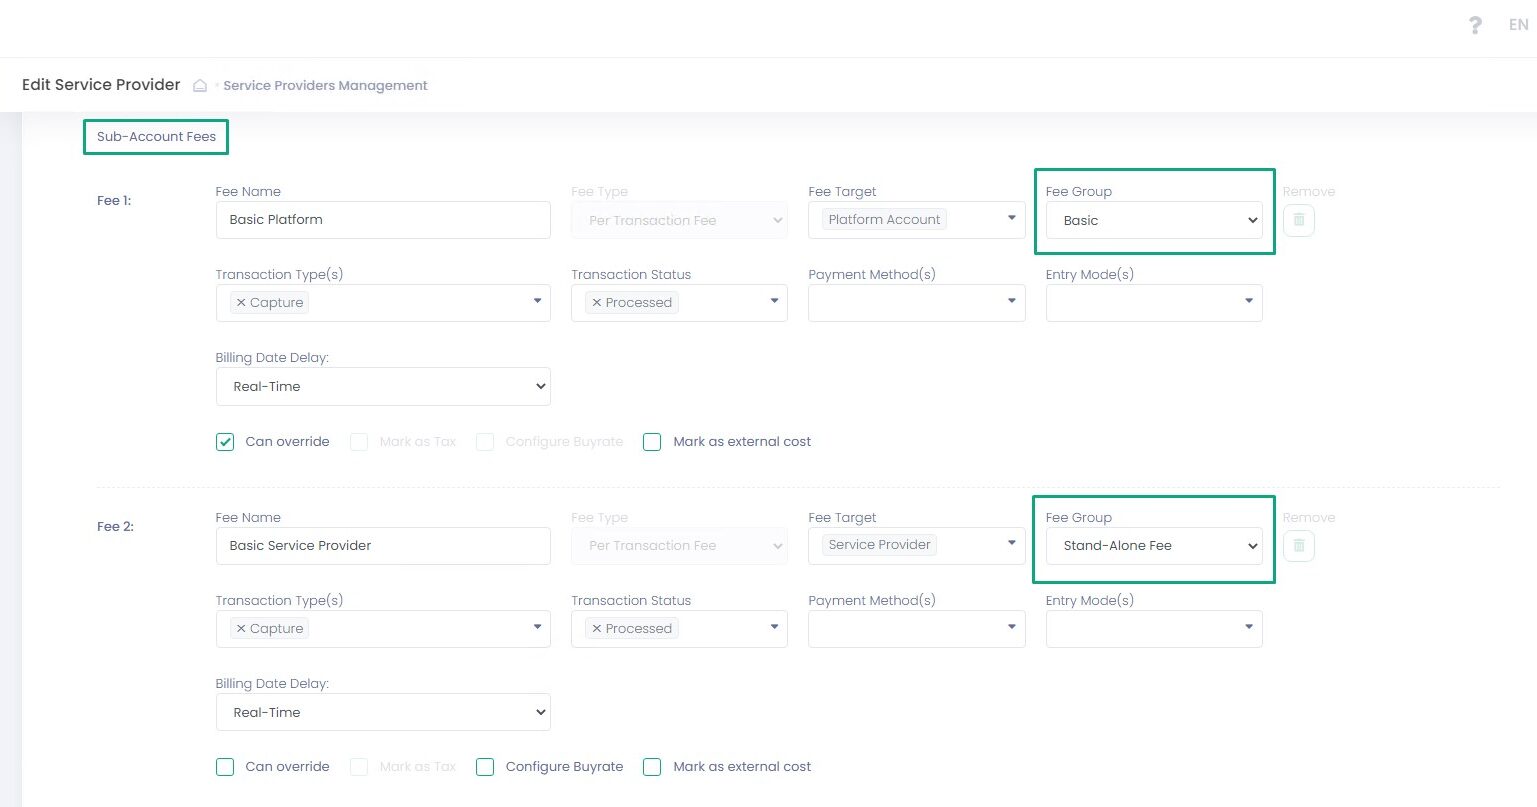


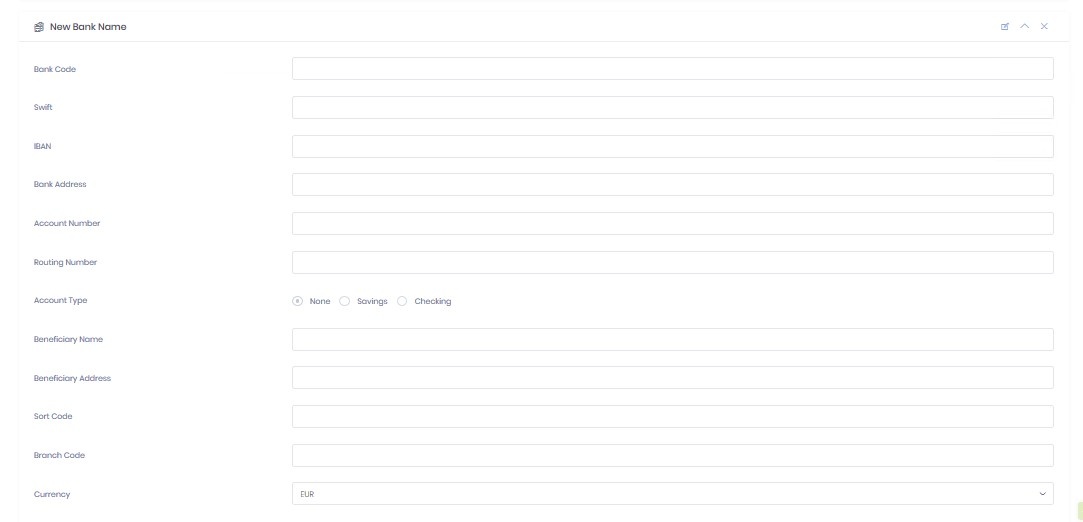

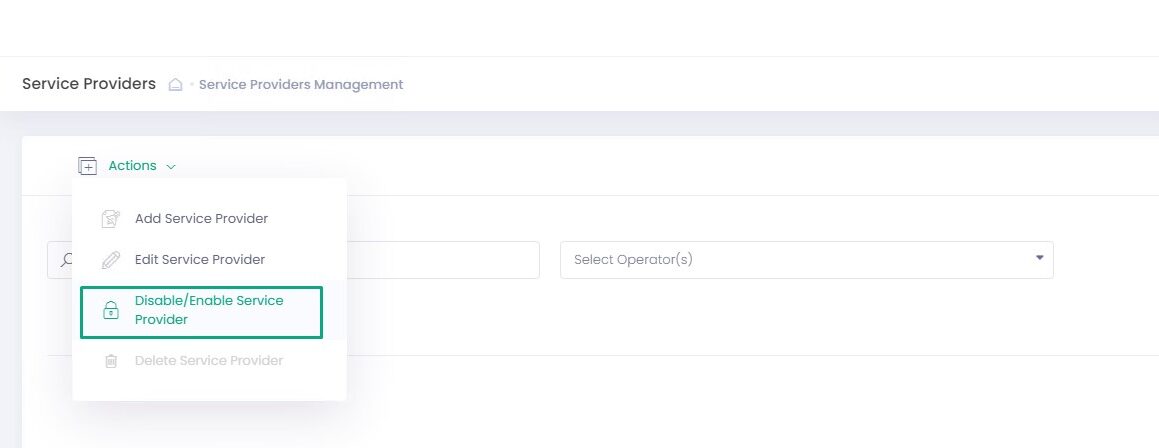


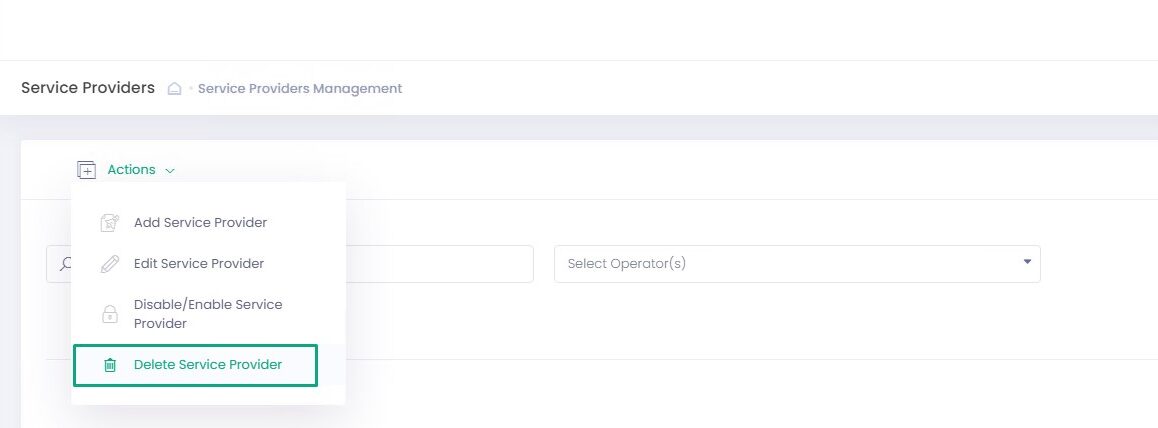
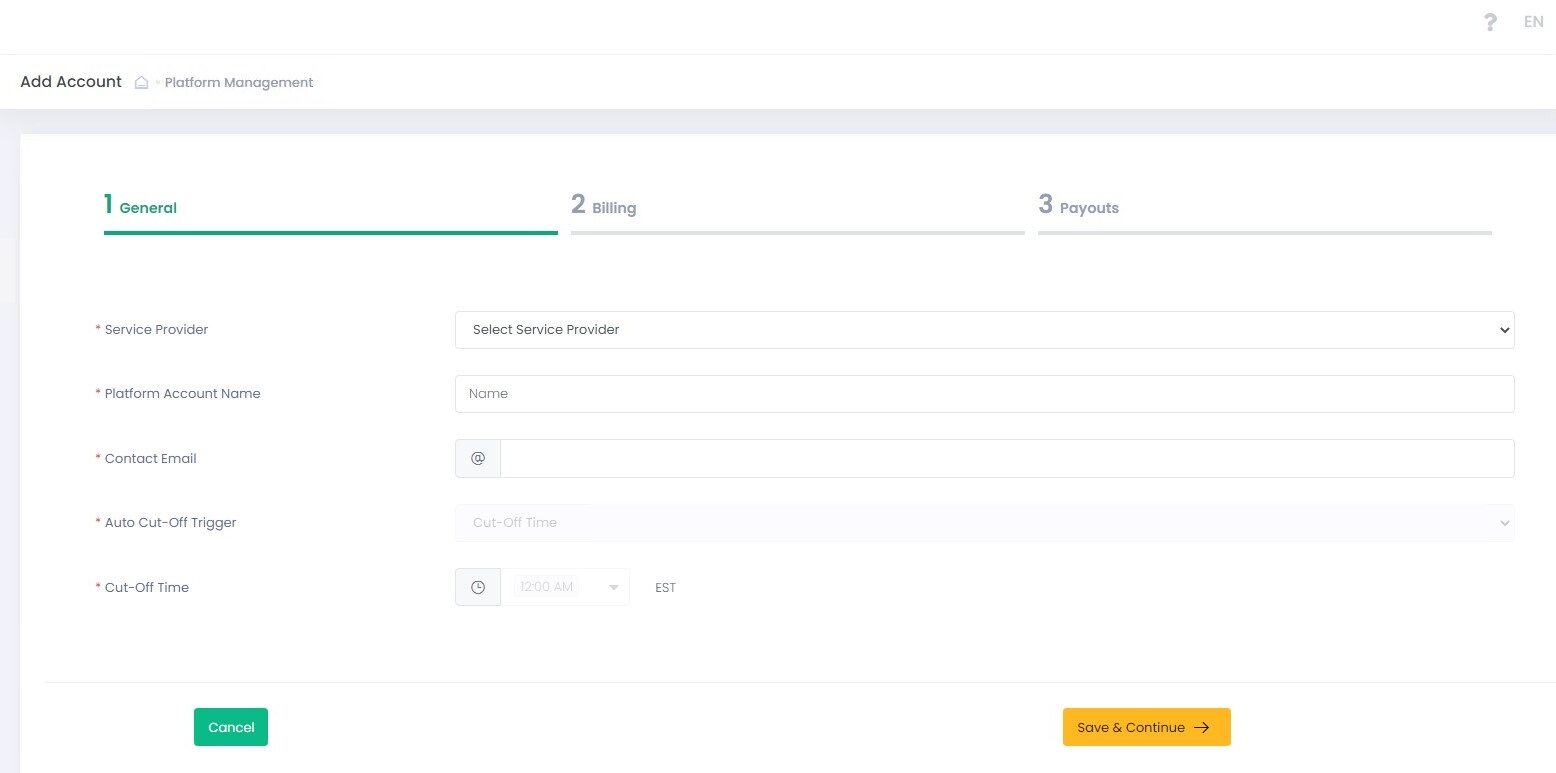


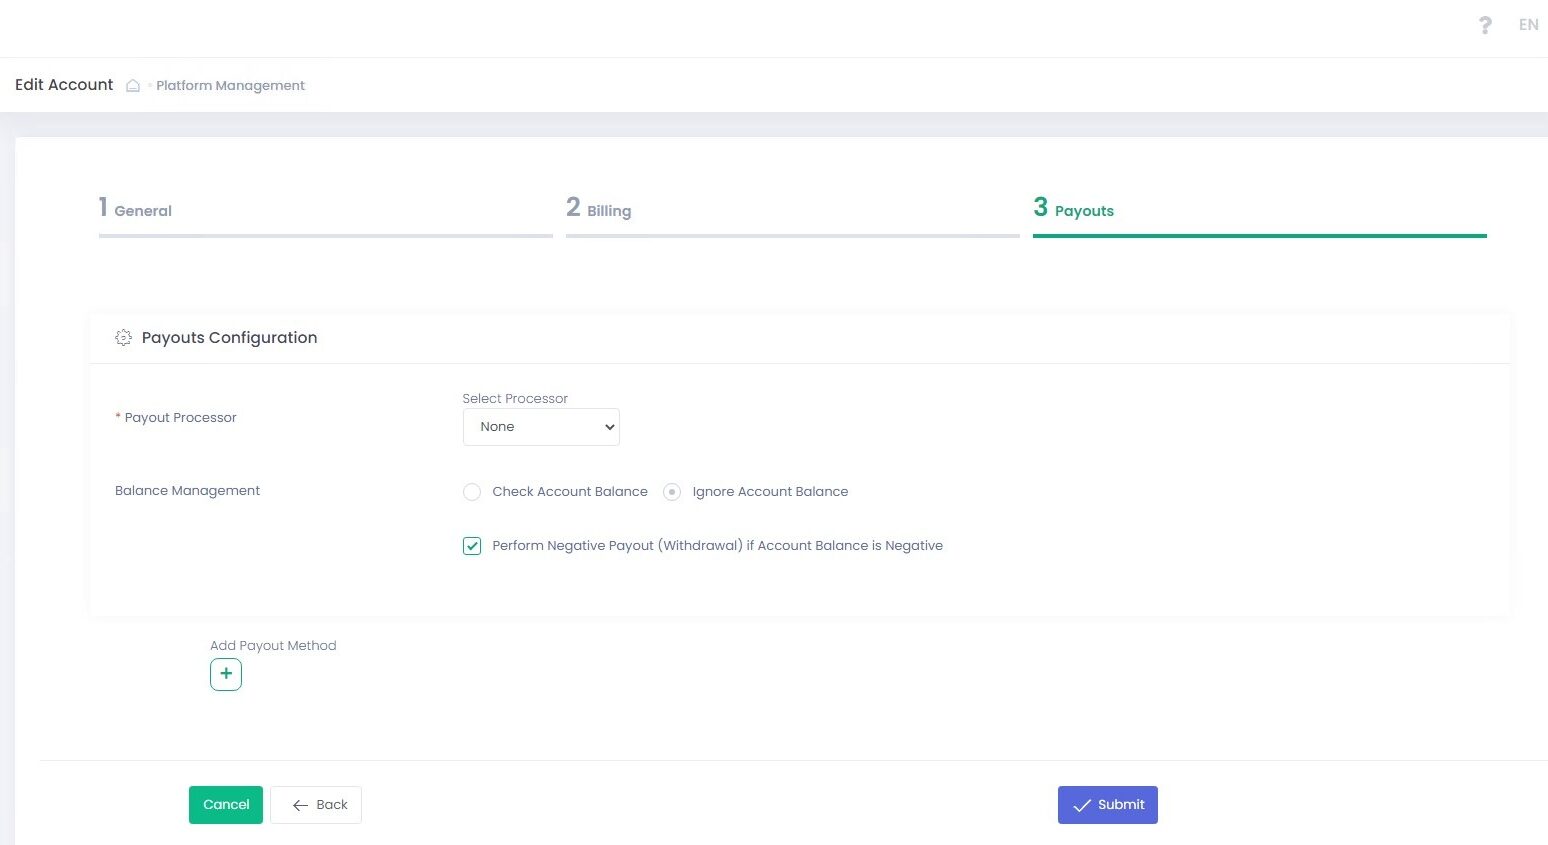


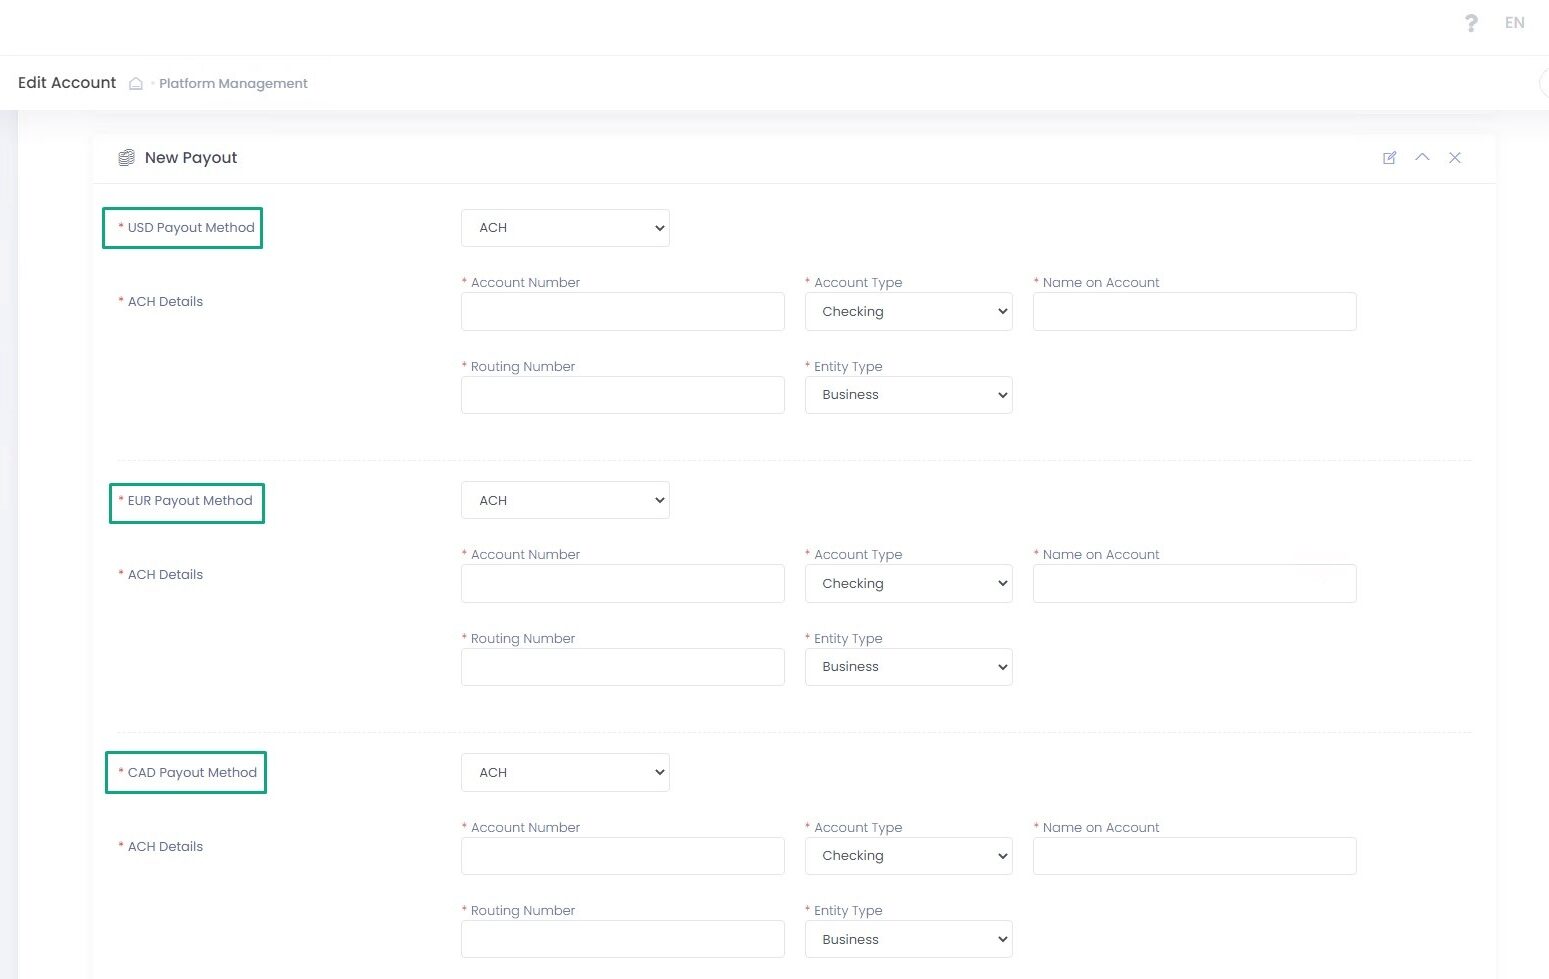
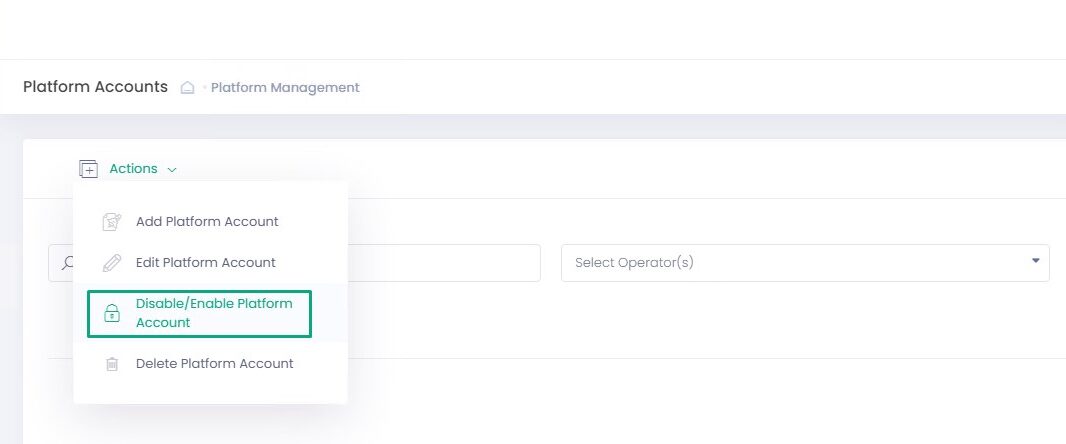

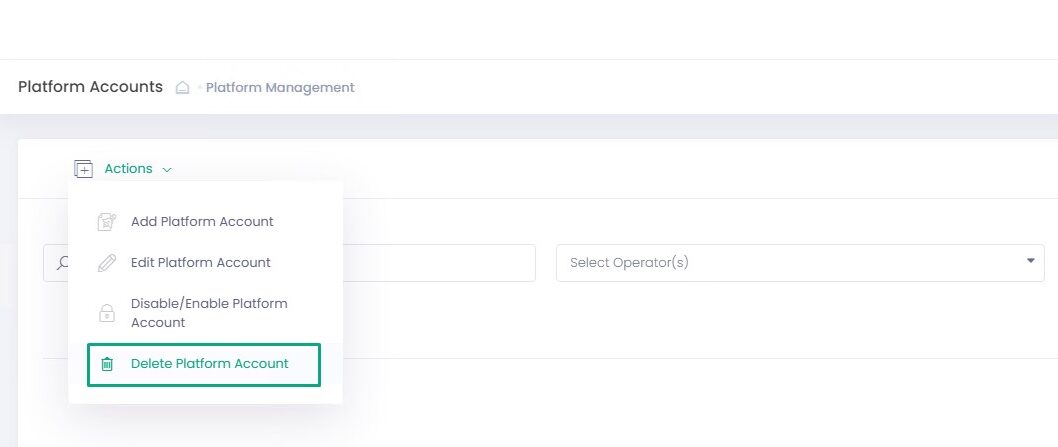


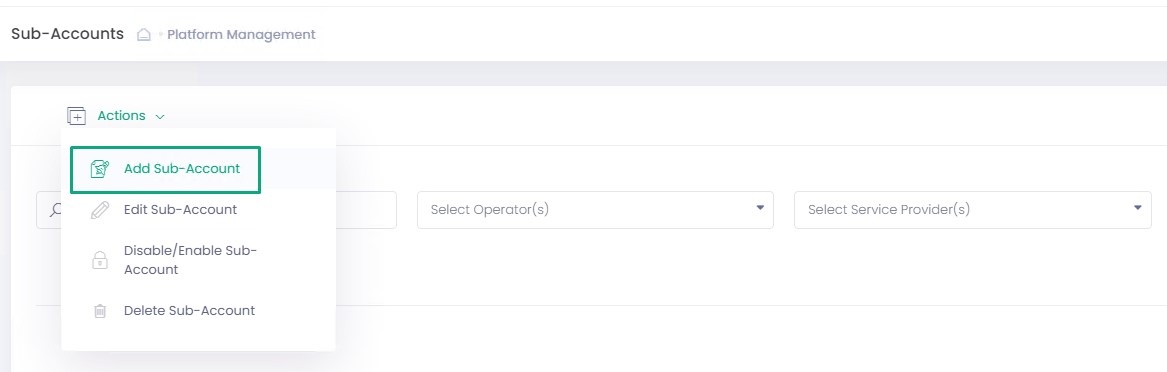

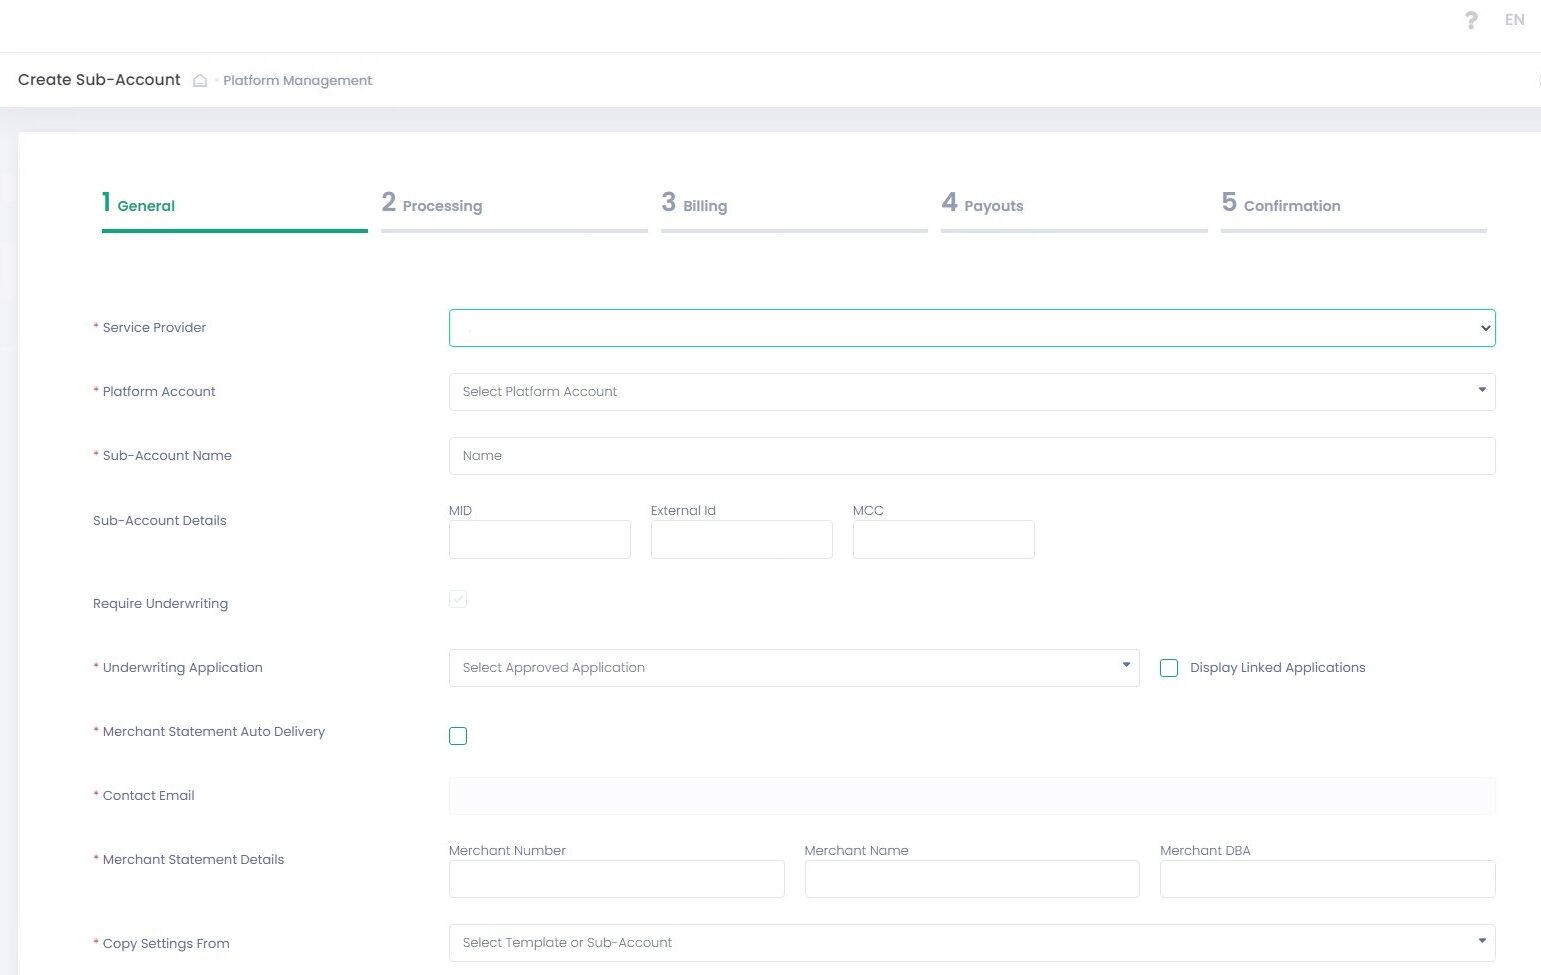
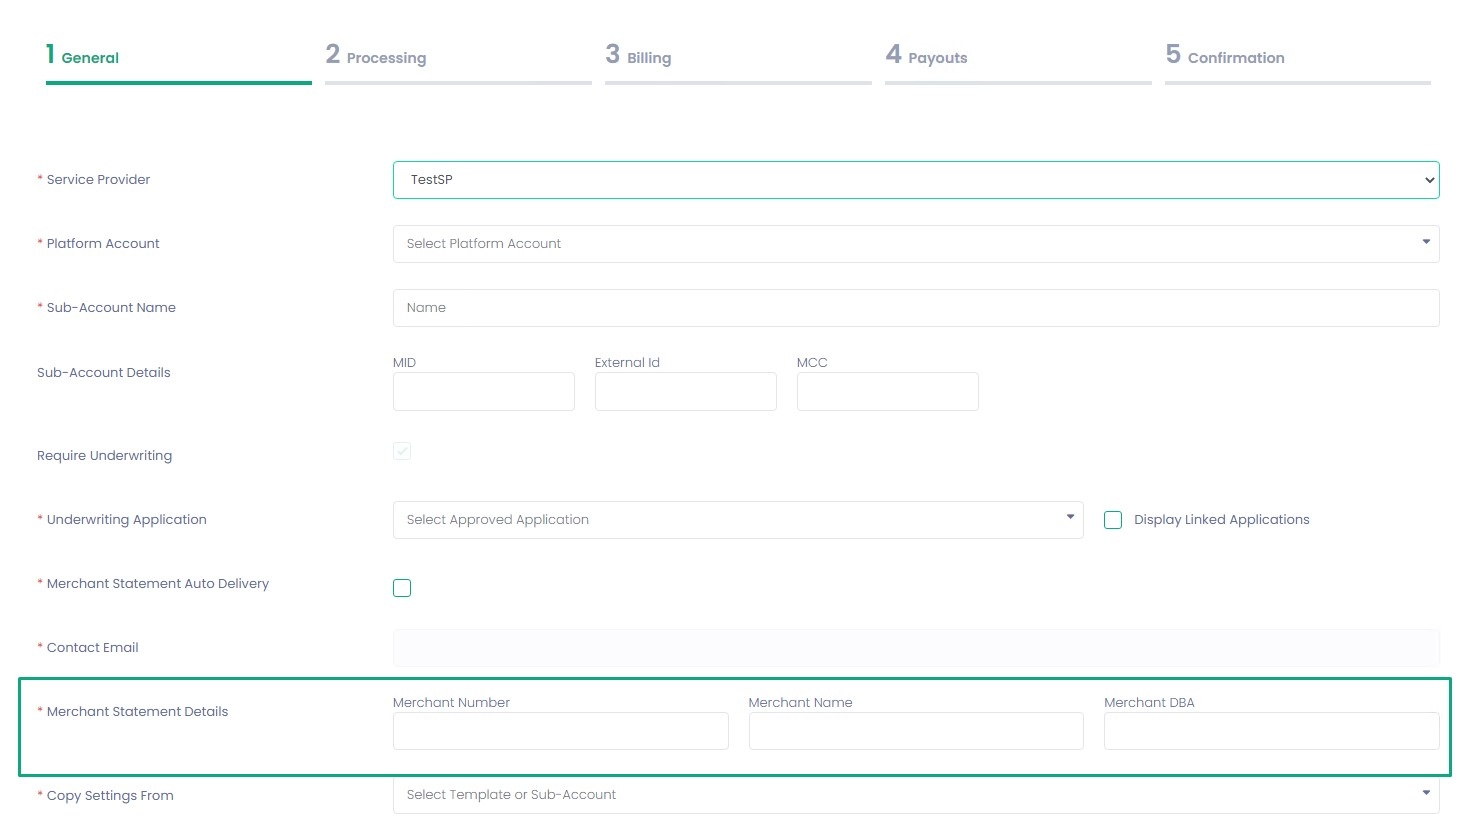


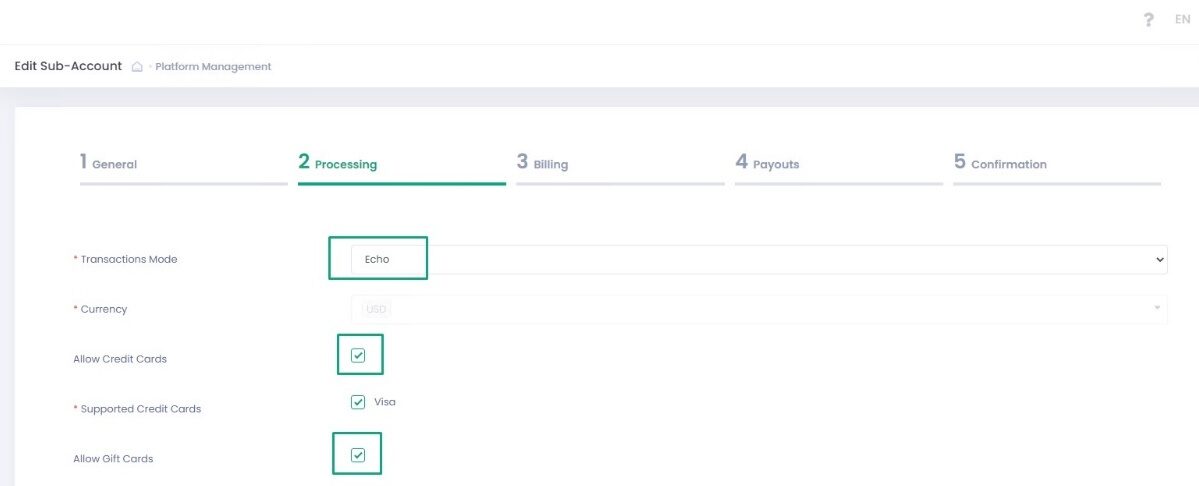
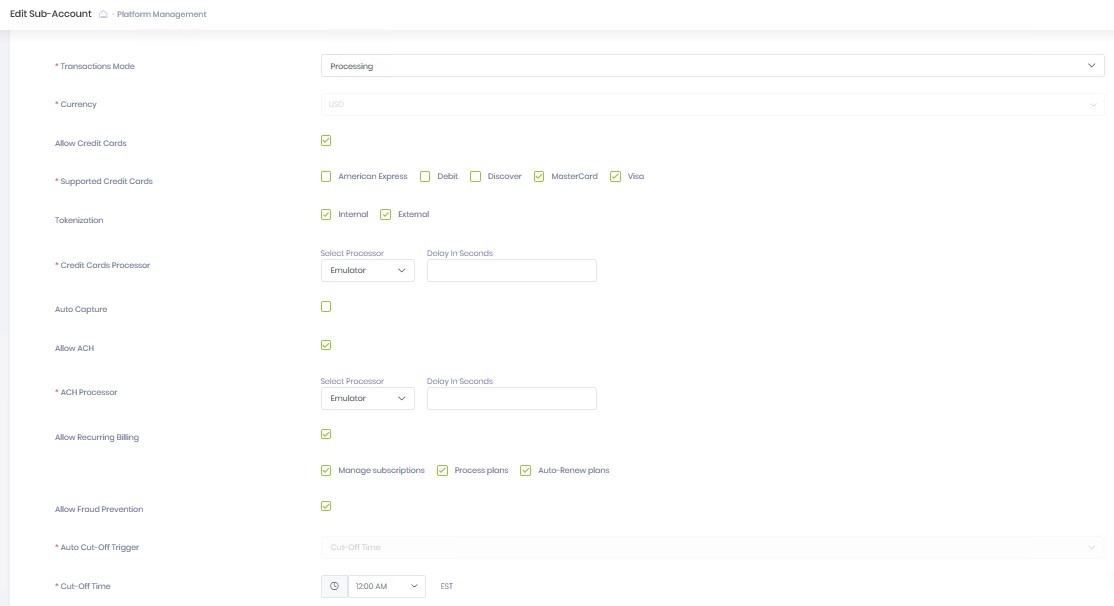
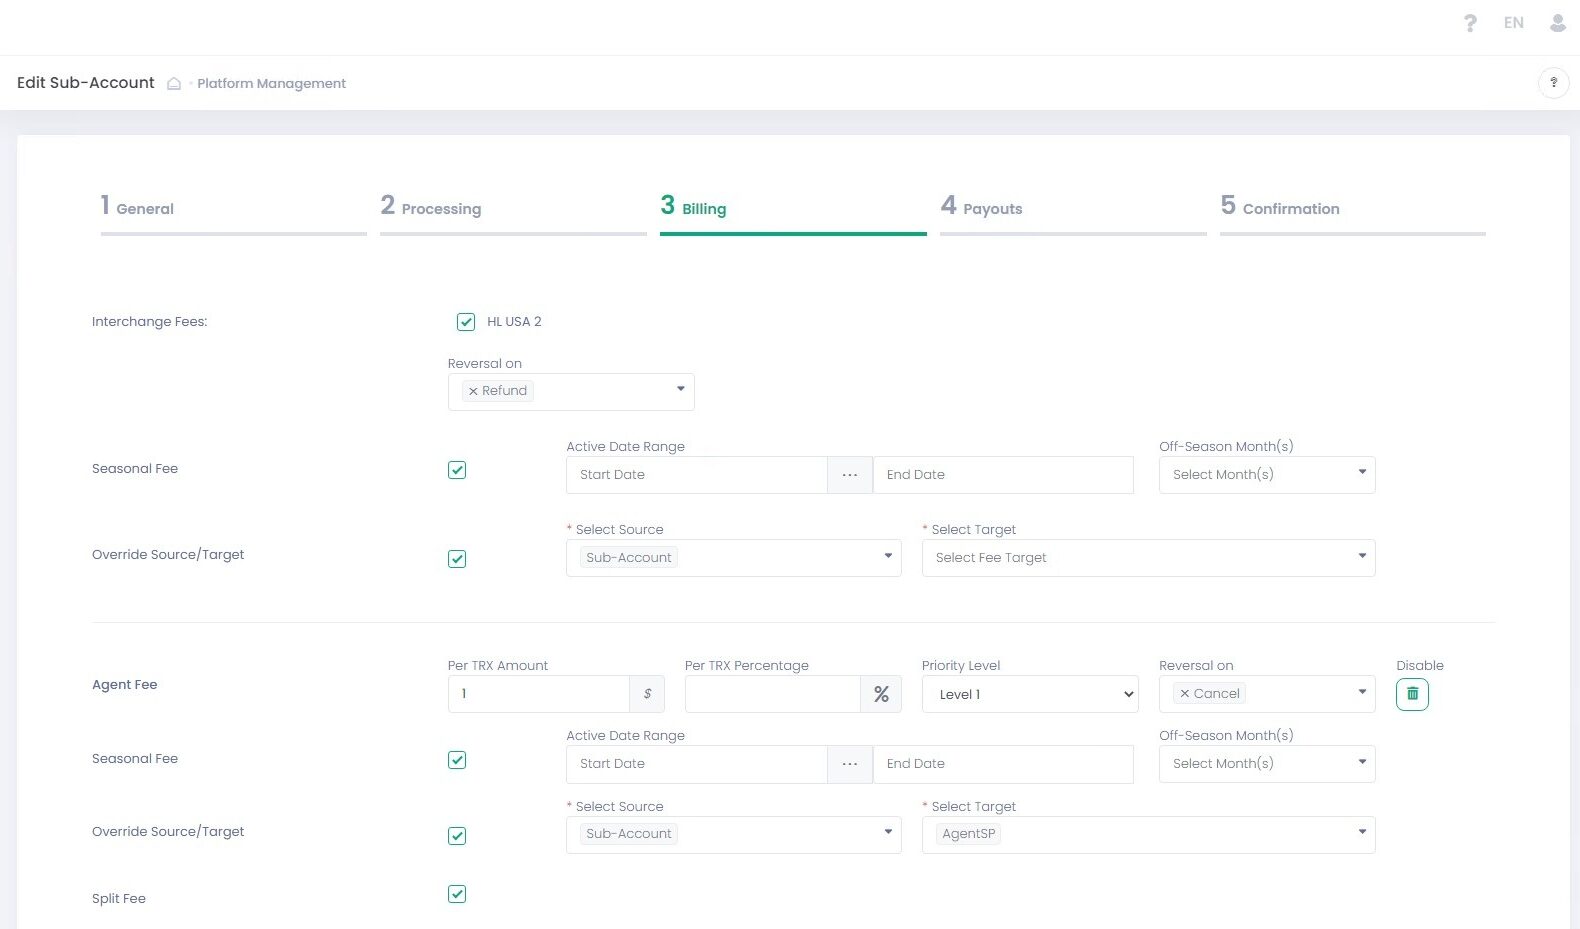

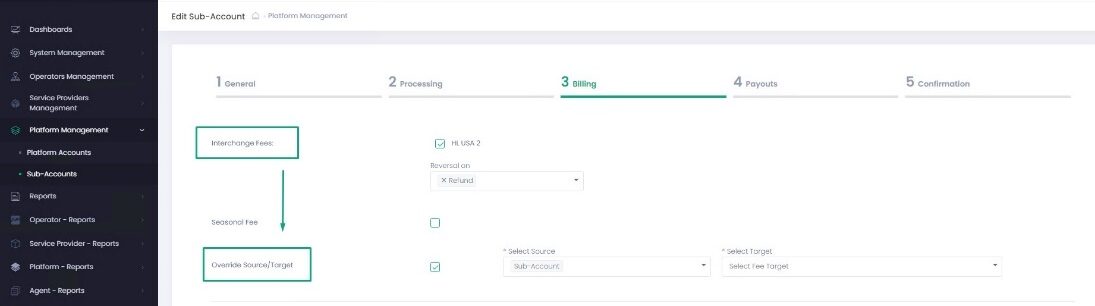
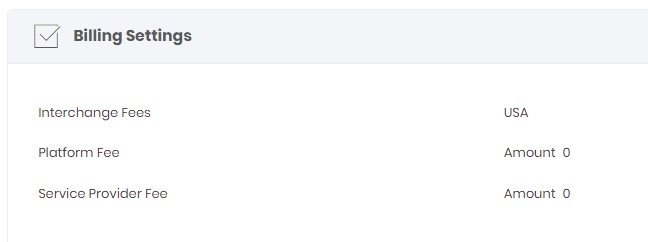


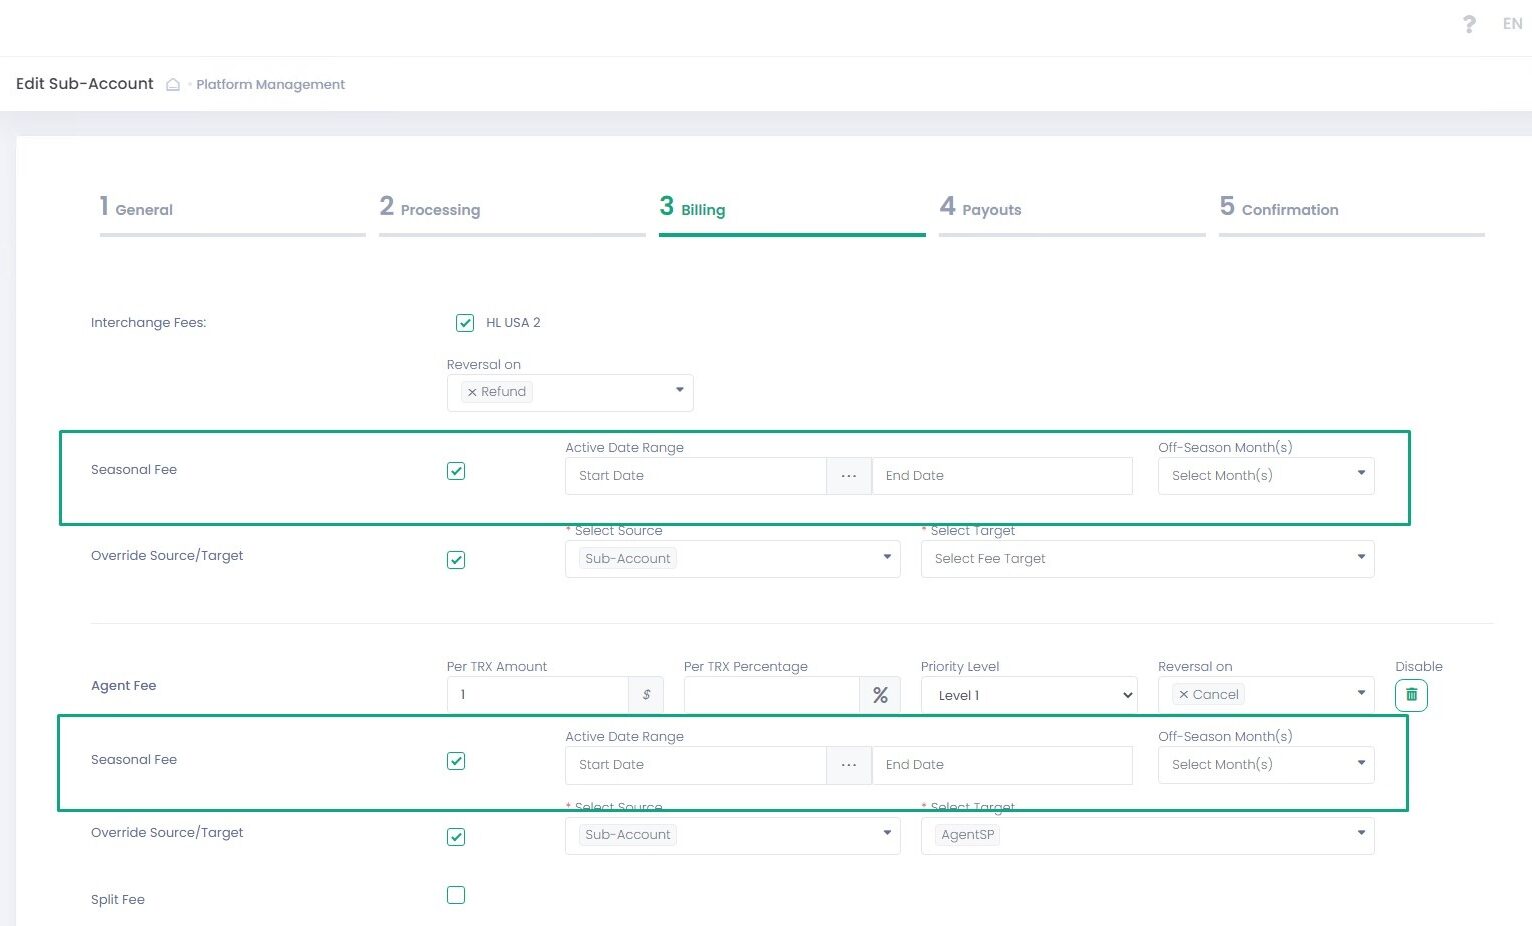
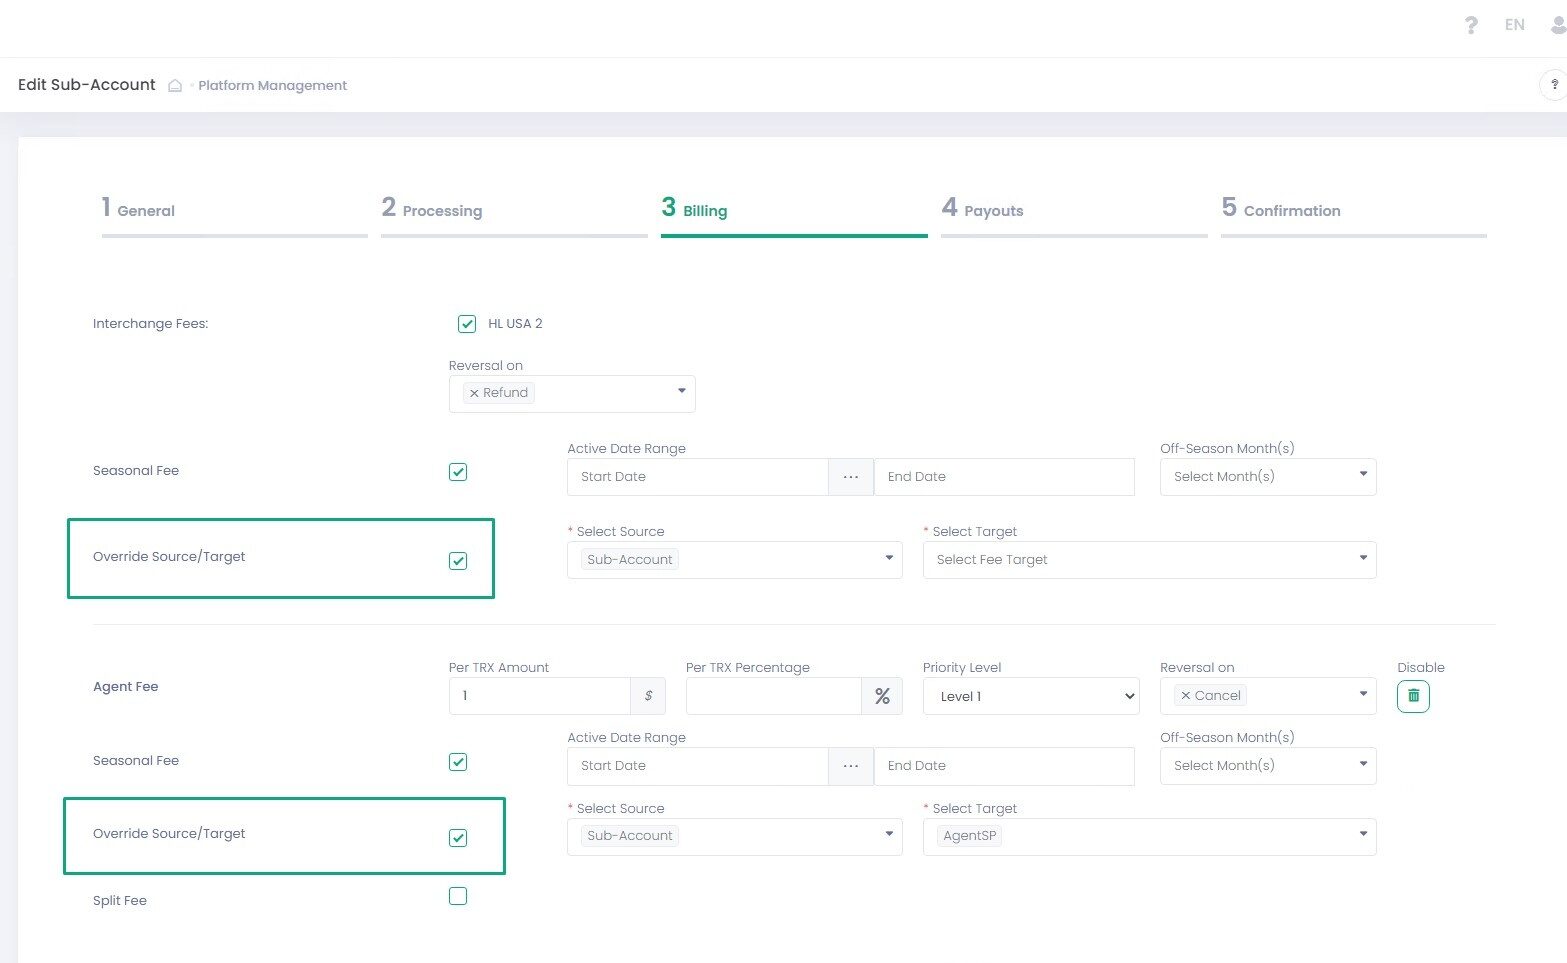
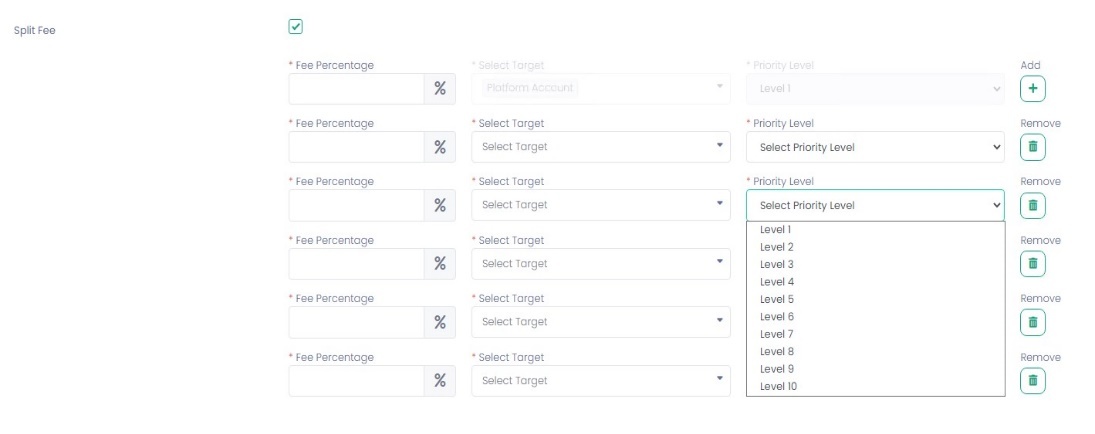
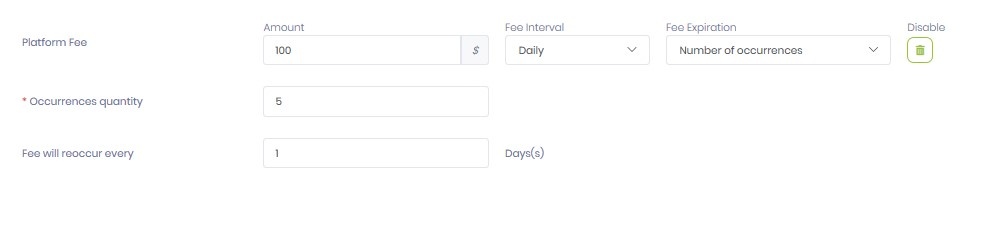
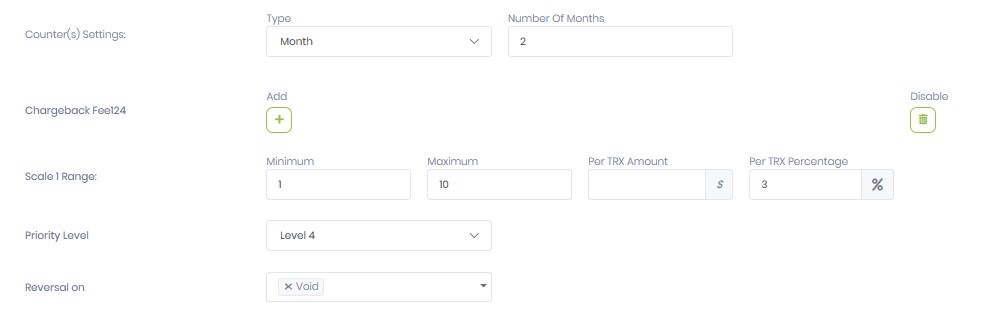

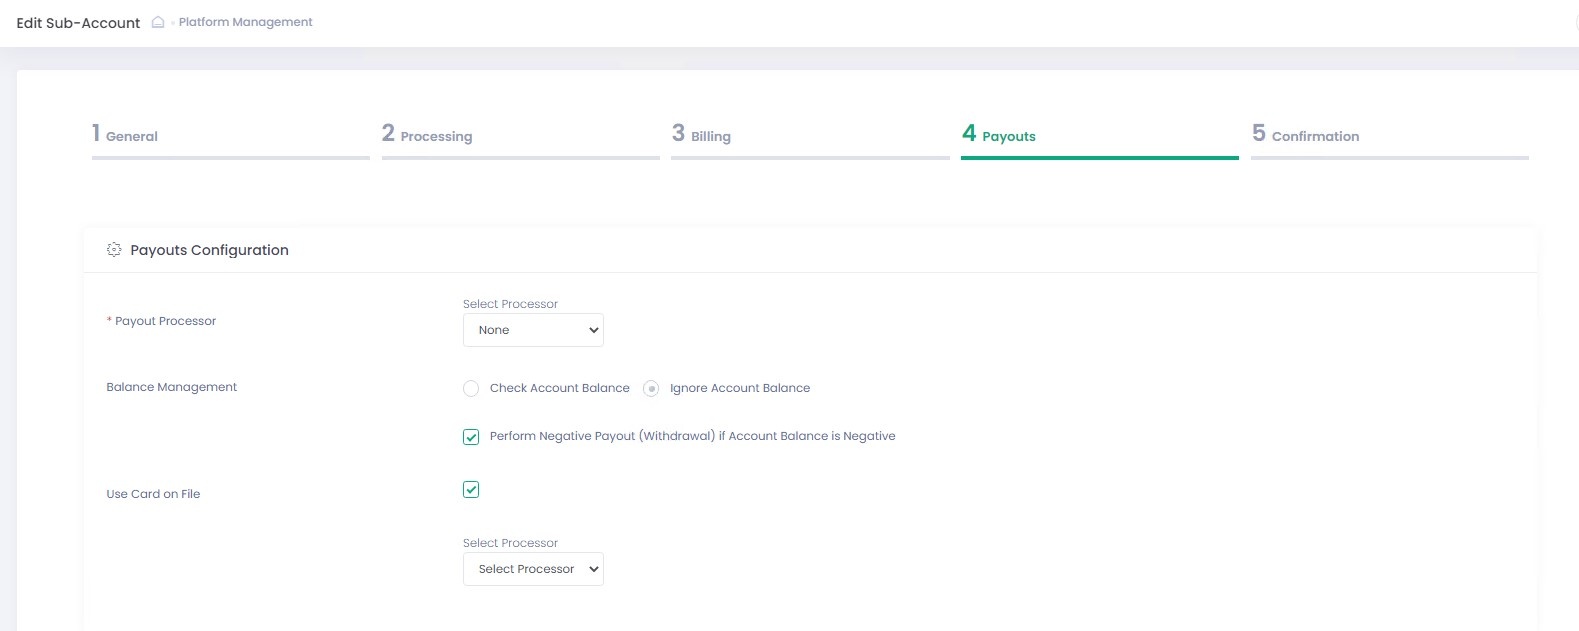
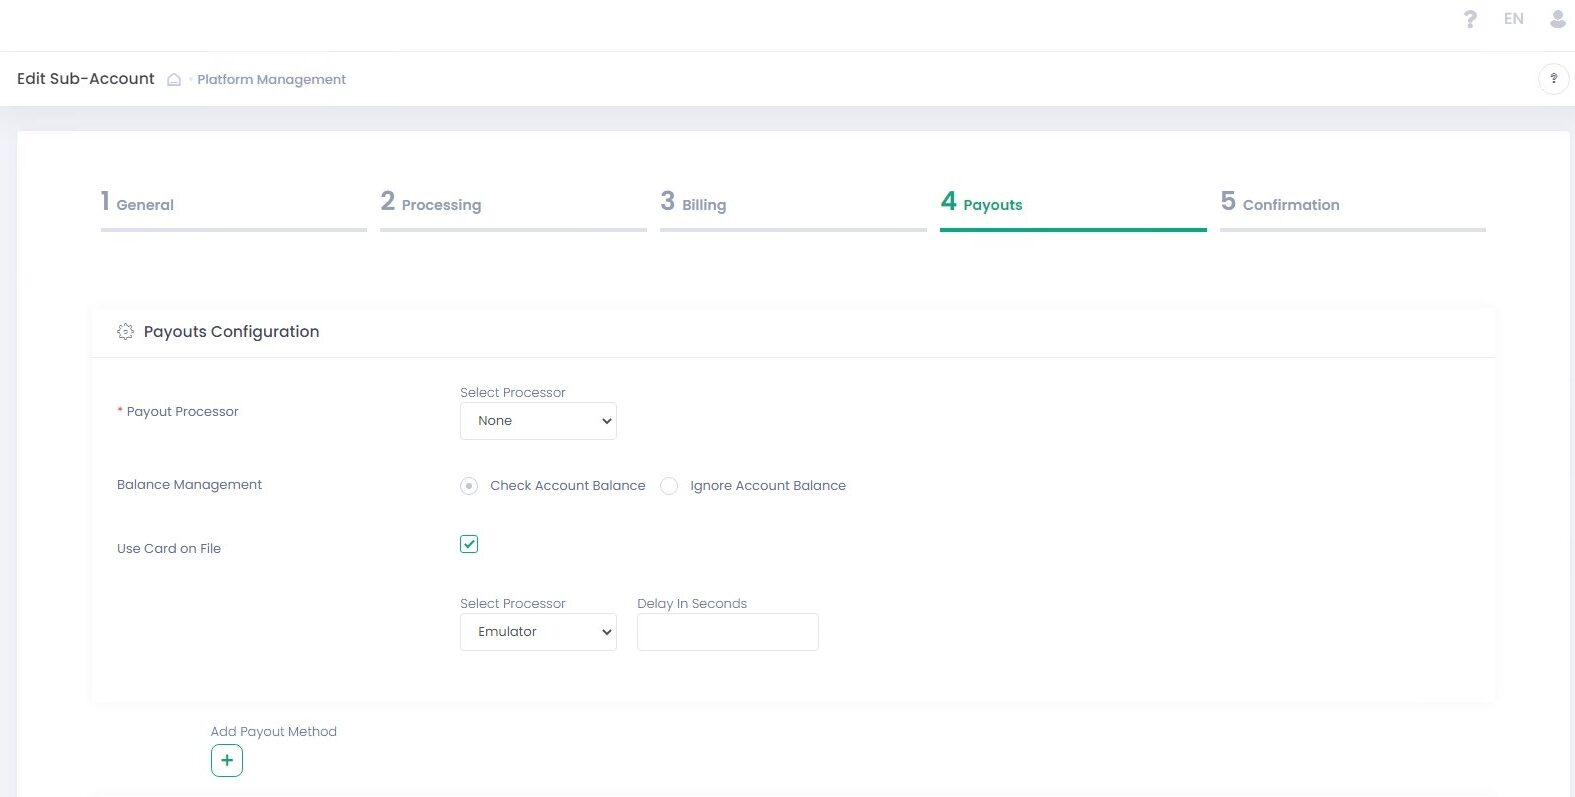
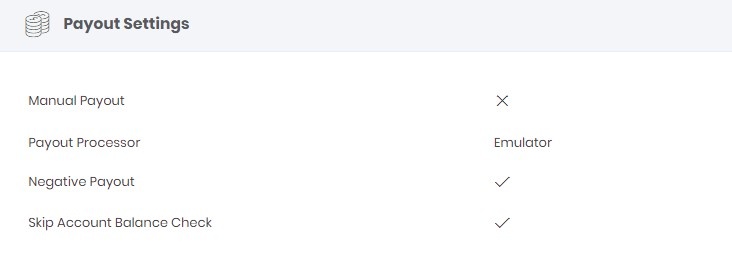
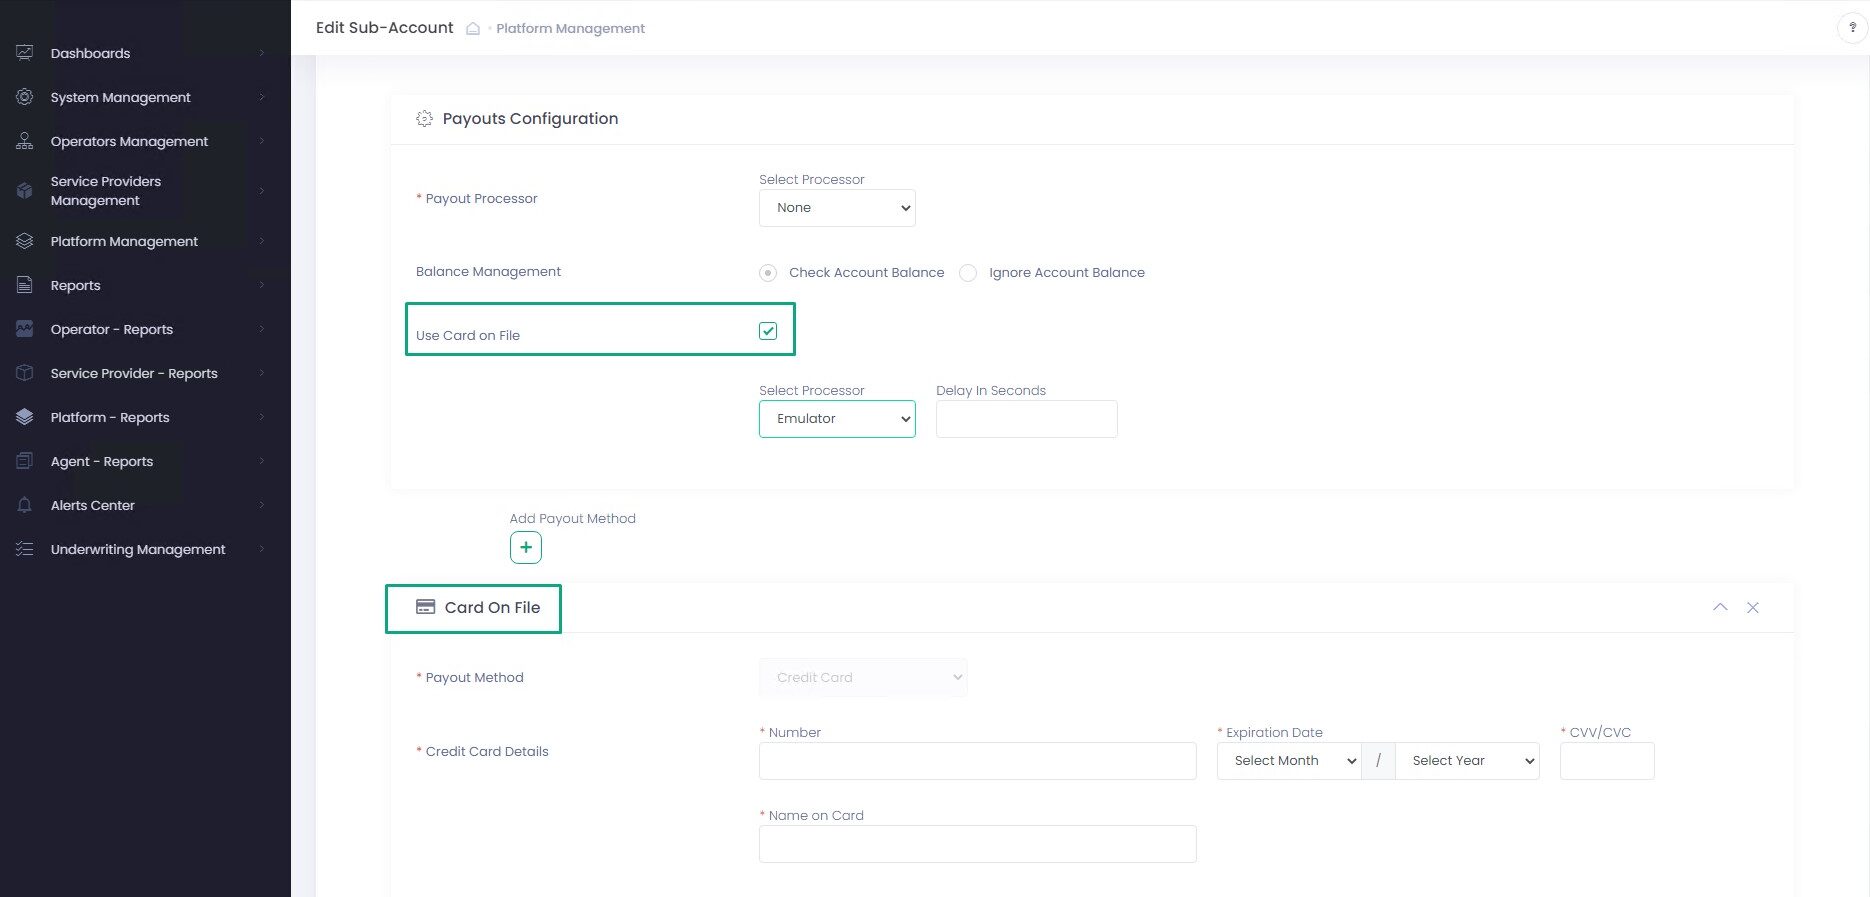 Use Card On File to process negative payouts using the provided credit card instead of the default ACH payment method.
Card On File is optional and in case activated and configured together with negative payouts, Payout Tool processes negative payouts based on provided in Card On File instructions and the negative payout payment method changes to Credit Card; otherwise, payment method is ACH and Payout Tool processes negative payouts the usual way.
To Create Card On File Instruction for Negative Payouts
Use Card On File to process negative payouts using the provided credit card instead of the default ACH payment method.
Card On File is optional and in case activated and configured together with negative payouts, Payout Tool processes negative payouts based on provided in Card On File instructions and the negative payout payment method changes to Credit Card; otherwise, payment method is ACH and Payout Tool processes negative payouts the usual way.
To Create Card On File Instruction for Negative Payouts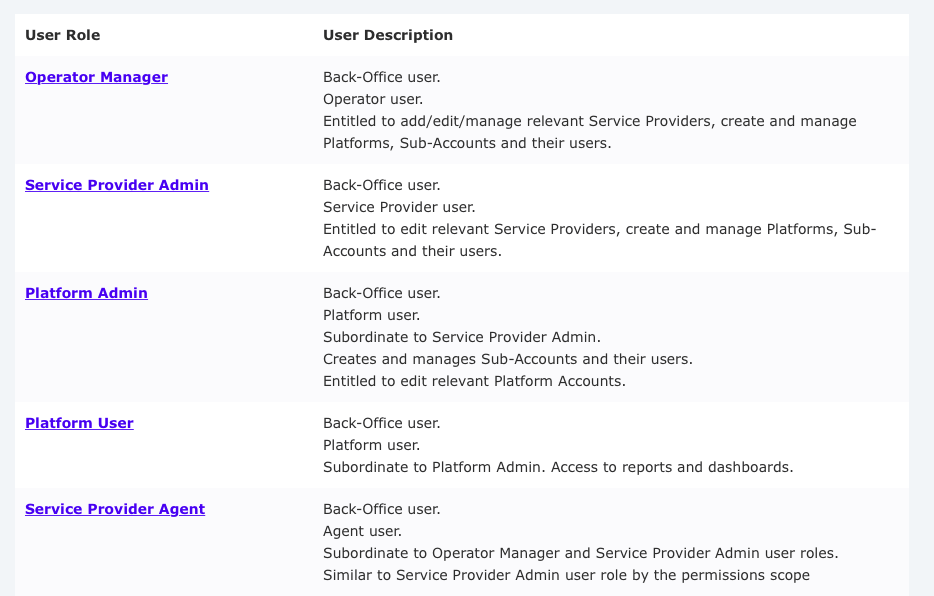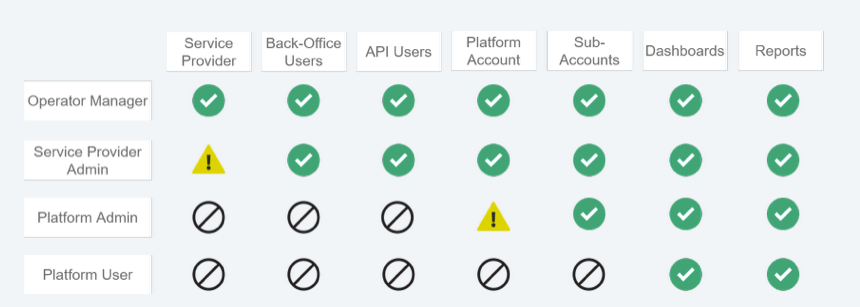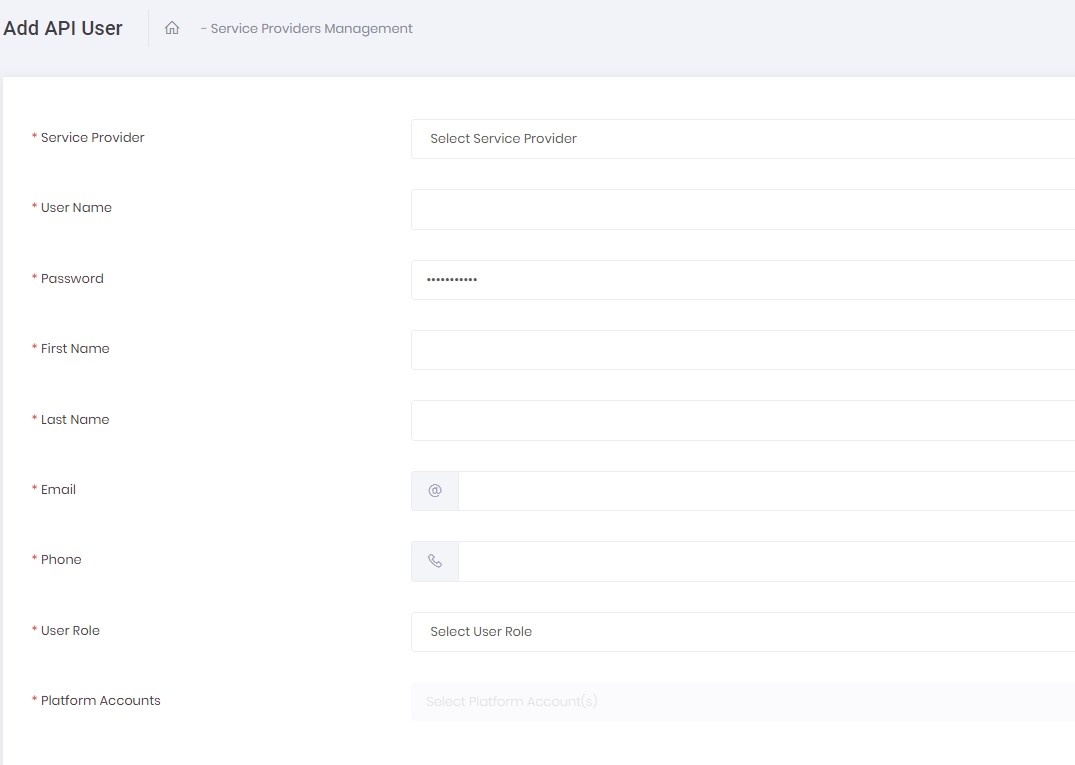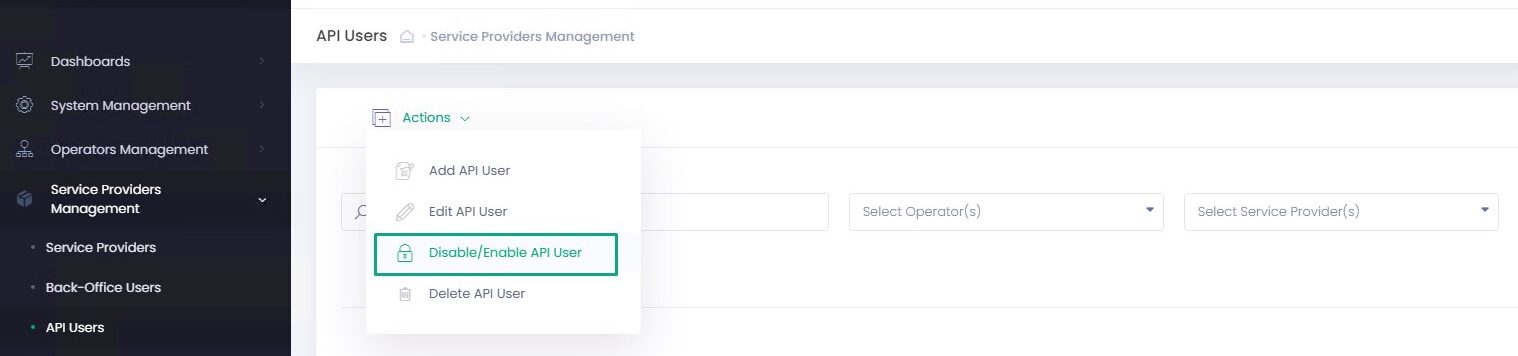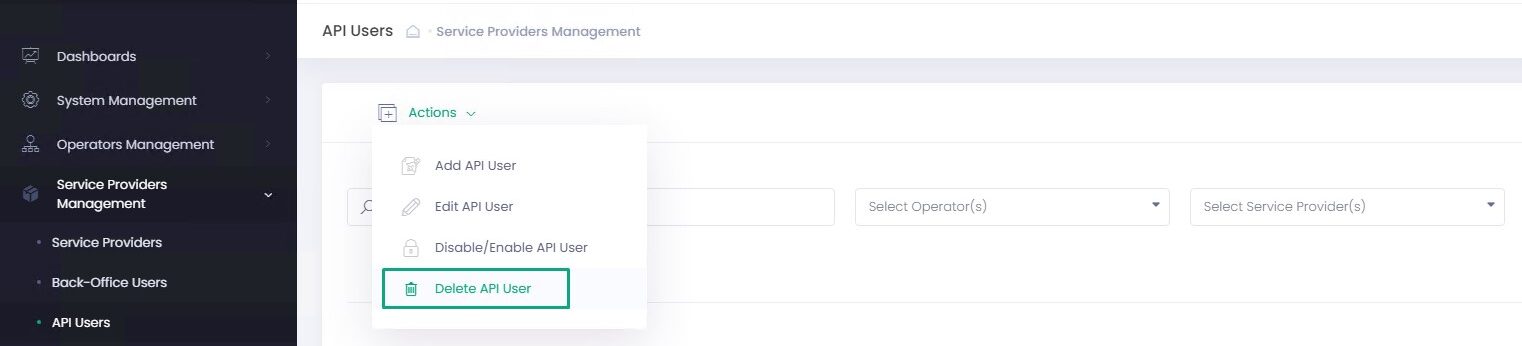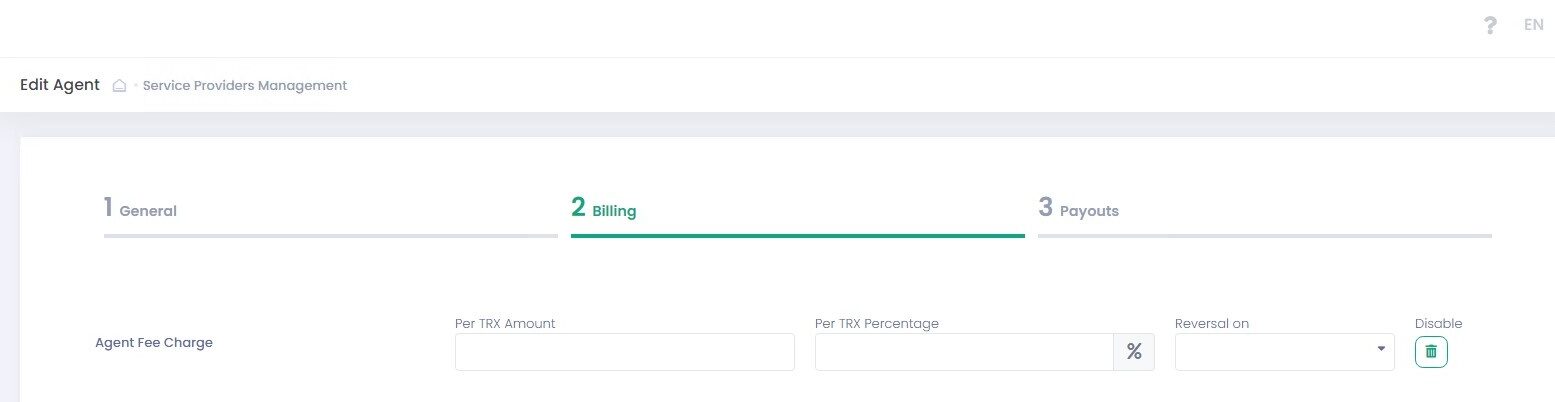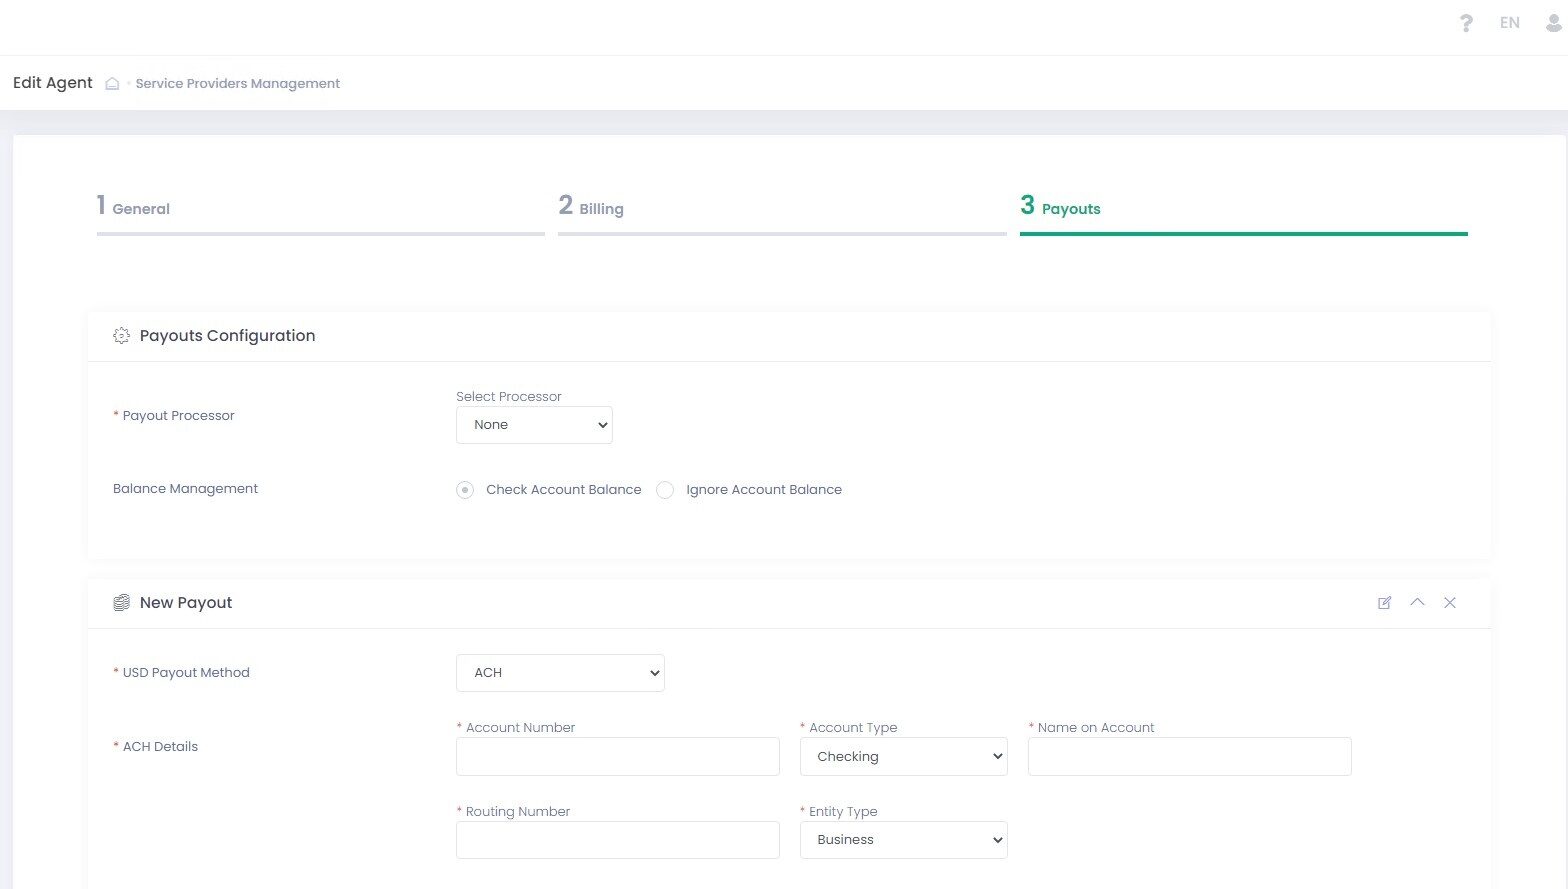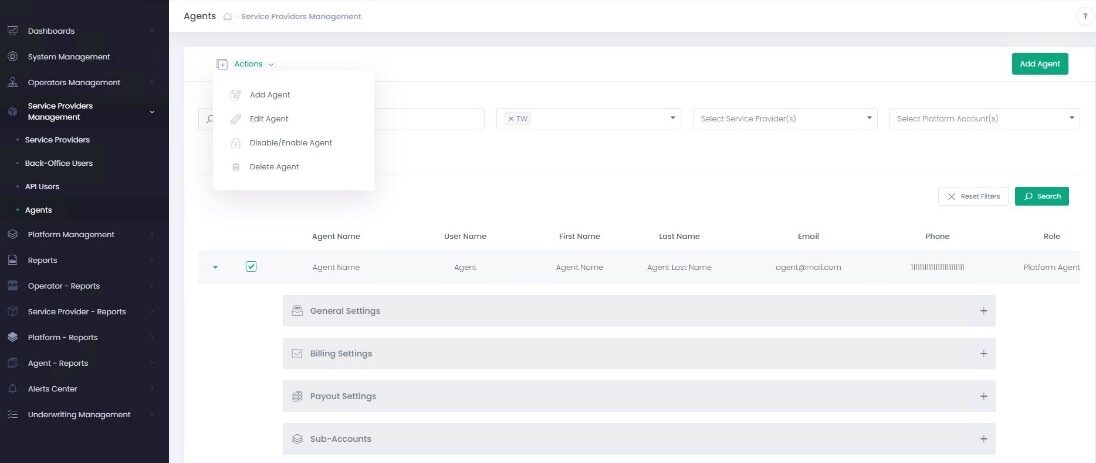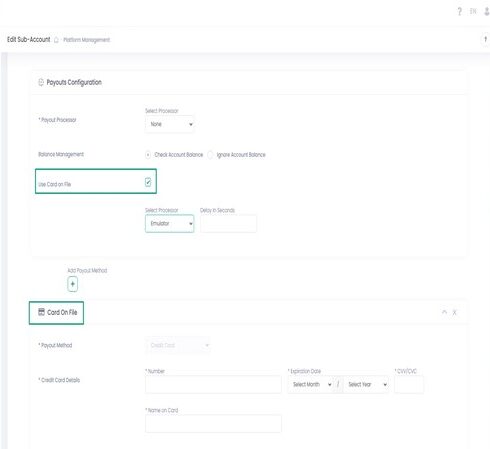


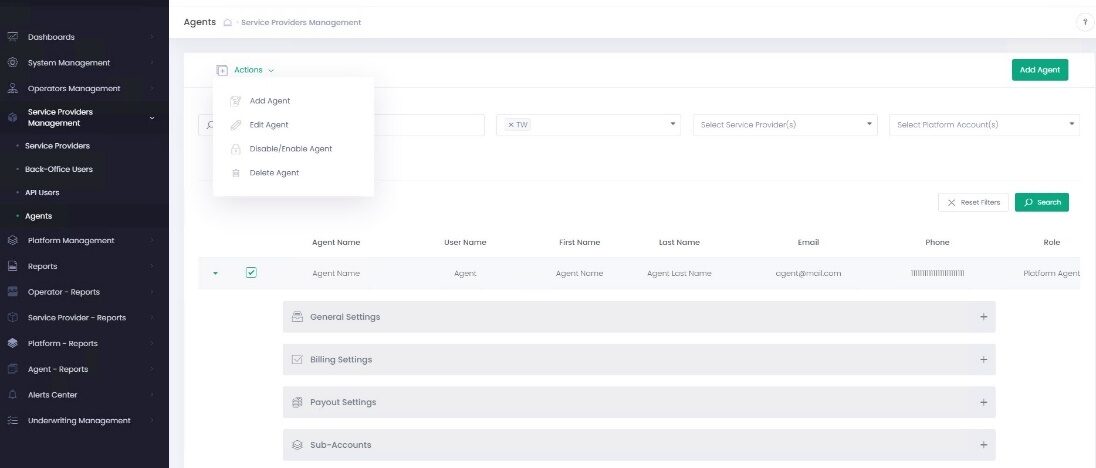
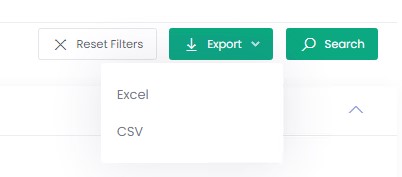


 Use report filter to narrow down your search parameters.
To display the report for a specific Sub-Account select Service Provider, Platform Account and Sub-Account.
The prior selection determines the latter available options.
Use Date filter parameters to generate a report for a specific date or a date range.
Use report filter to narrow down your search parameters.
To display the report for a specific Sub-Account select Service Provider, Platform Account and Sub-Account.
The prior selection determines the latter available options.
Use Date filter parameters to generate a report for a specific date or a date range.
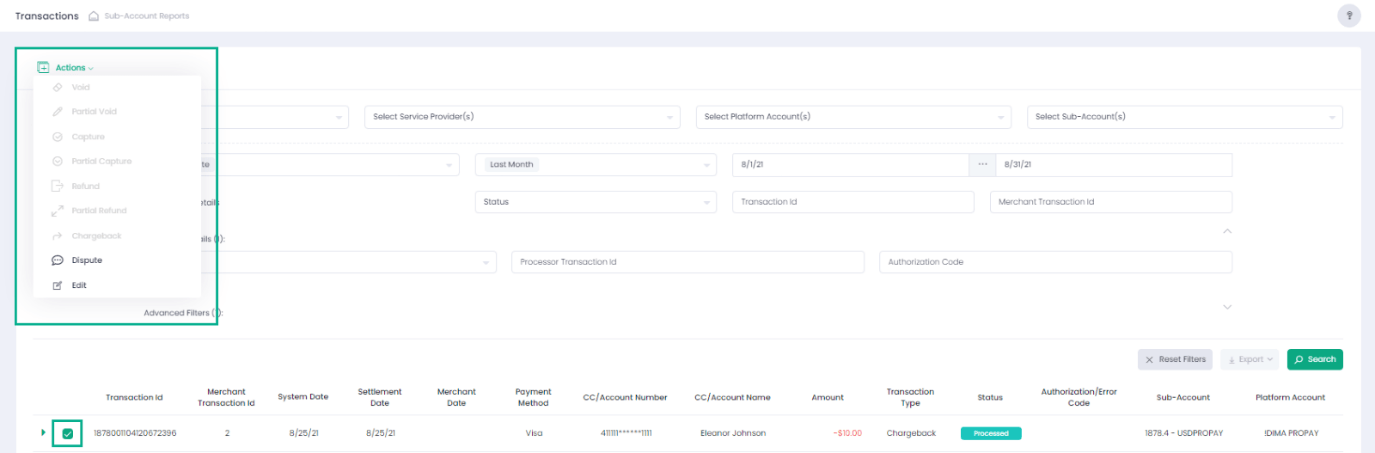 Select a specific transaction and click Actions in the upper-left report filter area to see what actions you are authorized to perform on the selected transaction or a set of transactions in case you have selected more than one transaction.
The following Actions might be available, available actions depend on Parent Transaction.
Select a specific transaction and click Actions in the upper-left report filter area to see what actions you are authorized to perform on the selected transaction or a set of transactions in case you have selected more than one transaction.
The following Actions might be available, available actions depend on Parent Transaction.
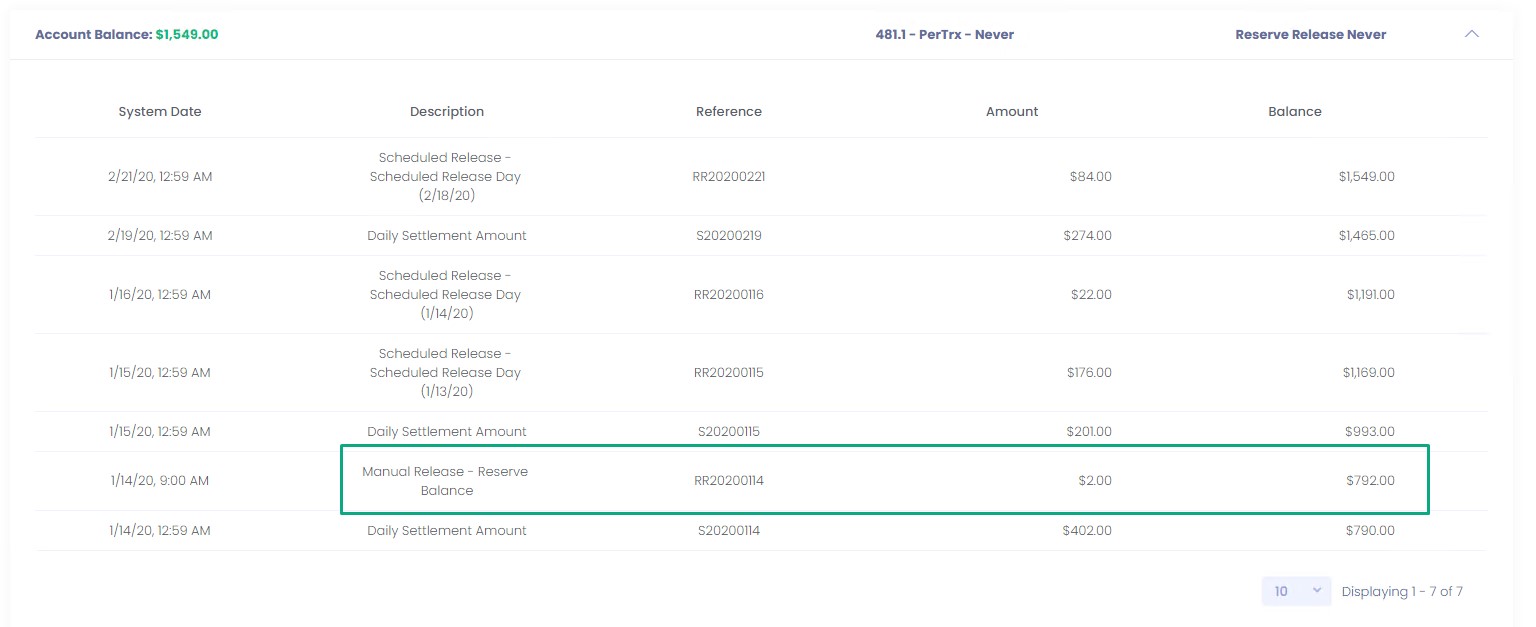 Account Balance displays the current Sub-Account balance amount:
Account Balance = Settlements – Processed Payouts – Fees
In this section you can also display Reserve Balance Released transactions.
Such transactions have positive amount values and a corresponding description.
Cross-Report Navigation
You can use hyperlinks embedded in the report to navigate to relevant reports:
Account Balance displays the current Sub-Account balance amount:
Account Balance = Settlements – Processed Payouts – Fees
In this section you can also display Reserve Balance Released transactions.
Such transactions have positive amount values and a corresponding description.
Cross-Report Navigation
You can use hyperlinks embedded in the report to navigate to relevant reports:
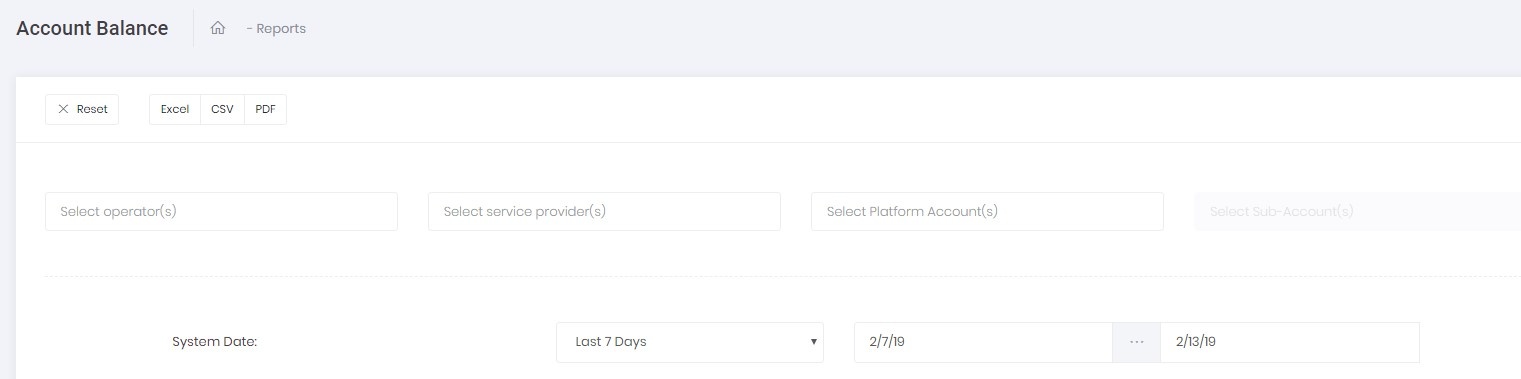 Use report filter to narrow down your search parameters.
To display the report for a specific Sub-Account select Service Provider, Platform Account and Sub-Account. The prior selection determines the latter available options.
Use Date filter parameters to generate a report for a specific date or a date range.
Use report filter to narrow down your search parameters.
To display the report for a specific Sub-Account select Service Provider, Platform Account and Sub-Account. The prior selection determines the latter available options.
Use Date filter parameters to generate a report for a specific date or a date range.
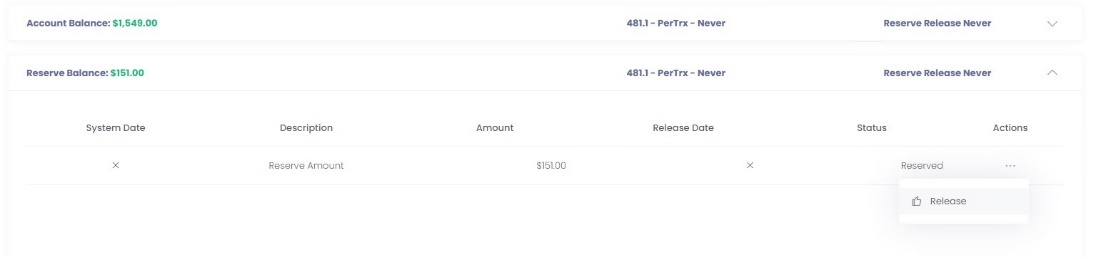
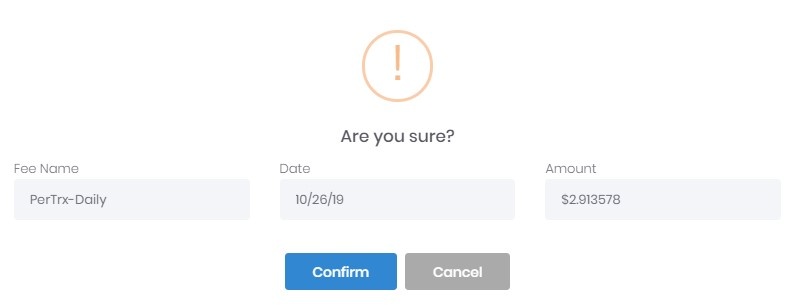
 Release of Unscheduled Fees You can perform manual release for reserve balance fees without scheduled release date.
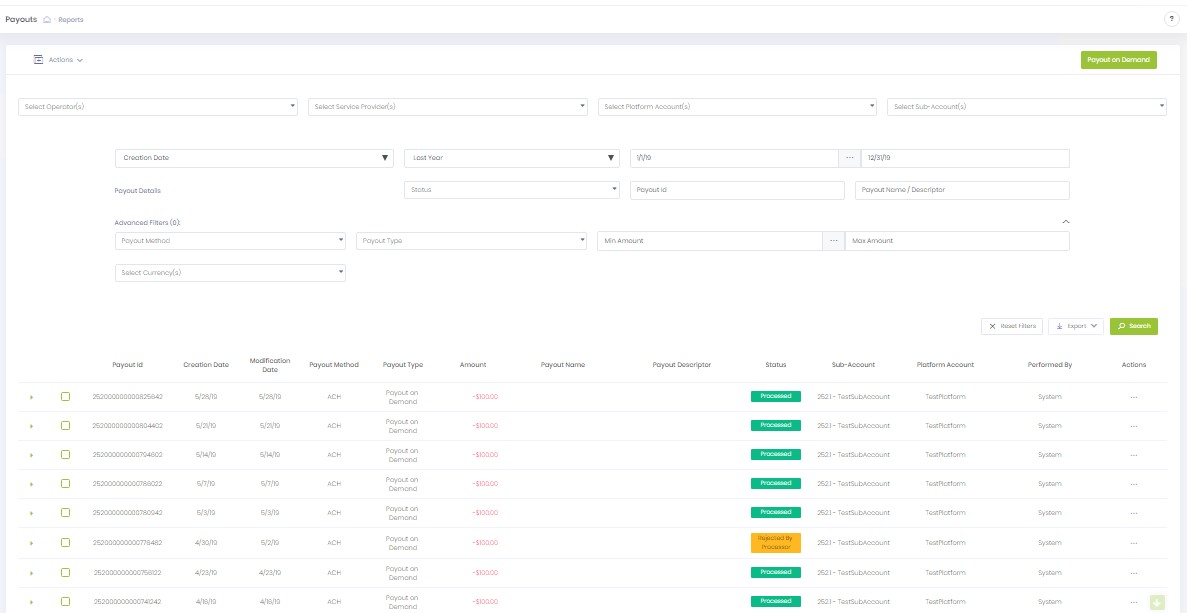 Payouts report provides access to all your Sub-Account payouts history and allows to perform actions on payouts all in one place based on your user’s permissions.
Query payouts for a specific Sub-Account, view payout parameters and perform a set of manual actions: accept, reject, approve, cancel and reprocess.
Payouts report provides access to all your Sub-Account payouts history and allows to perform actions on payouts all in one place based on your user’s permissions.
Query payouts for a specific Sub-Account, view payout parameters and perform a set of manual actions: accept, reject, approve, cancel and reprocess. 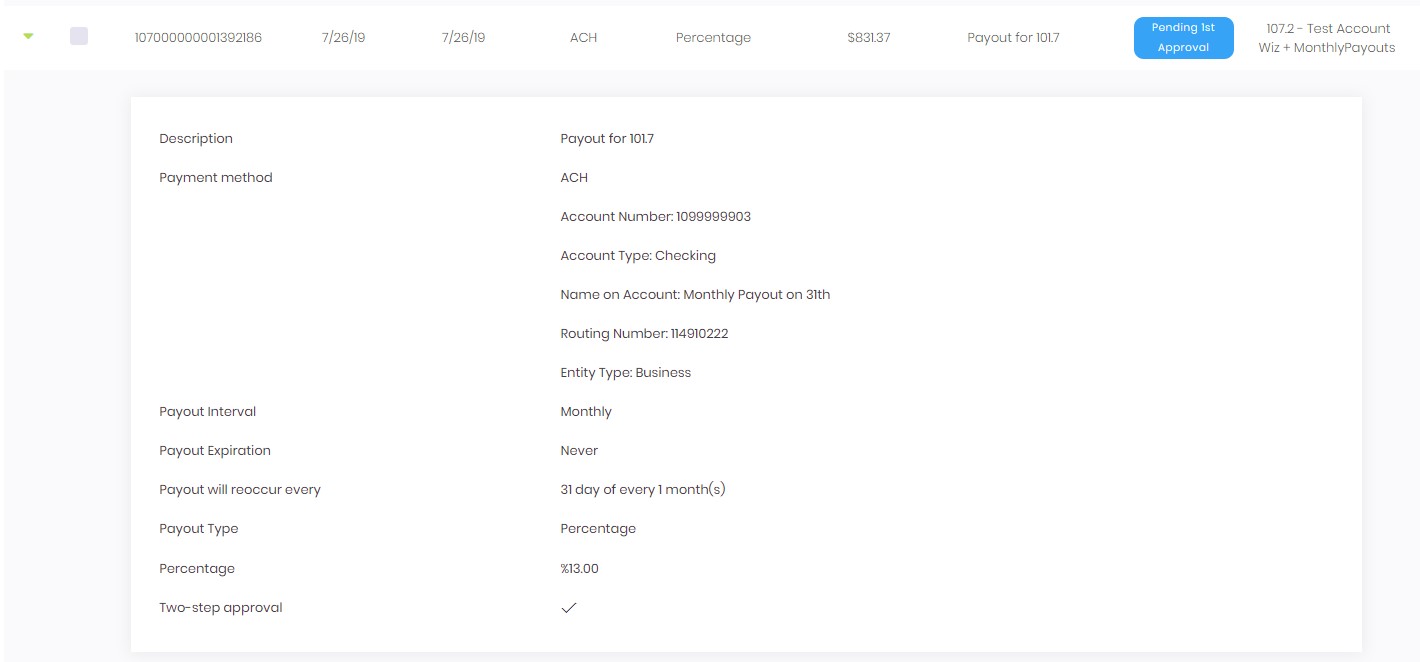 Click Arrow next to the Payout Name in the report grid to display a Payout Information and click Plus to unfold a Payout details.
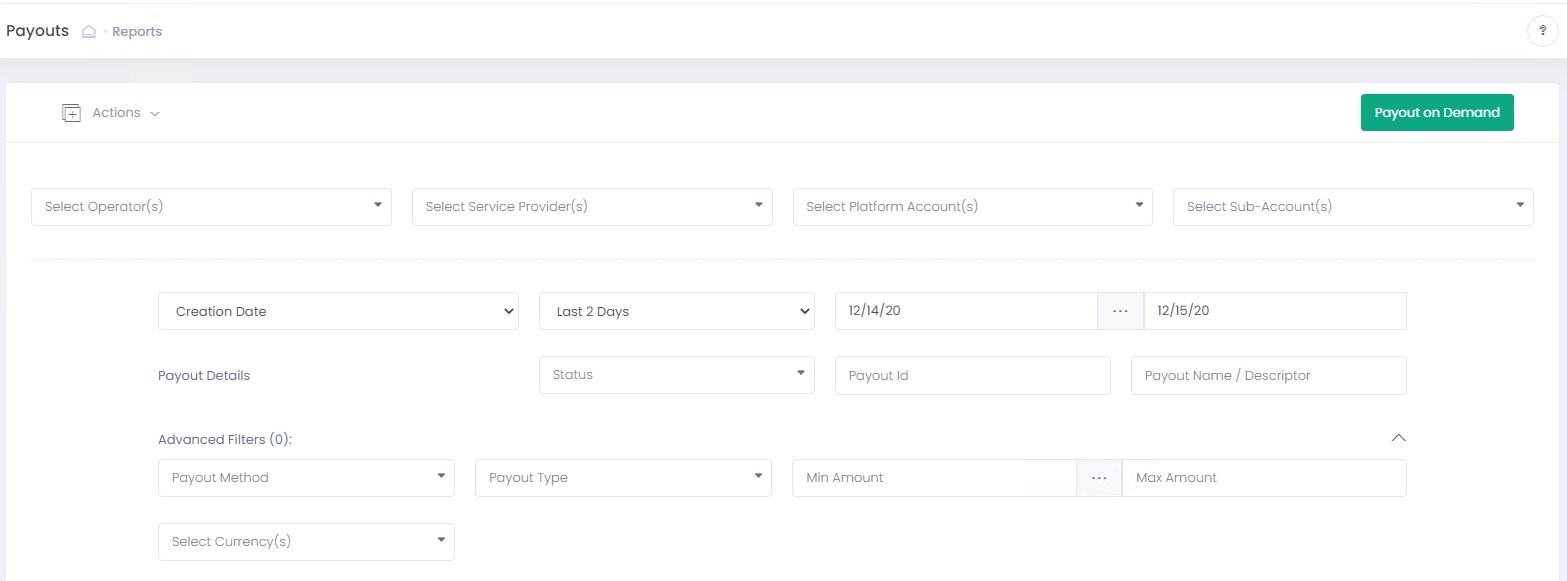
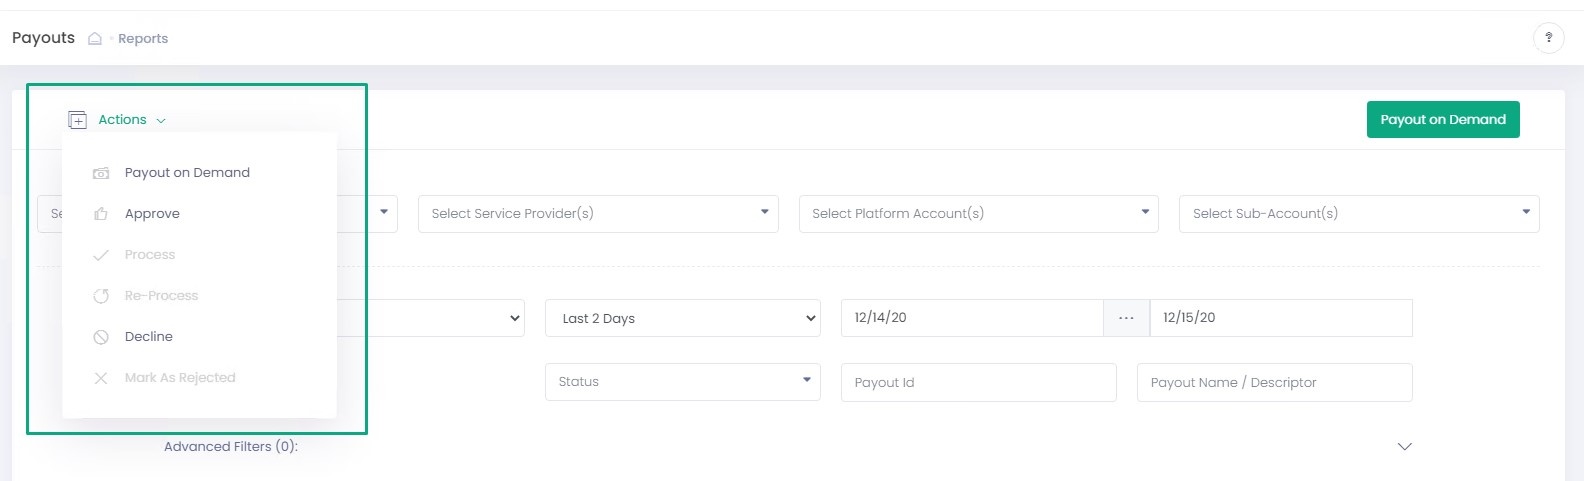 Select at least one payout checkbox and click Actions in the upper-left search filter area to see what actions you can perform on selected payouts.


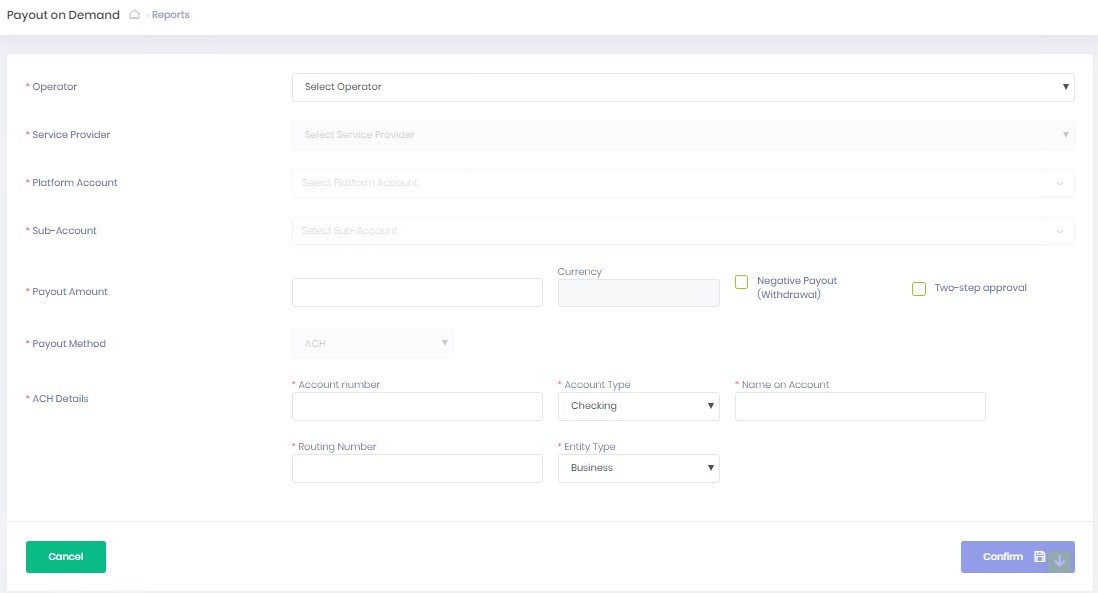
 Payouts Reconciliation report displays detailed Payout information allowing clients to have an additional view when attempting to reconcile the funds paid out, to the transactions they apply to. .
The Report includes the summary and detailed data pertaining to the following sections in relation to a specific Payout.
The following payout types represented in the report
Payouts Reconciliation report displays detailed Payout information allowing clients to have an additional view when attempting to reconcile the funds paid out, to the transactions they apply to. .
The Report includes the summary and detailed data pertaining to the following sections in relation to a specific Payout.
The following payout types represented in the report
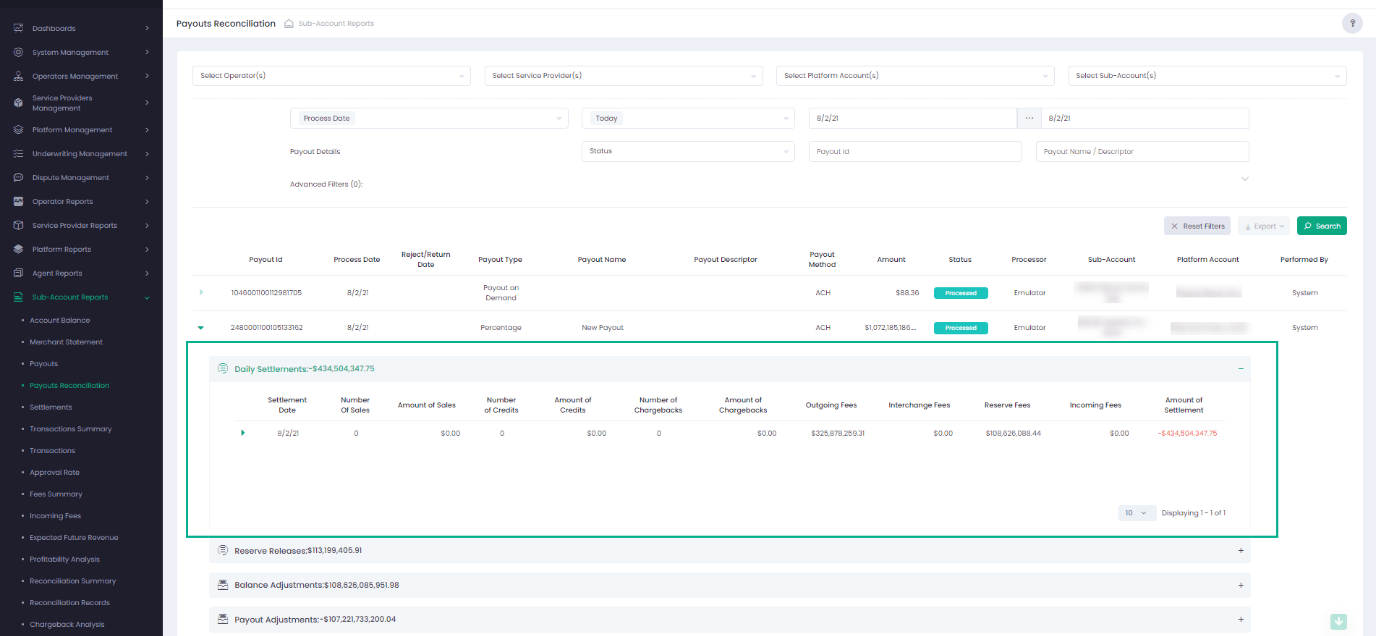 For information about the settlement report parameters please refer to the Settlement Report.
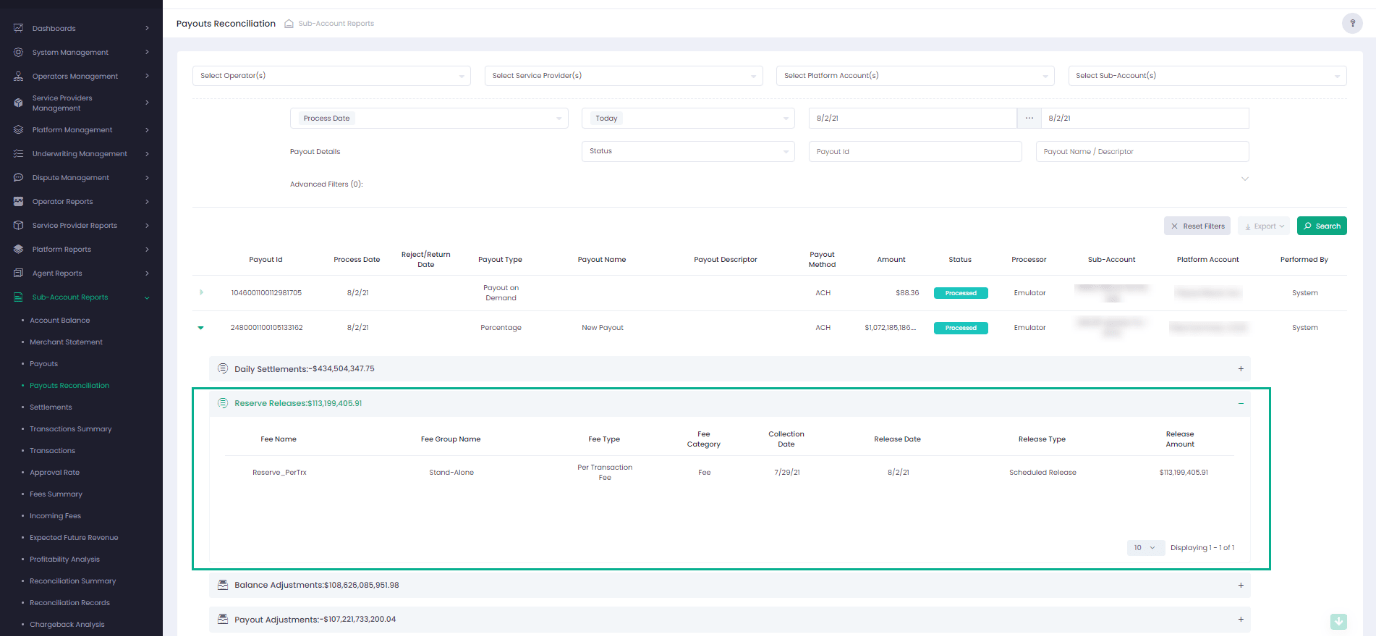
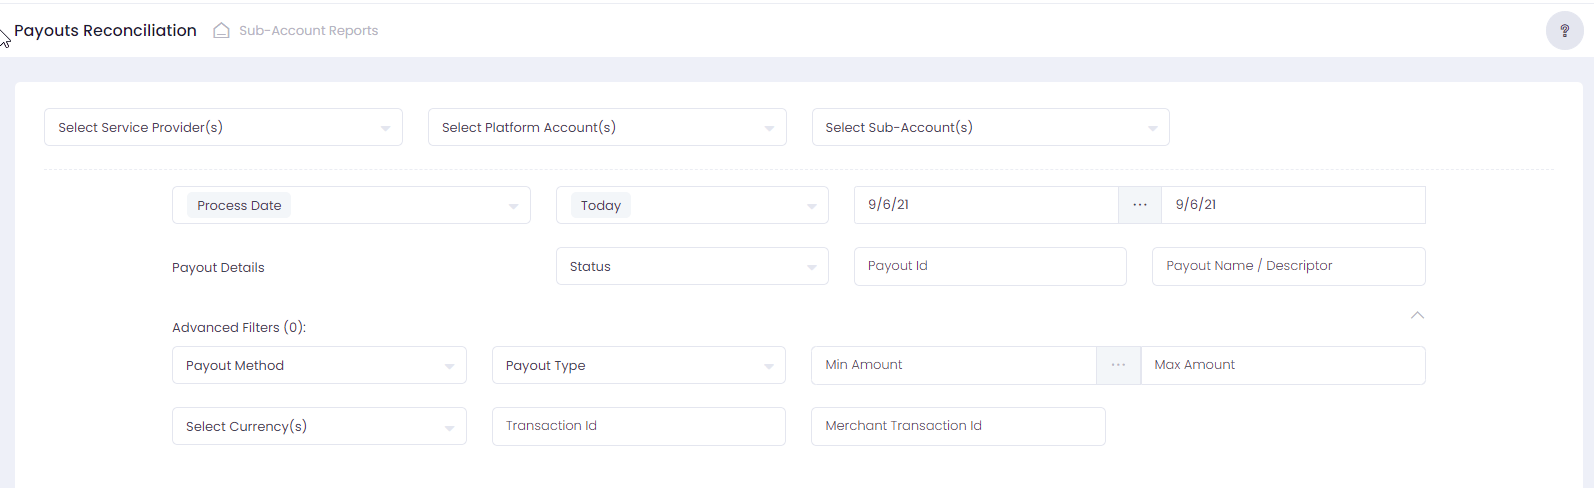 Use report filter to narrow down your search parameters.
To display the report for a specific Sub-Account select Service Provider, Platform Account and Sub-Account.
The prior selection determines the latter available options.
Use Date filter to set Process Date or Reject/Return Date for the report.
In the Payout Details section, you can choose a payout Status (processed, rejected), Payout Id and a Payout Name for your query.
Use Advanced Filters to set:
Use report filter to narrow down your search parameters.
To display the report for a specific Sub-Account select Service Provider, Platform Account and Sub-Account.
The prior selection determines the latter available options.
Use Date filter to set Process Date or Reject/Return Date for the report.
In the Payout Details section, you can choose a payout Status (processed, rejected), Payout Id and a Payout Name for your query.
Use Advanced Filters to set:
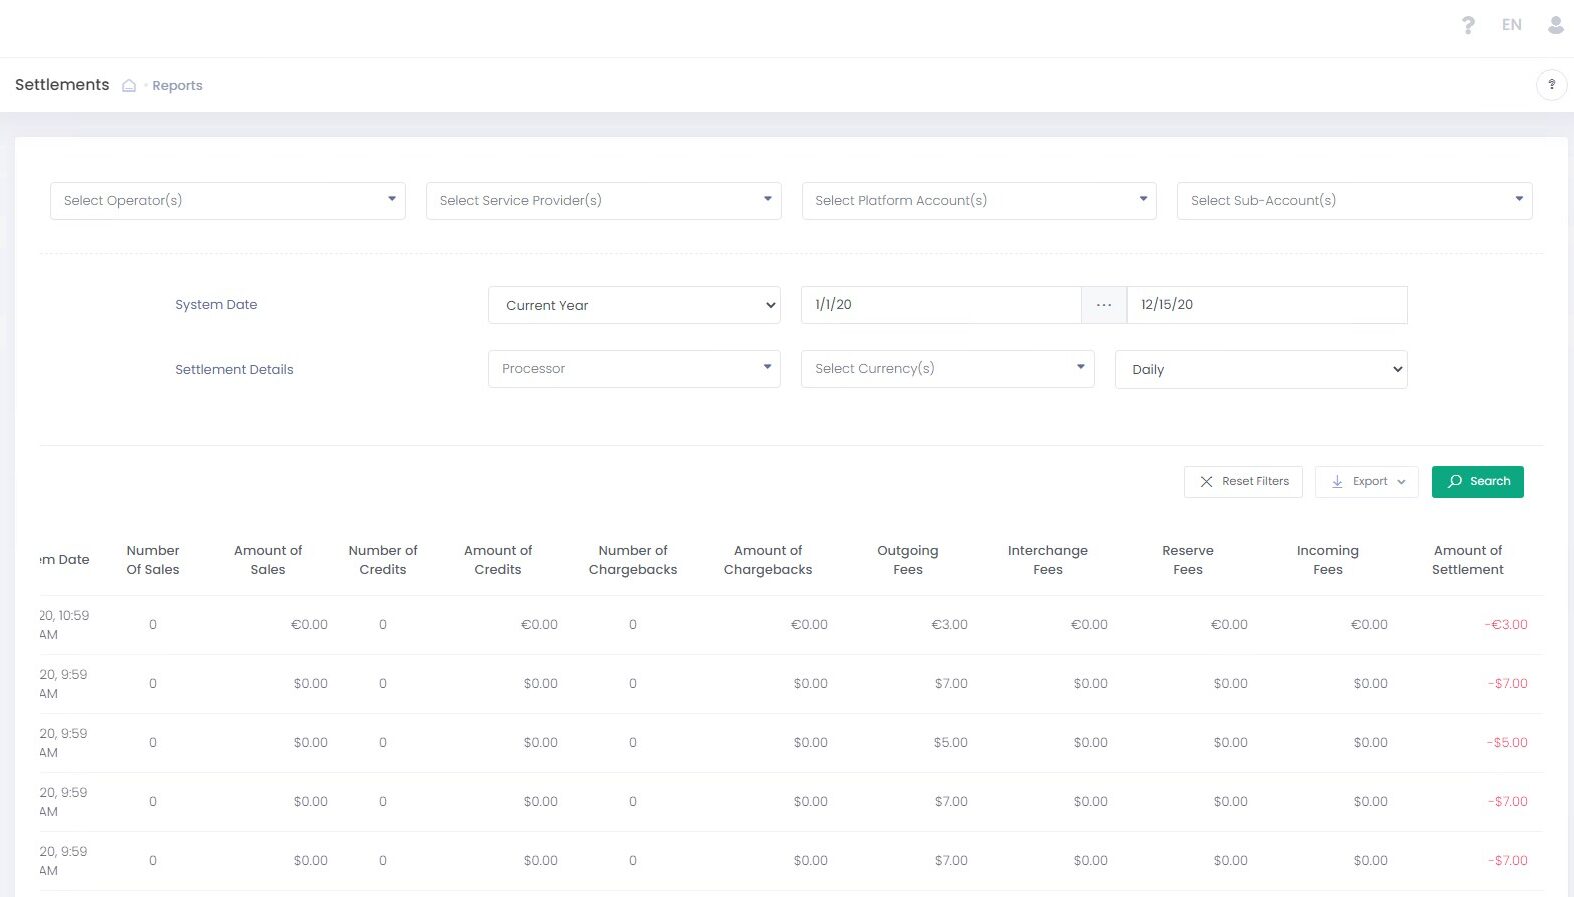 Settlement is the net calculated transfer amount from Buyers to Merchants (Sellers).
Sales (Charges, Captures, Partial Captures), Incoming Fees, Reversals generate a positive settlement balance.
Credits (Credits, Refunds, Partial Refunds, Cancels), Chargebacks and Outgoing Fees generate a negative settlement balance.
Settlement is the net calculated transfer amount from Buyers to Merchants (Sellers).
Sales (Charges, Captures, Partial Captures), Incoming Fees, Reversals generate a positive settlement balance.
Credits (Credits, Refunds, Partial Refunds, Cancels), Chargebacks and Outgoing Fees generate a negative settlement balance.
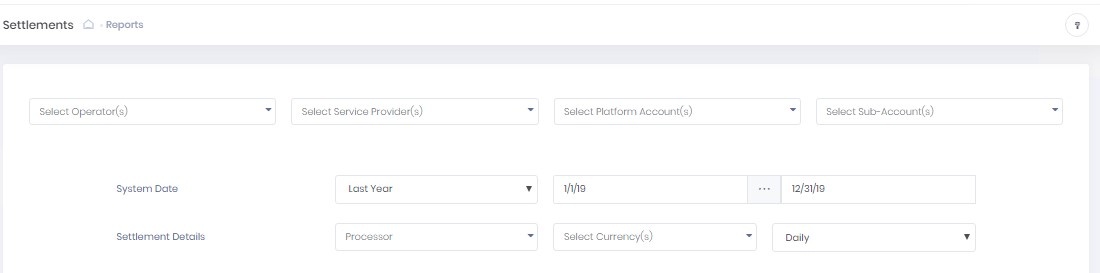 To display the report for a specific Sub-Account select Service Provider, Platform Account and Sub-Account.
The prior selection determines the latter available options.
Use Date filter to get a report for a specific date.
Settlements report is based on the configured Cut-Off time.
All Sale transactions canceled BEFORE the Cut-off are not included in Number Of Sales and Amount of Sales.
Use Settlements Details filter to filter by the external Processor, set the report periodicity and filter by Currency. period.
Cross-Report Navigation
You can use embedded in the report hyperlinks to navigate to relevant reports:
To display the report for a specific Sub-Account select Service Provider, Platform Account and Sub-Account.
The prior selection determines the latter available options.
Use Date filter to get a report for a specific date.
Settlements report is based on the configured Cut-Off time.
All Sale transactions canceled BEFORE the Cut-off are not included in Number Of Sales and Amount of Sales.
Use Settlements Details filter to filter by the external Processor, set the report periodicity and filter by Currency. period.
Cross-Report Navigation
You can use embedded in the report hyperlinks to navigate to relevant reports:
 The Approval Rate Report provides count and volumes of successful Sales (Charges, Captures, Partial Captures) transactions and approval rates for a selected period.
Each report record can be expanded to view statistics for all Credit, Sales and Authorization transactions for the selected period and system entity.
User can expand each section to preview all transactions and navigate directly to the Transaction Report for further investigation.
Click Total in the Date column summary to get redirected to the Transactions report filtered by the selected in the Approval Rate Report time range.
The Approval Rate Report provides count and volumes of successful Sales (Charges, Captures, Partial Captures) transactions and approval rates for a selected period.
Each report record can be expanded to view statistics for all Credit, Sales and Authorization transactions for the selected period and system entity.
User can expand each section to preview all transactions and navigate directly to the Transaction Report for further investigation.
Click Total in the Date column summary to get redirected to the Transactions report filtered by the selected in the Approval Rate Report time range.
 Transactions Summary Report provides Sales, Credits and Chargebacks transaction summary and payment method details for the selected time range and system entity.
 Transactions Report provides detailed information on real-time and history transactions per Sub-Account.
Transactions report displays standard transaction parameters like identifiers, dates, payment methods, amount, transaction status and other.
In addition, you can perform basic manual actions on your transactions like cancel transaction, capture or refund based on your user permissions.
Transactions Report provides detailed information on real-time and history transactions per Sub-Account.
Transactions report displays standard transaction parameters like identifiers, dates, payment methods, amount, transaction status and other.
In addition, you can perform basic manual actions on your transactions like cancel transaction, capture or refund based on your user permissions.
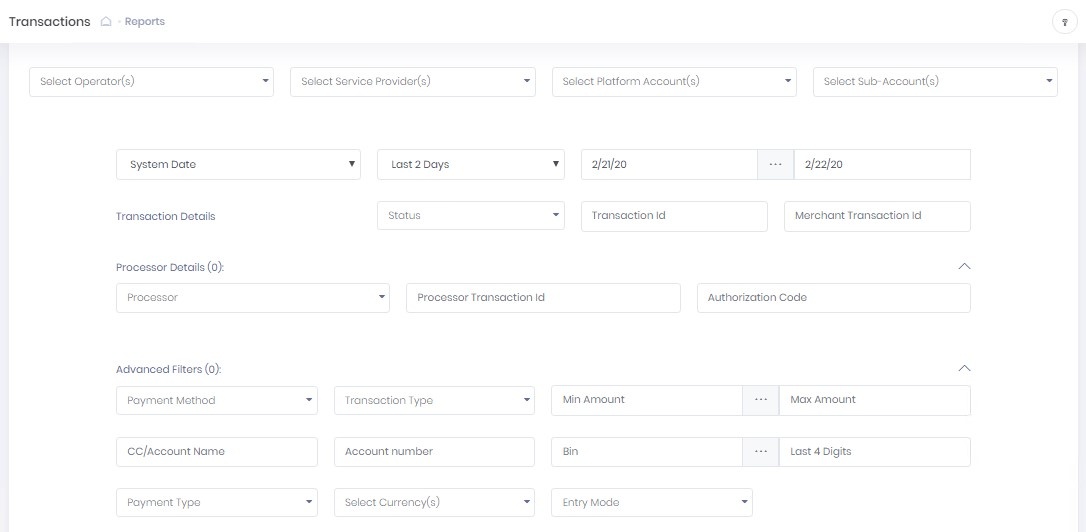 Use report filter to narrow down your search parameters.
To display the report for a specific Sub-Account select Service Provider, Platform Account and Sub-Account.
The prior selection determines the latter available options.
Use Date filter to generate a report based on either System Date or Merchant Date.
Use Settlement Date option to search transactions by the cut-off sum-up time and date.
Use report filter to narrow down your search parameters.
To display the report for a specific Sub-Account select Service Provider, Platform Account and Sub-Account.
The prior selection determines the latter available options.
Use Date filter to generate a report based on either System Date or Merchant Date.
Use Settlement Date option to search transactions by the cut-off sum-up time and date.  Use Transactions Details filter to specify transaction and merchant transaction identifiers together with the transaction status.
Display related transactions check box appears once you start entering your Transaction Id.
Use Processor Details filter specify the relevant Processor name, Processor Transaction Id and the processor Authorization Code.
Available processors are based on the Service Provider settings.
Use Transactions Details filter to specify transaction and merchant transaction identifiers together with the transaction status.
Display related transactions check box appears once you start entering your Transaction Id.
Use Processor Details filter specify the relevant Processor name, Processor Transaction Id and the processor Authorization Code.
Available processors are based on the Service Provider settings.
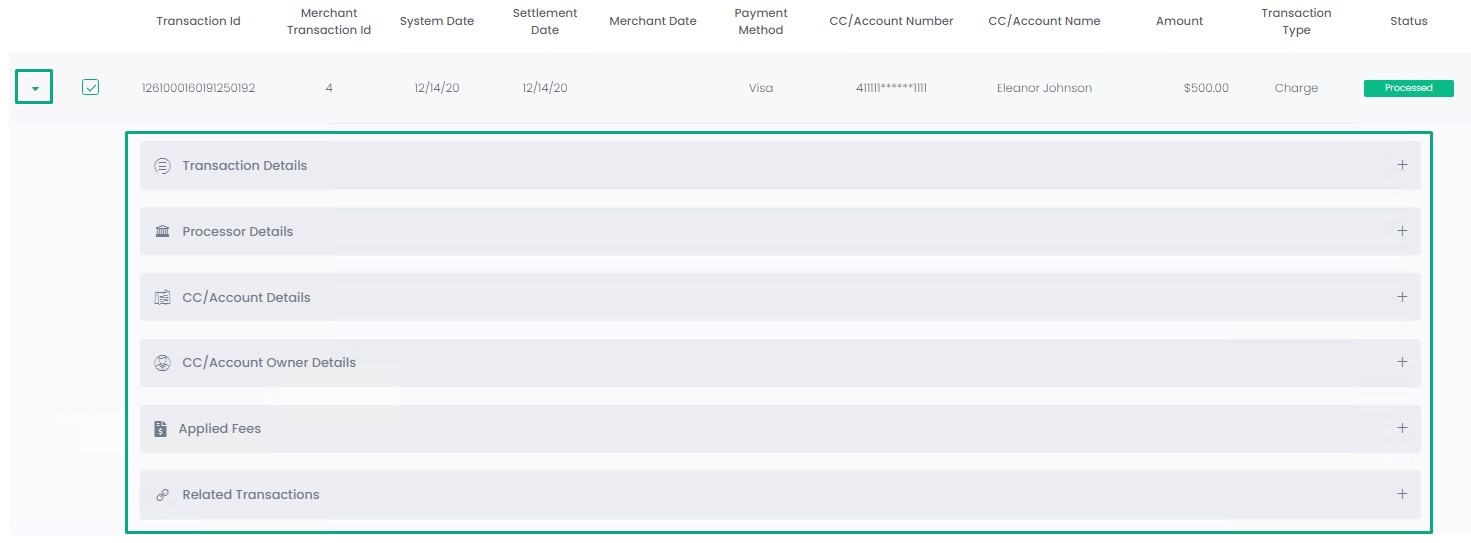 For each transaction record you may unfold the transaction record to display:
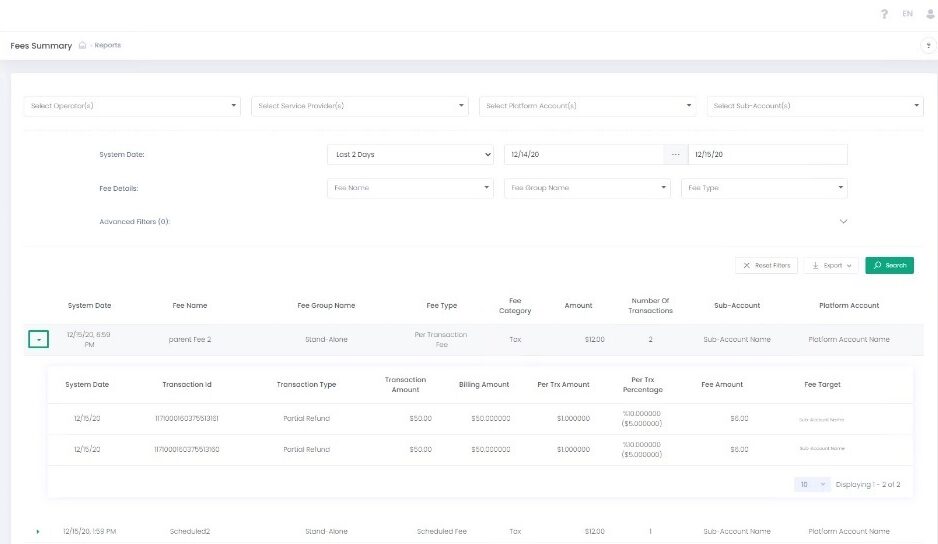 Fees Summary report provides a complete overview of all the incoming and outgoing fees that have been processed on a specific Sub-Account.
 Use report filter to narrow down your search parameters.
To display the report for a specific Sub-Account select Service Provider, Platform Account and Sub-Account.
The prior selection determines the latter available options.
Use Date filter to generate a report for a specific date or a date range.
Use Fee Details filter to set a specific Fee Name, Fee Group Name and Fee Type.
Use report filter to narrow down your search parameters.
To display the report for a specific Sub-Account select Service Provider, Platform Account and Sub-Account.
The prior selection determines the latter available options.
Use Date filter to generate a report for a specific date or a date range.
Use Fee Details filter to set a specific Fee Name, Fee Group Name and Fee Type.  In the Advanced Filters section, you can set (all parameters are multi-select):
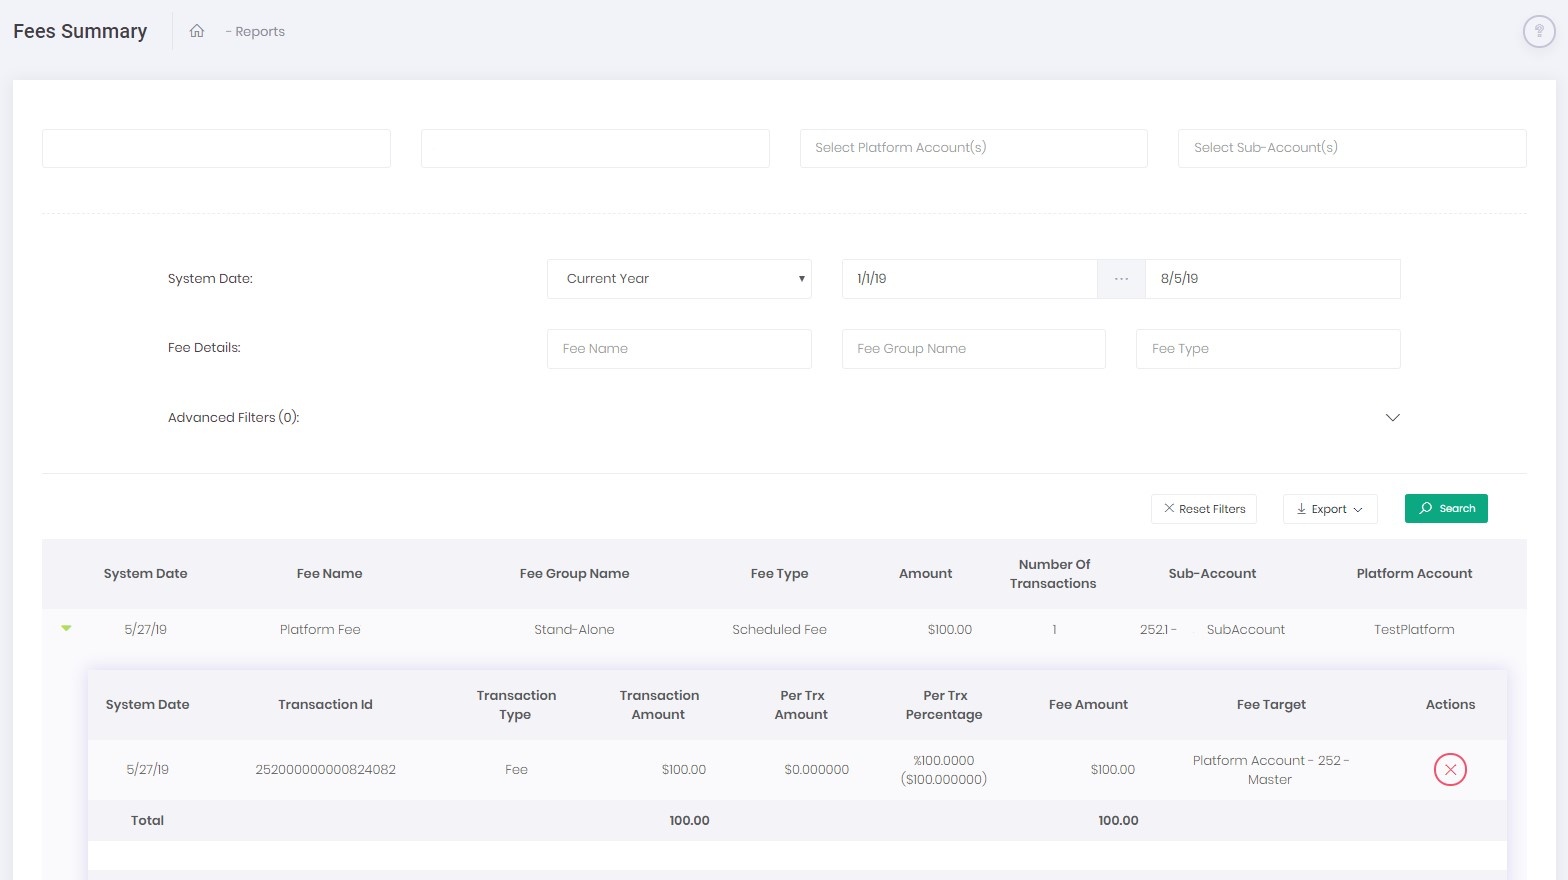 Cancel Fee operation is enabled for Scheduled Fee types.
 In the Fees Summary Report cancelled fees are displayed in the fee details grid with the negative Amount value and the transaction type Cancelled.
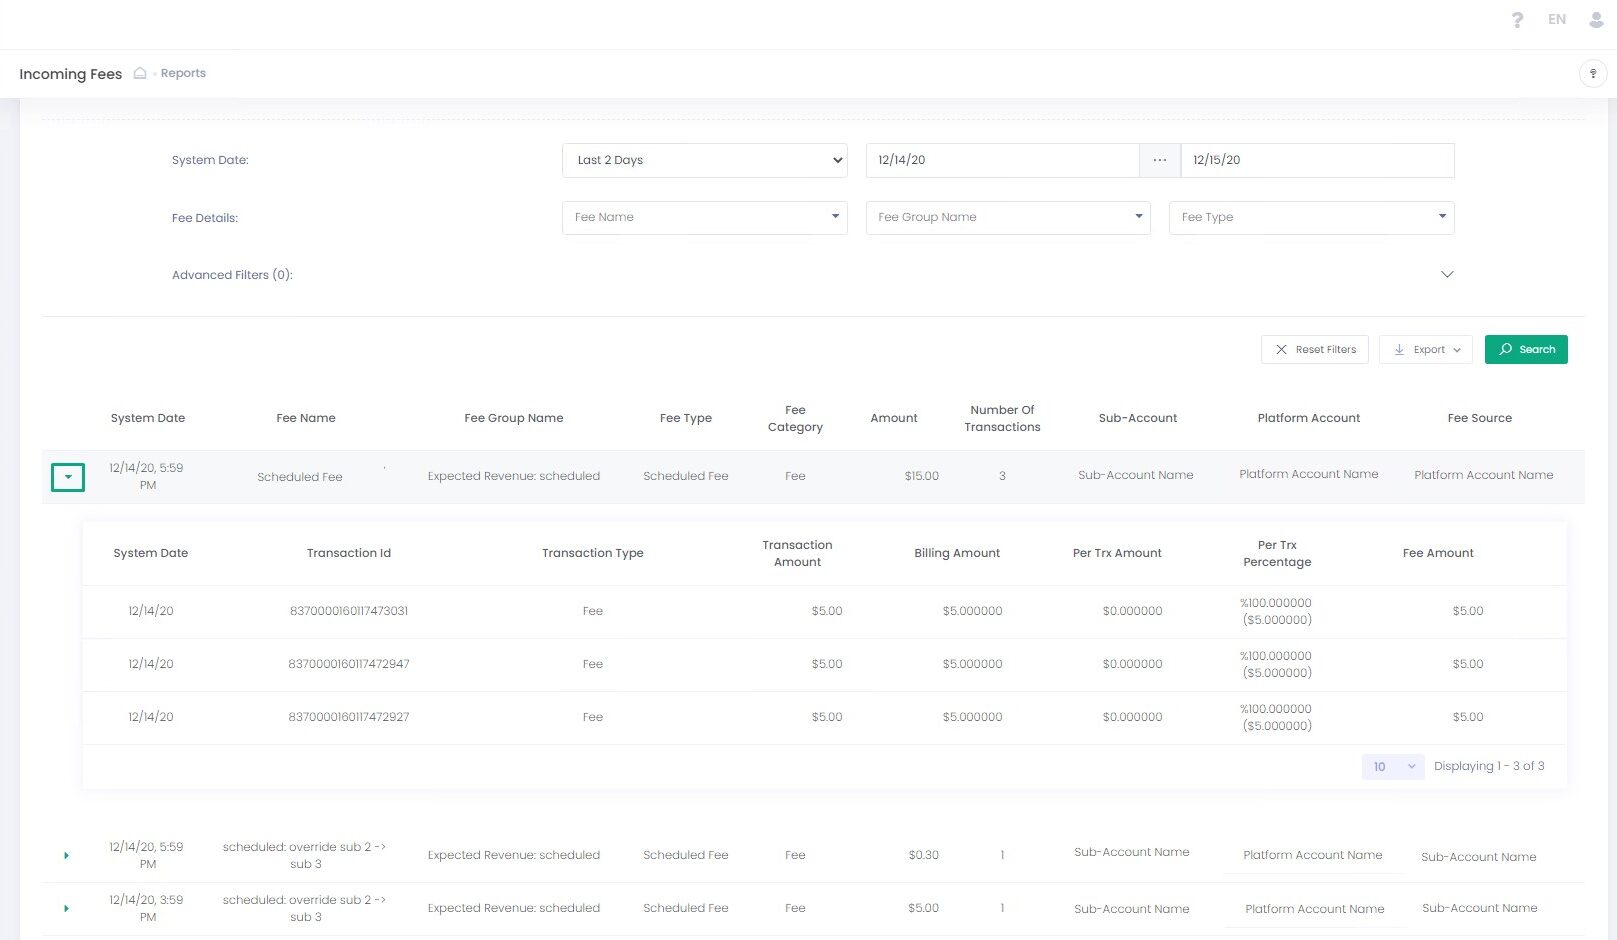

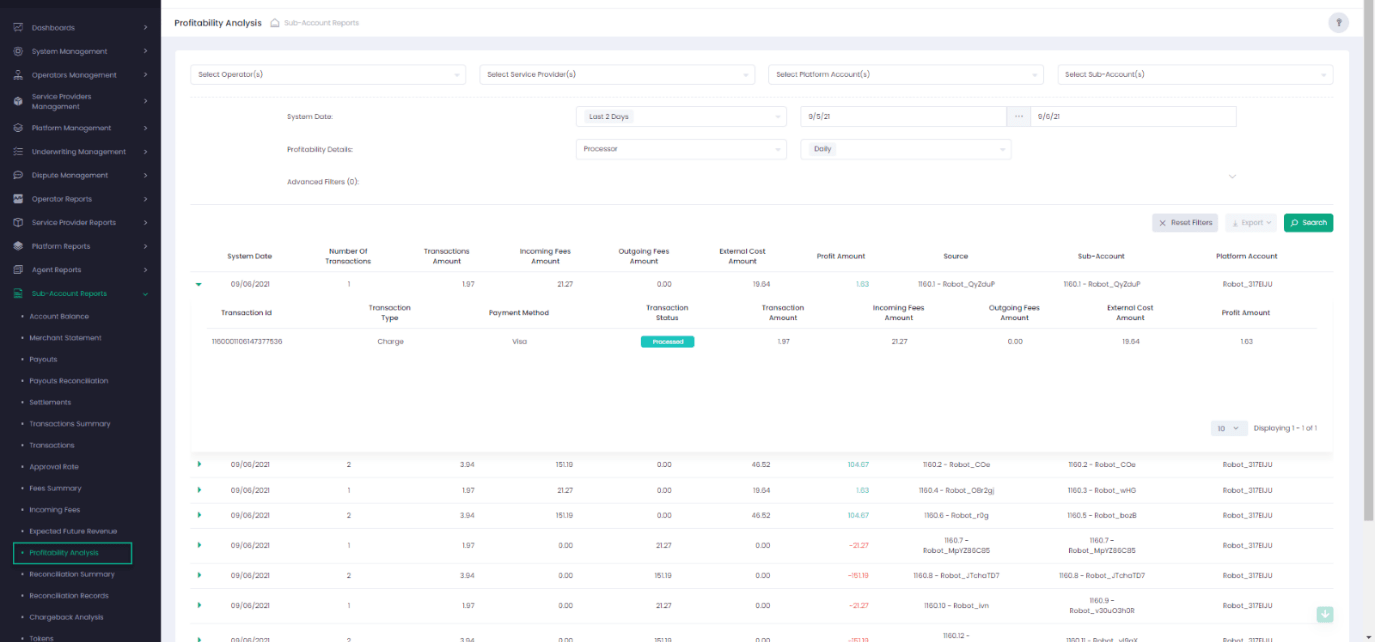 Profitability Analysis report allows to view incoming fees (fees received by entity), outgoing fees and external costs (external outgoing fees) and to display a Profit Amount.
 In the Advanced Filters section, you can specify additional parameters to narrow down your search:
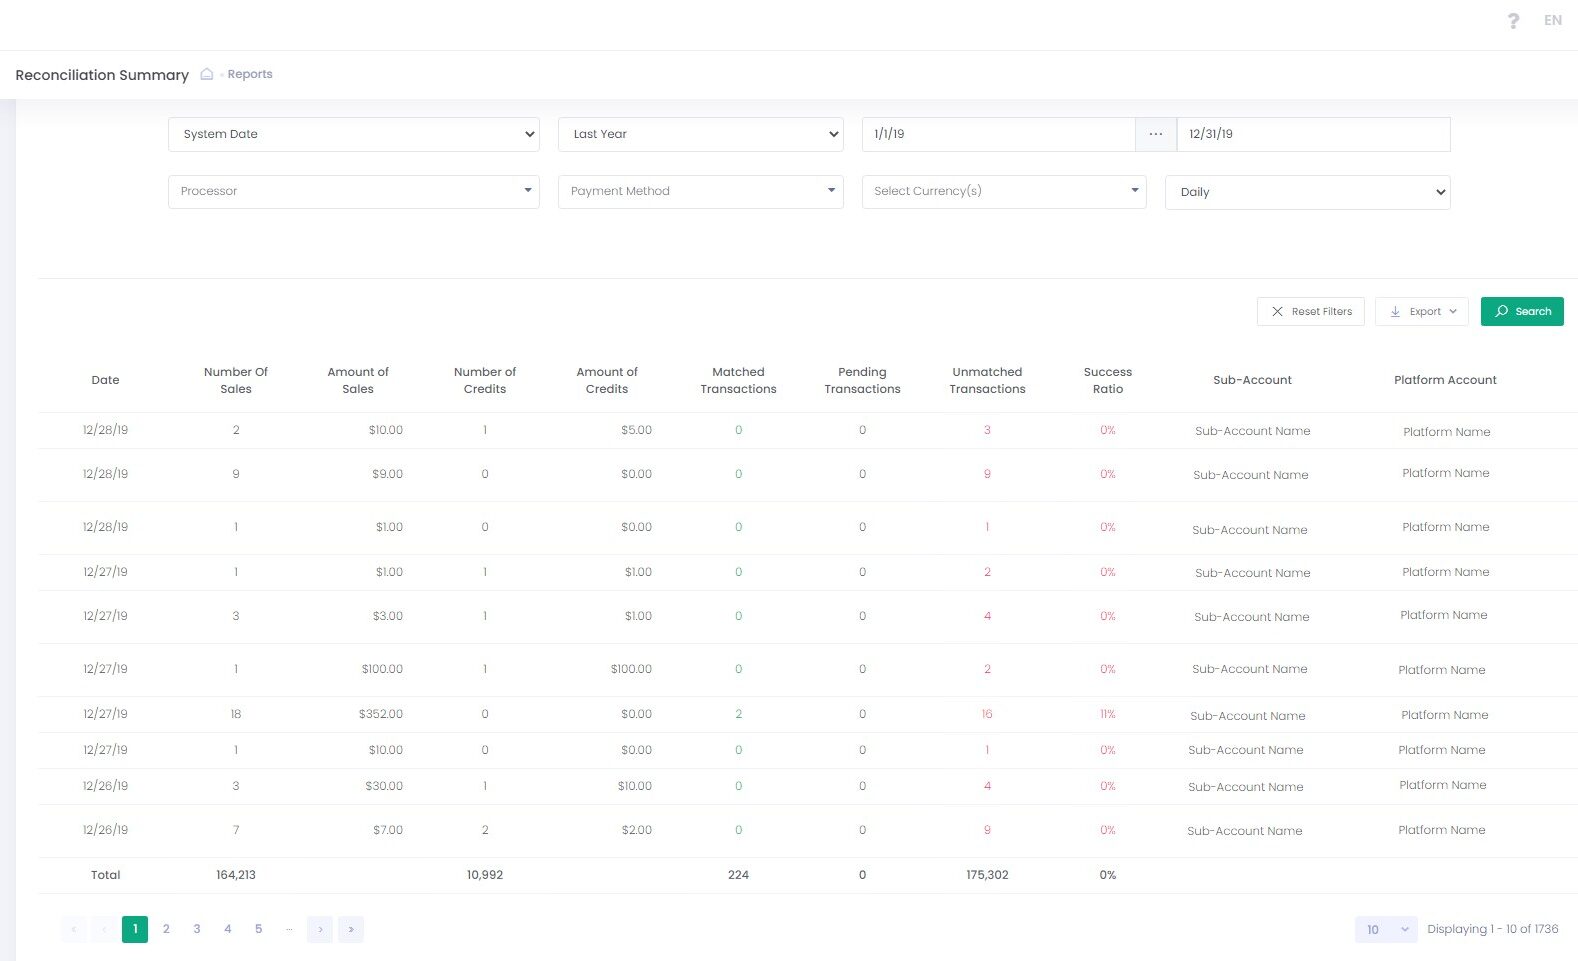 Use Reconciliation Summary Report to access a specific Sub-Account transactions matching statistics for a specific date.
This report allows you to select a specific Processor, Payment Method and Date range to display the information on all transactions that have been matched, not matched and/or pending and navigate directly to the Reconciliation Records Report to get all in depth transactions details.
Cross-Report Navigation
Embedded hyperlinks in the report hyperlinks will take you to the Reconciliation Records Report where you can get all the details on the relevant transactions.
Use Reconciliation Summary Report to access a specific Sub-Account transactions matching statistics for a specific date.
This report allows you to select a specific Processor, Payment Method and Date range to display the information on all transactions that have been matched, not matched and/or pending and navigate directly to the Reconciliation Records Report to get all in depth transactions details.
Cross-Report Navigation
Embedded hyperlinks in the report hyperlinks will take you to the Reconciliation Records Report where you can get all the details on the relevant transactions.
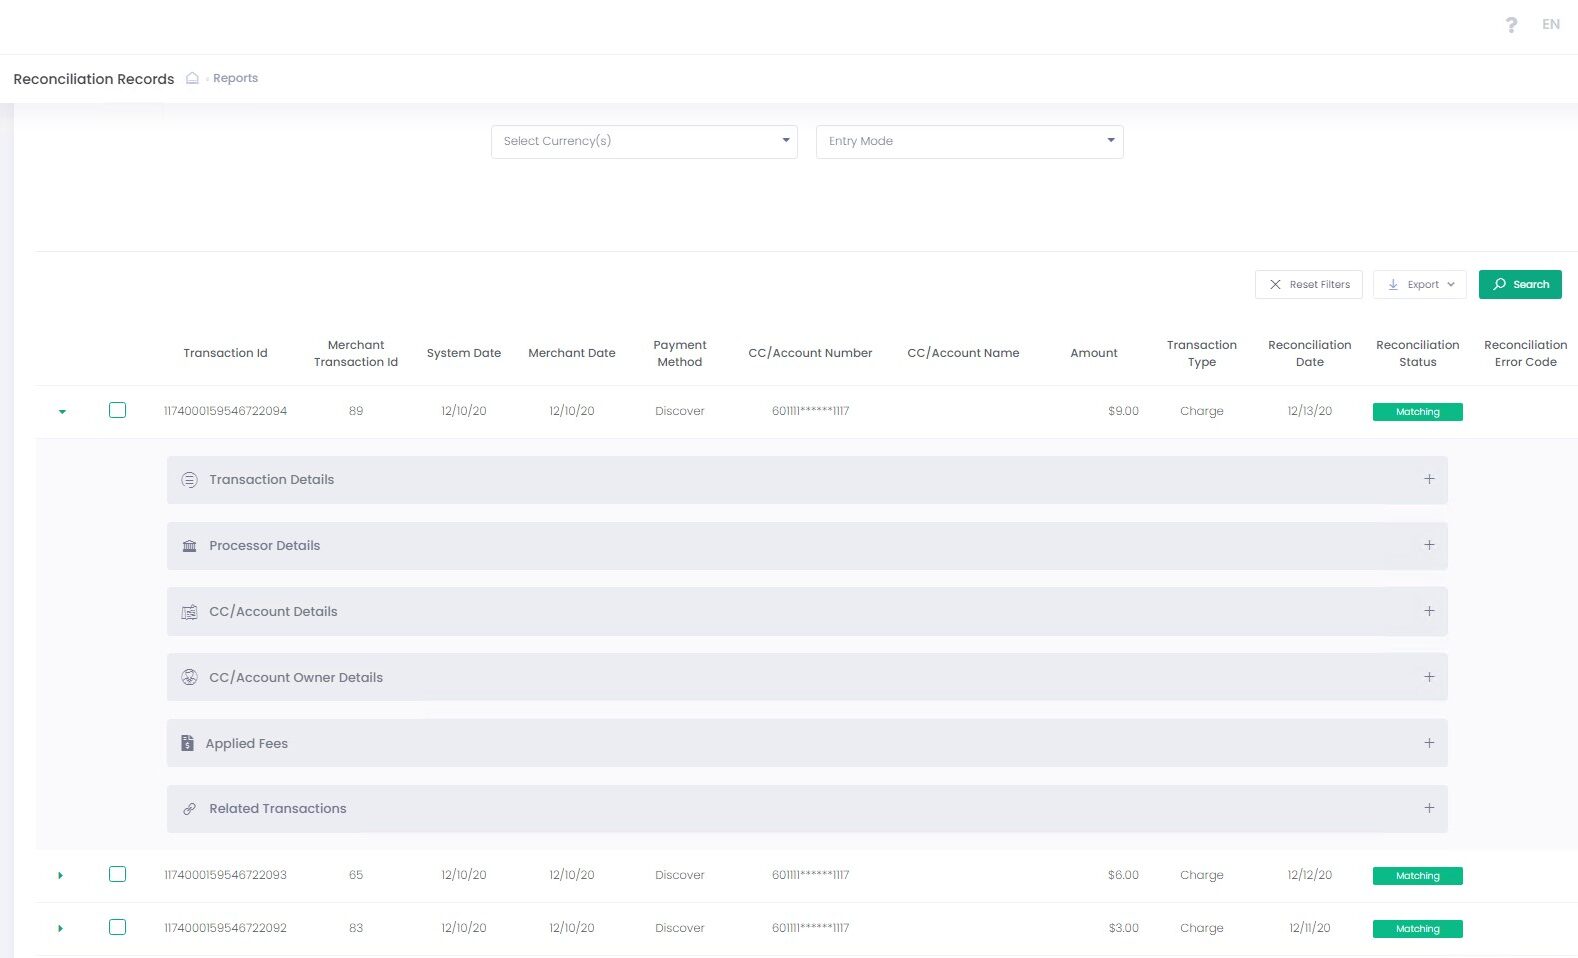 Reconciliation Records Report Filter
 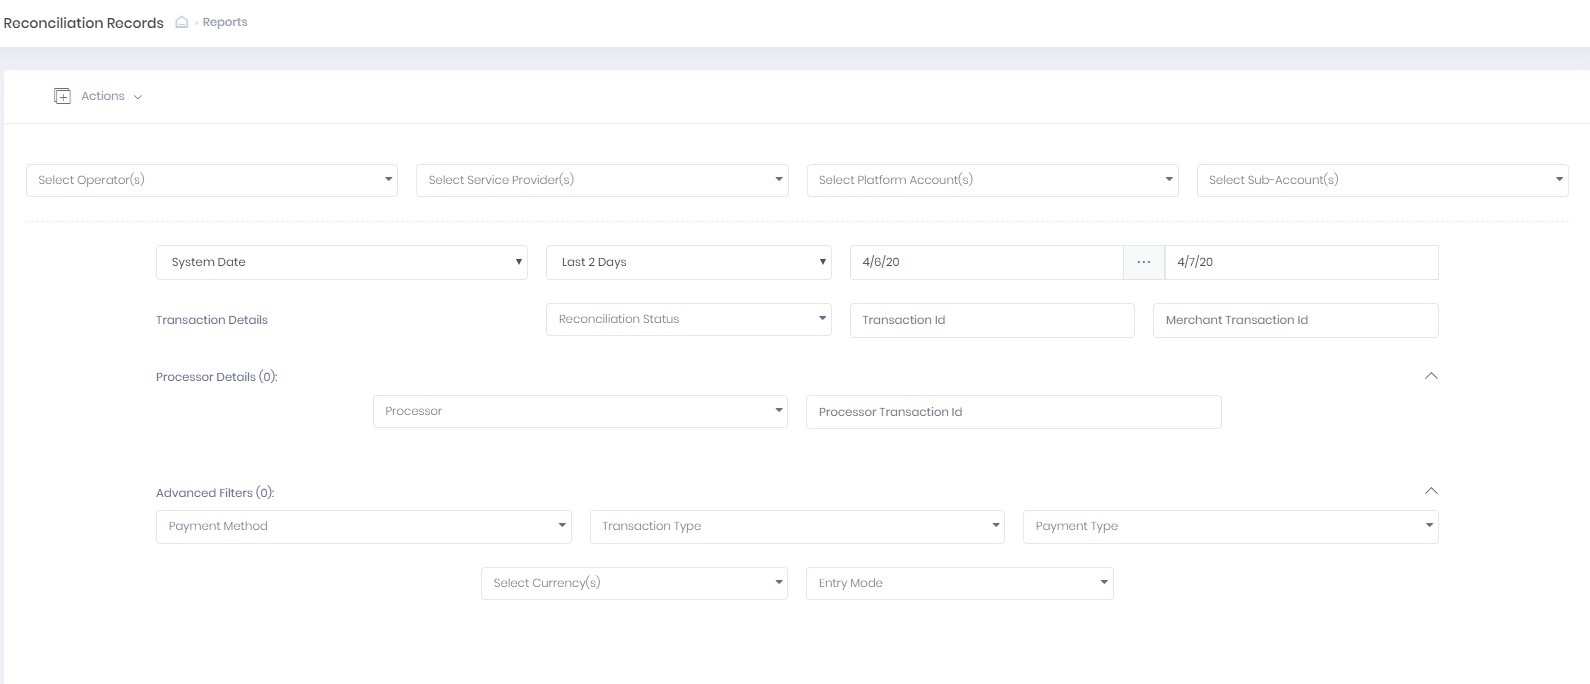 Use report filter to narrow down your search parameters.
To display the report for a specific Sub-Account select Service Provider, Platform Account and Sub-Account.
The prior selection determines the latter available options.
Use Date filter to generate report based on System Date, Merchant Date or the Reconciliation Date.
Use a drop-down to choose a preset time range option or a calendar to manually input a required time range for the report.
Use Transaction Details filter to specify:
Use report filter to narrow down your search parameters.
To display the report for a specific Sub-Account select Service Provider, Platform Account and Sub-Account.
The prior selection determines the latter available options.
Use Date filter to generate report based on System Date, Merchant Date or the Reconciliation Date.
Use a drop-down to choose a preset time range option or a calendar to manually input a required time range for the report.
Use Transaction Details filter to specify:
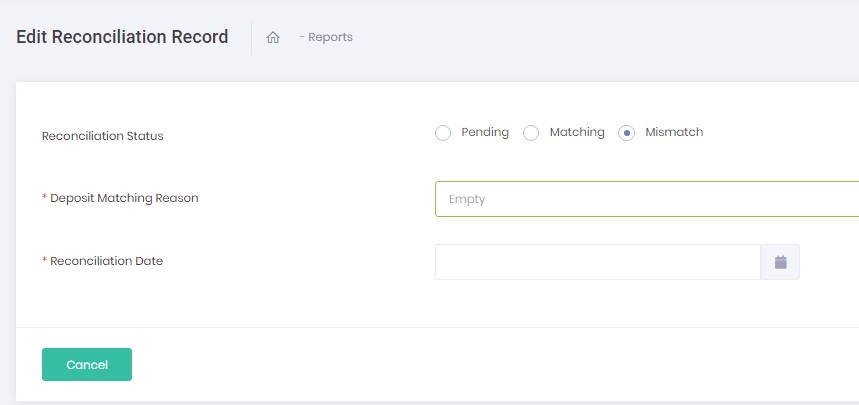 To Edit a specific transaction Reconciliation Record:
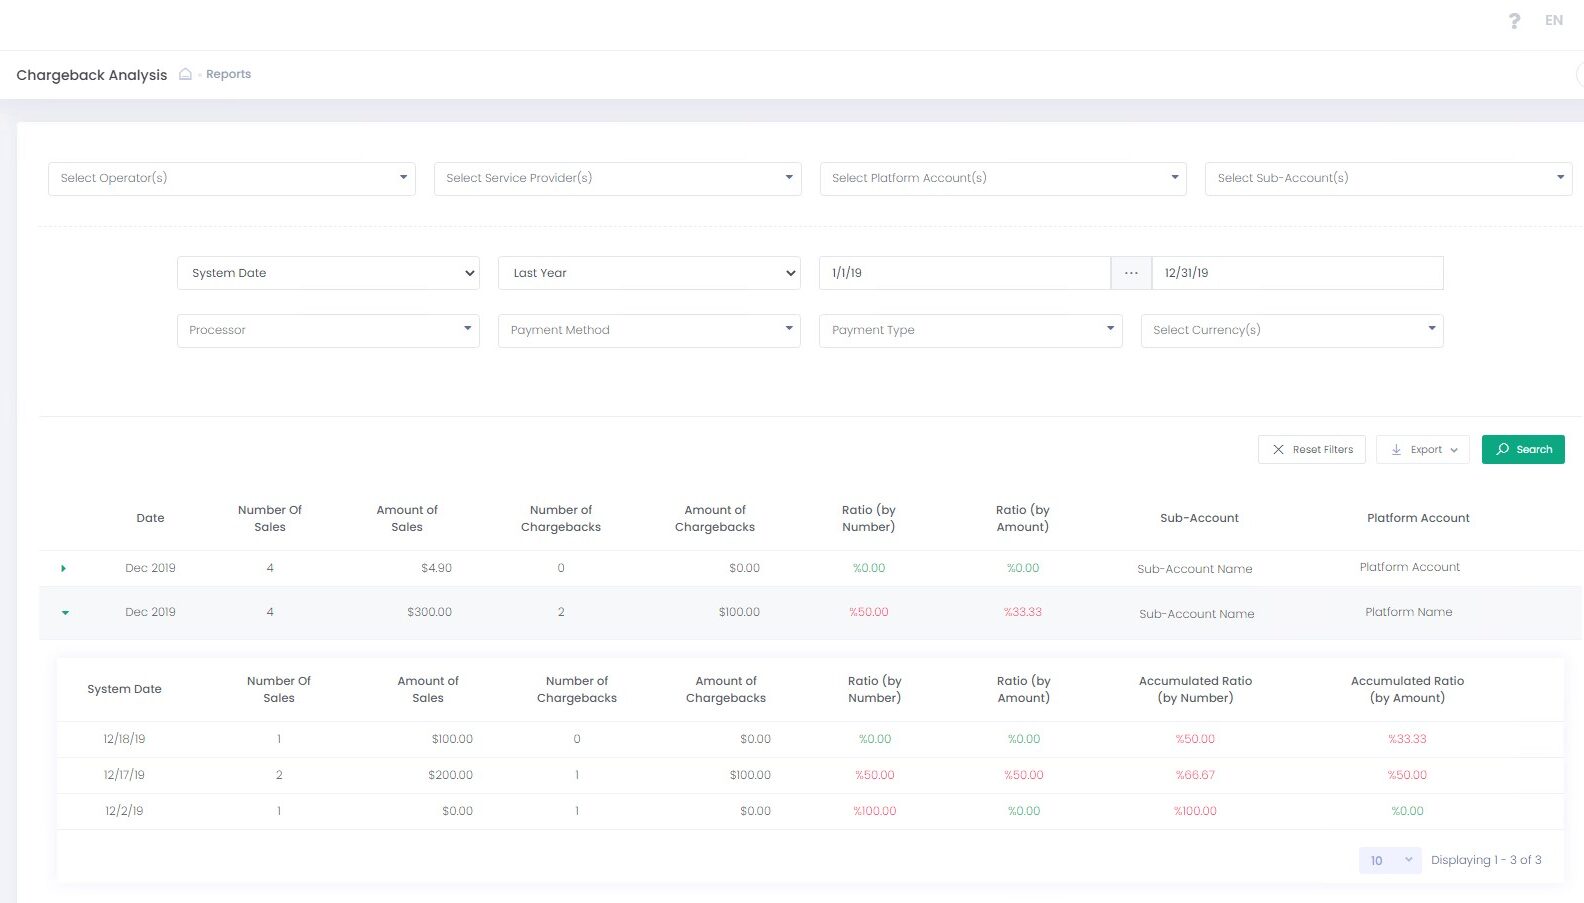
 Use report filter to narrow down your search parameters.
To display the report for a specific Sub-Account select Service Provider, Platform Account and Sub-Account.
The prior selection determines the latter available options.
Set the Date parameters to get a Chargeback Analysis report for a specific date or a date range.
Use Date filter to generate a report based on the System Date or the Processor Date.
Use Additional Filters to query by:
Use report filter to narrow down your search parameters.
To display the report for a specific Sub-Account select Service Provider, Platform Account and Sub-Account.
The prior selection determines the latter available options.
Set the Date parameters to get a Chargeback Analysis report for a specific date or a date range.
Use Date filter to generate a report based on the System Date or the Processor Date.
Use Additional Filters to query by:
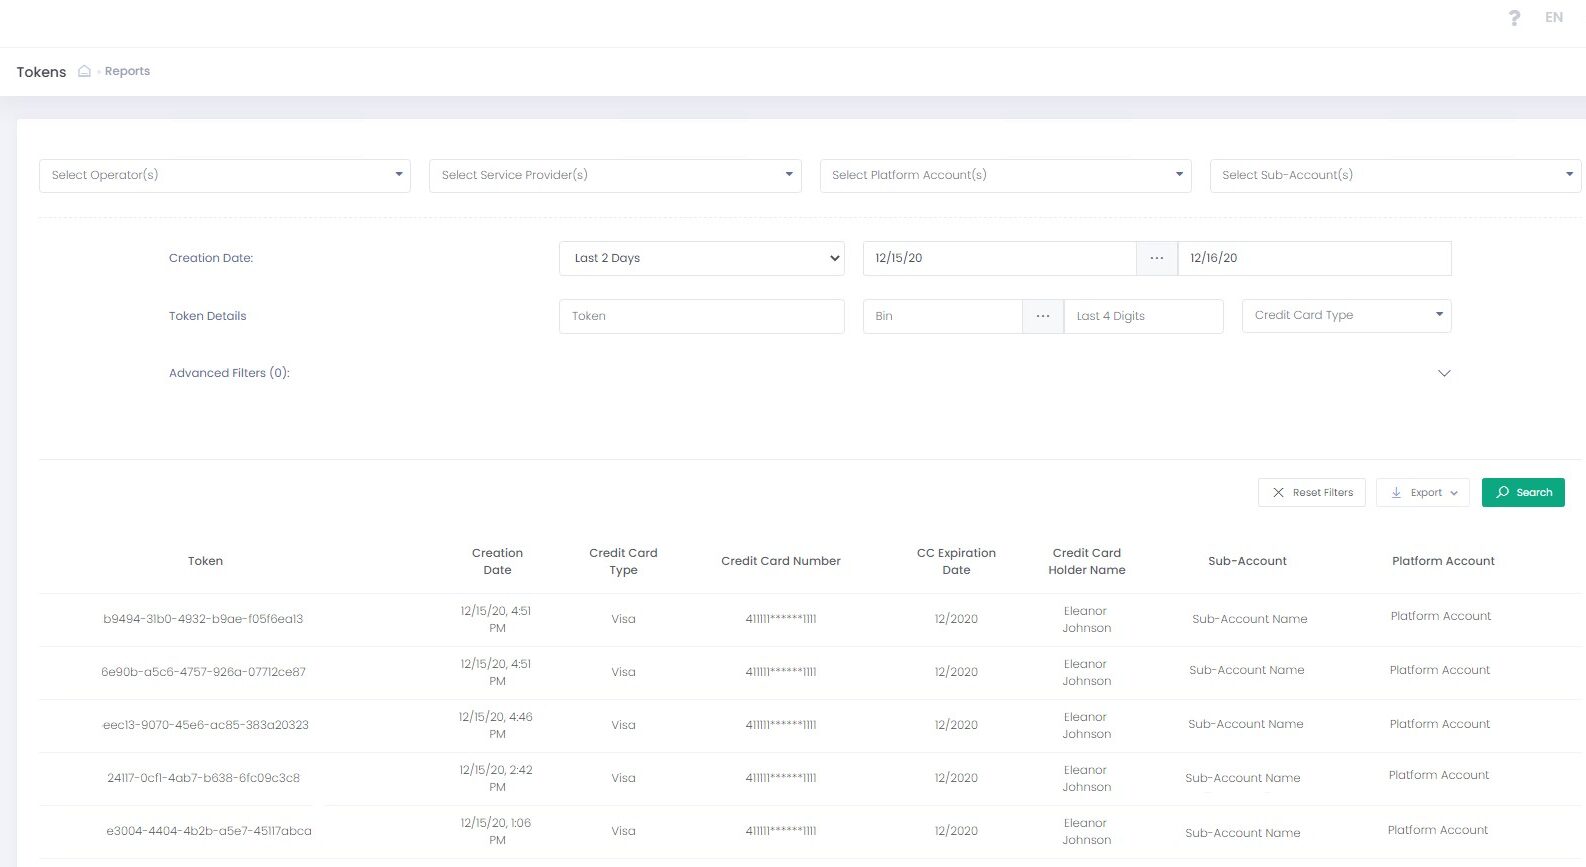 Use Tokens Report to display all tokens issued for specific credit cards per Sub-Account.
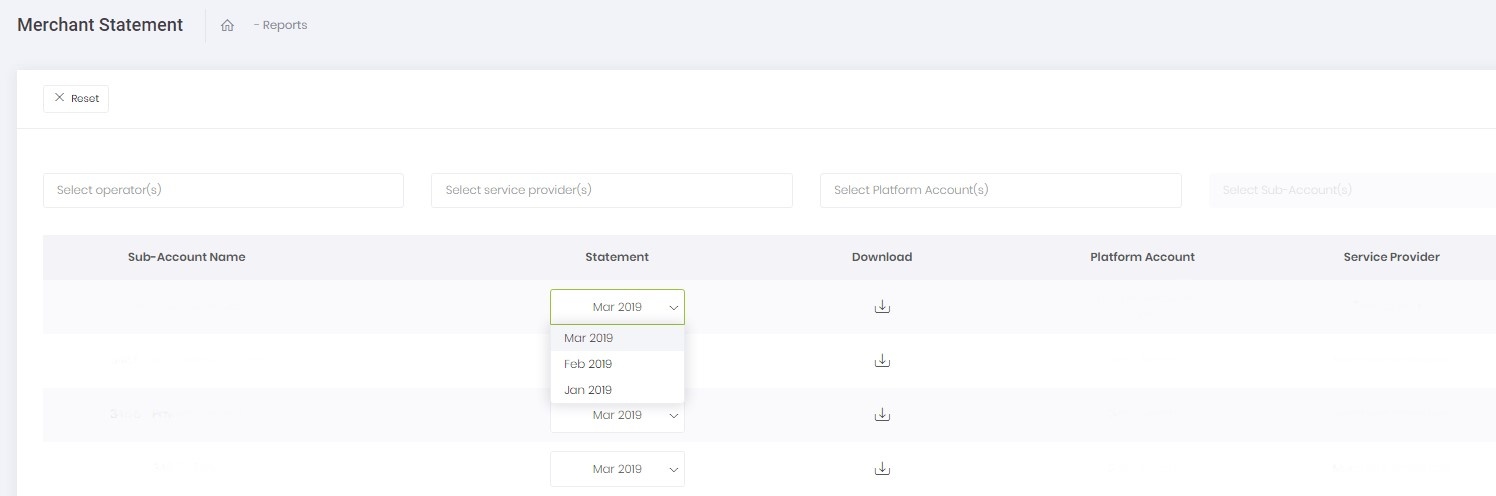

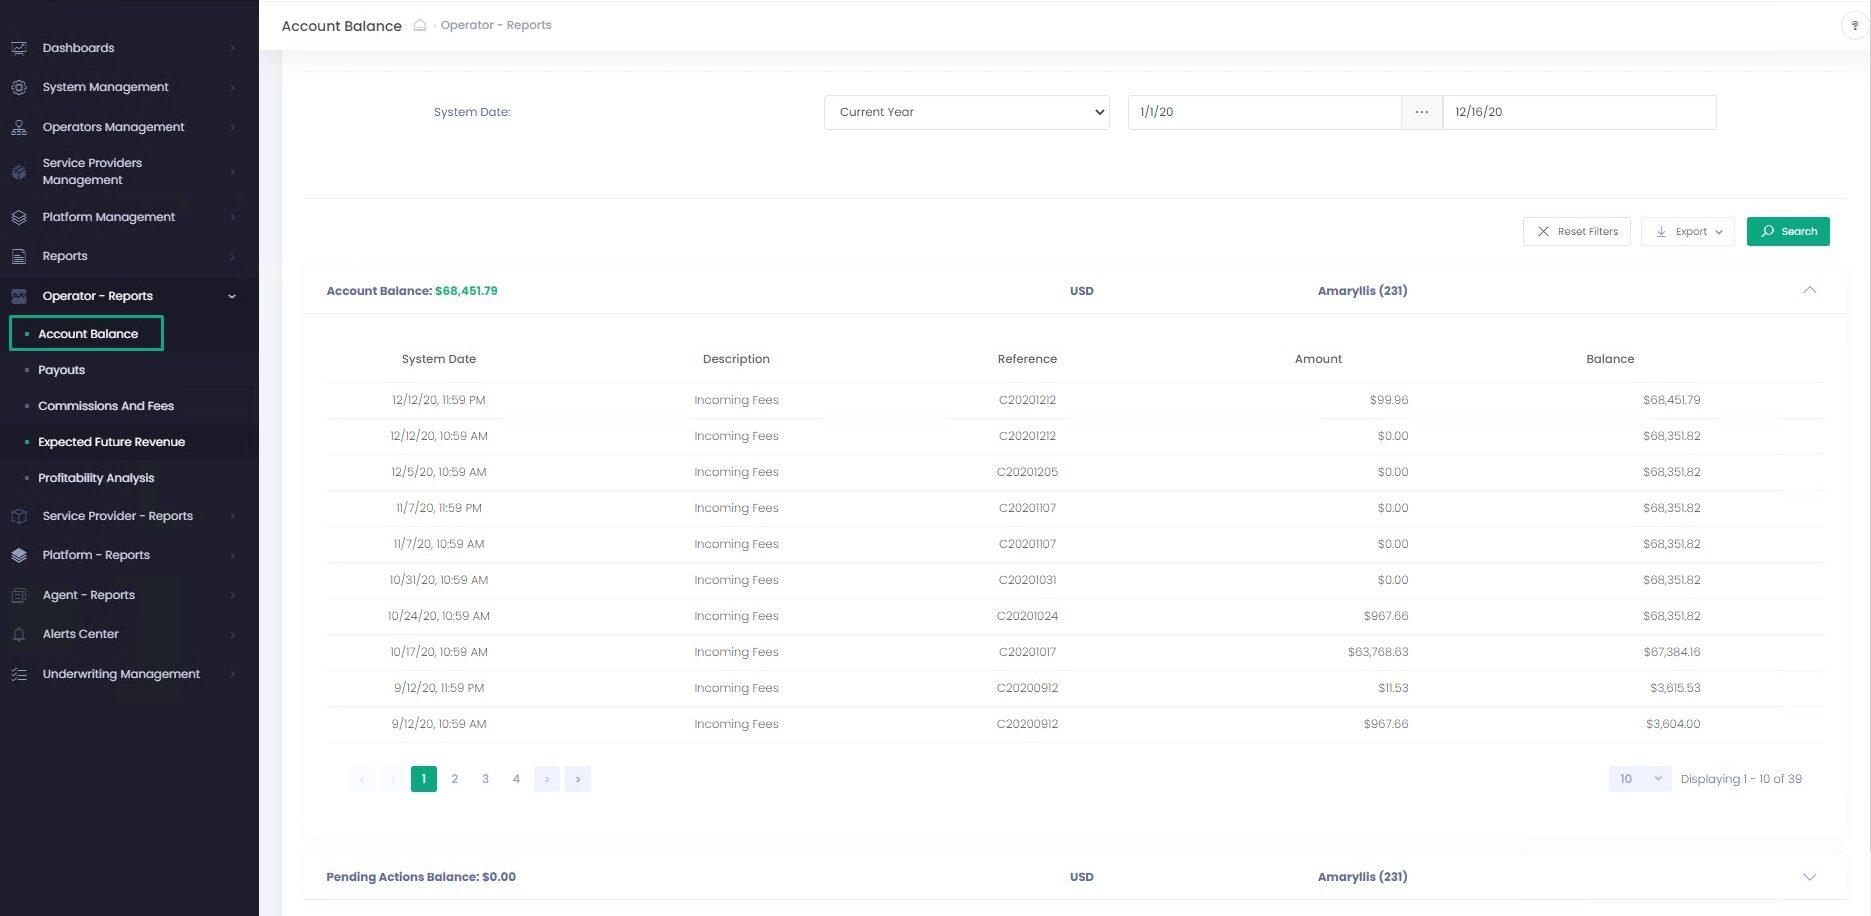 Account Balance report displays the total balance of all the incoming fees the Entity received for a selected time range per currency and Entity.
See Account Balance Report for information about this report.
Account Balance report displays the total balance of all the incoming fees the Entity received for a selected time range per currency and Entity.
See Account Balance Report for information about this report.
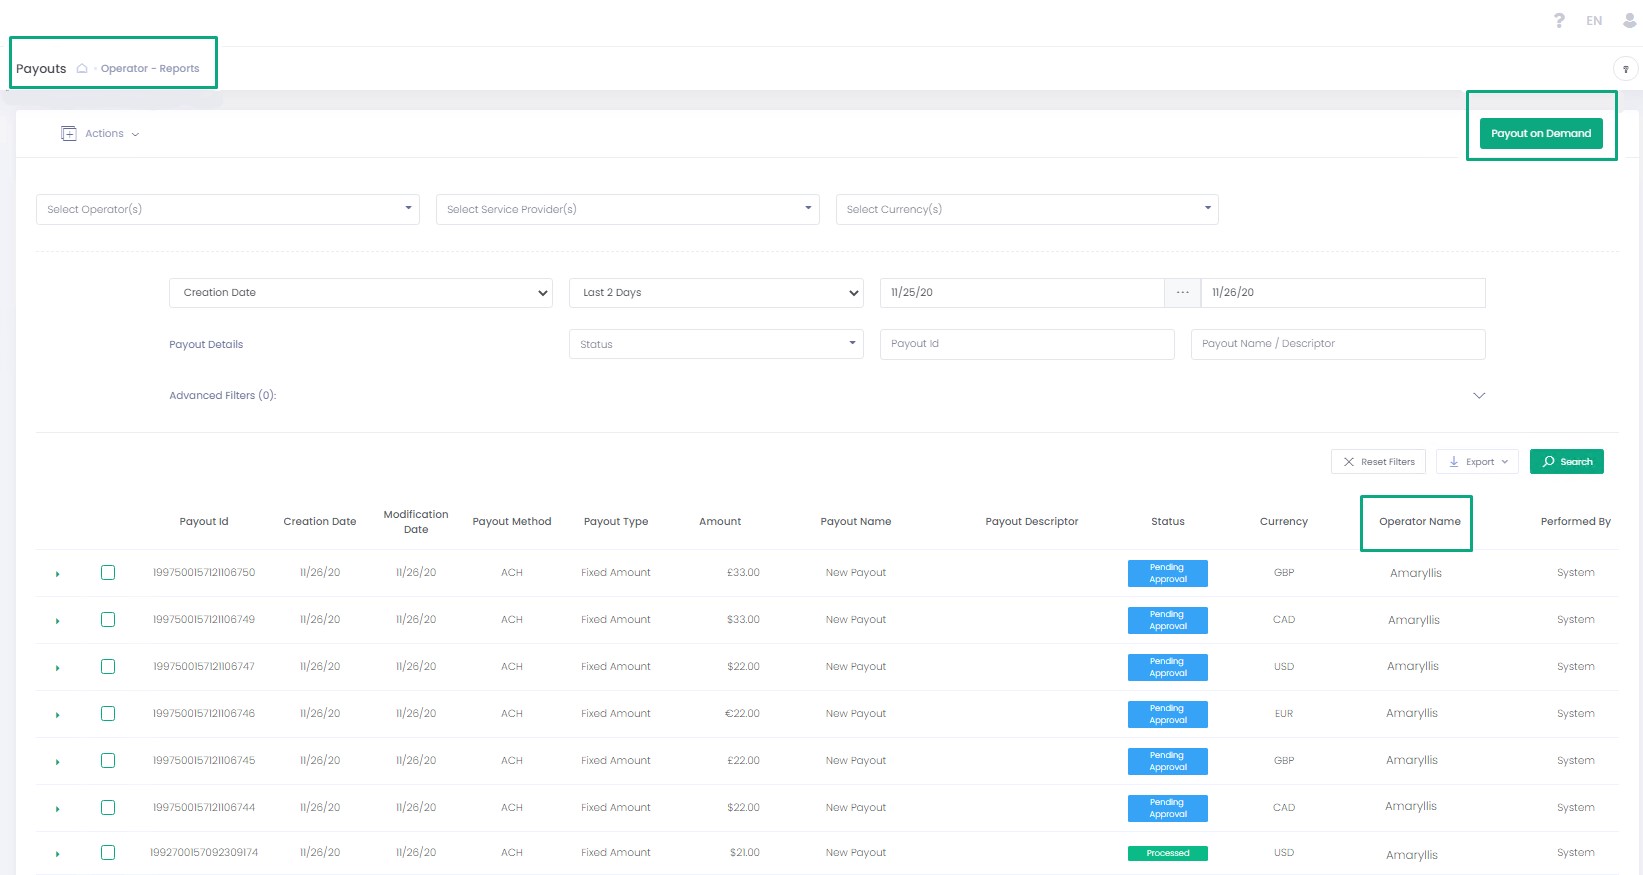
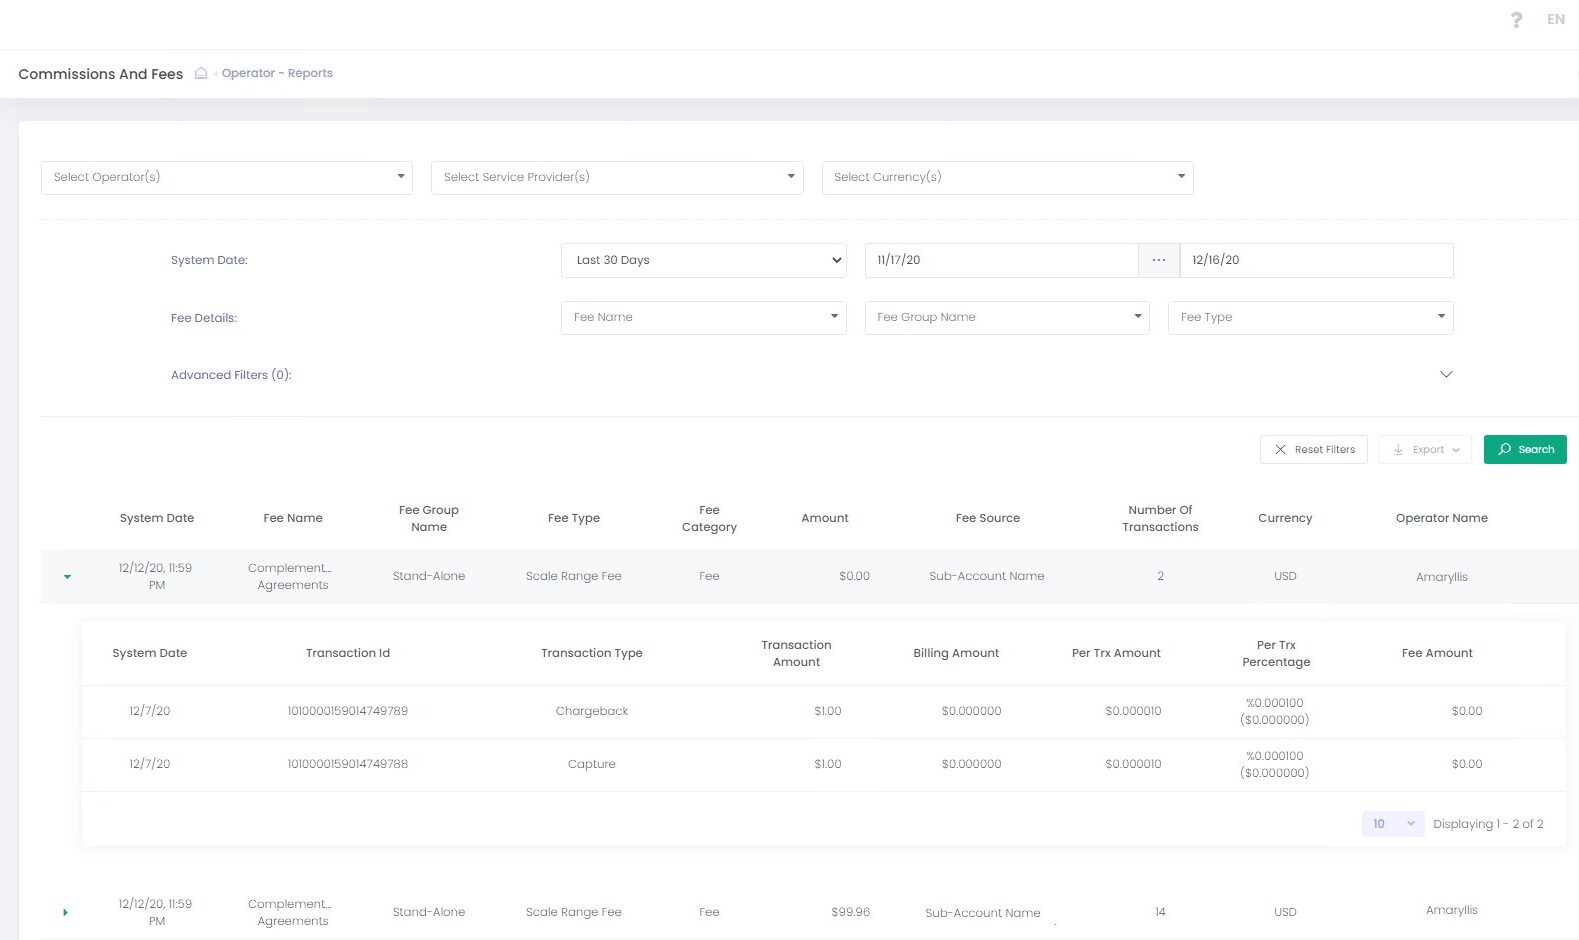 The Commissions and Fees report displays specific incoming fees (with positive fee amount value) and outgoing fees (with negative fee amount value) details and related transactions data for the selected entity.
Currency filter available values depend on the selected Entity.
You can additionally specify a specific Fee Name, Fee Group Name and a Fee Type in dedicated dropdowns.
Choose one or more options in each drop-down list.
For more information go to the Incoming Fees Report.
The Commissions and Fees report displays specific incoming fees (with positive fee amount value) and outgoing fees (with negative fee amount value) details and related transactions data for the selected entity.
Currency filter available values depend on the selected Entity.
You can additionally specify a specific Fee Name, Fee Group Name and a Fee Type in dedicated dropdowns.
Choose one or more options in each drop-down list.
For more information go to the Incoming Fees Report.
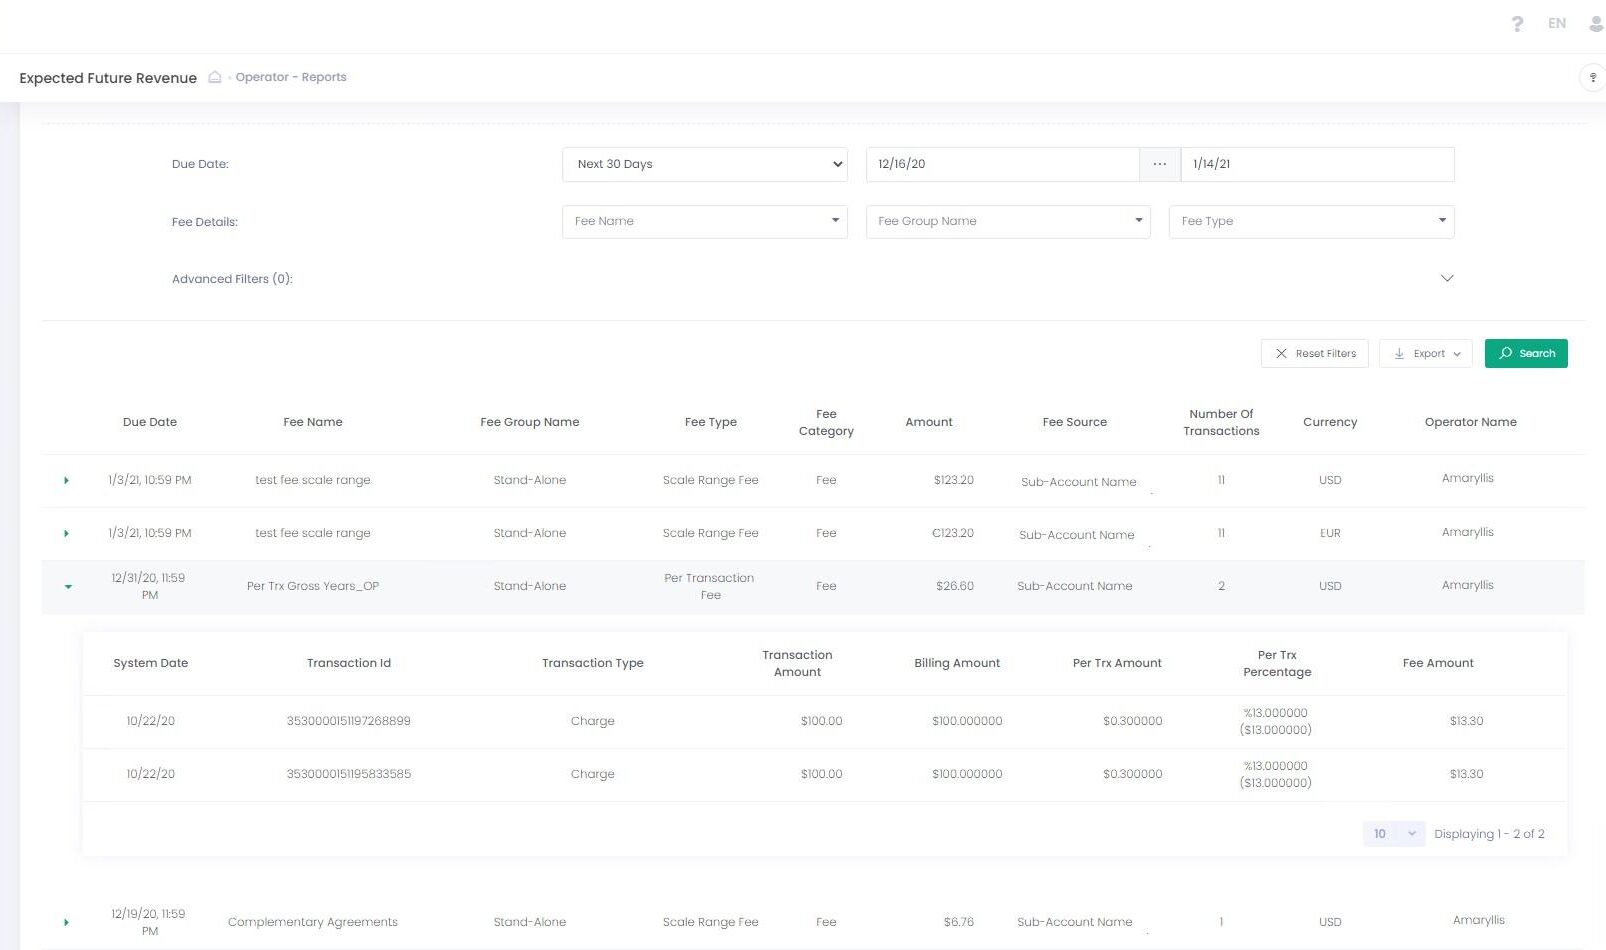 Expected Future Revenue report provides overview of all due fees, fees with billing delay and fees before the Cut-off.
Expand each report record to view underlying transaction details.
Report Filter
Use Due Date filtering options to set the report time range.
Note, that in comparison with the Commissions and Fees report, where the report date is System Date, the Expected Future Revenue report date is Due Date, because this report provides overview of fees that are due.
There is an option to select a specific Operator, Service Provider, and a Currency in the report filter to specify your report output.
You can additionally specify a specific Fee Name, Fee Group Name, and a Fee Type in dedicated dropdowns. Choose one or more options in each drop-down list.
See Expected Future Revenue Report for information about this report.
Expected Future Revenue report provides overview of all due fees, fees with billing delay and fees before the Cut-off.
Expand each report record to view underlying transaction details.
Report Filter
Use Due Date filtering options to set the report time range.
Note, that in comparison with the Commissions and Fees report, where the report date is System Date, the Expected Future Revenue report date is Due Date, because this report provides overview of fees that are due.
There is an option to select a specific Operator, Service Provider, and a Currency in the report filter to specify your report output.
You can additionally specify a specific Fee Name, Fee Group Name, and a Fee Type in dedicated dropdowns. Choose one or more options in each drop-down list.
See Expected Future Revenue Report for information about this report.
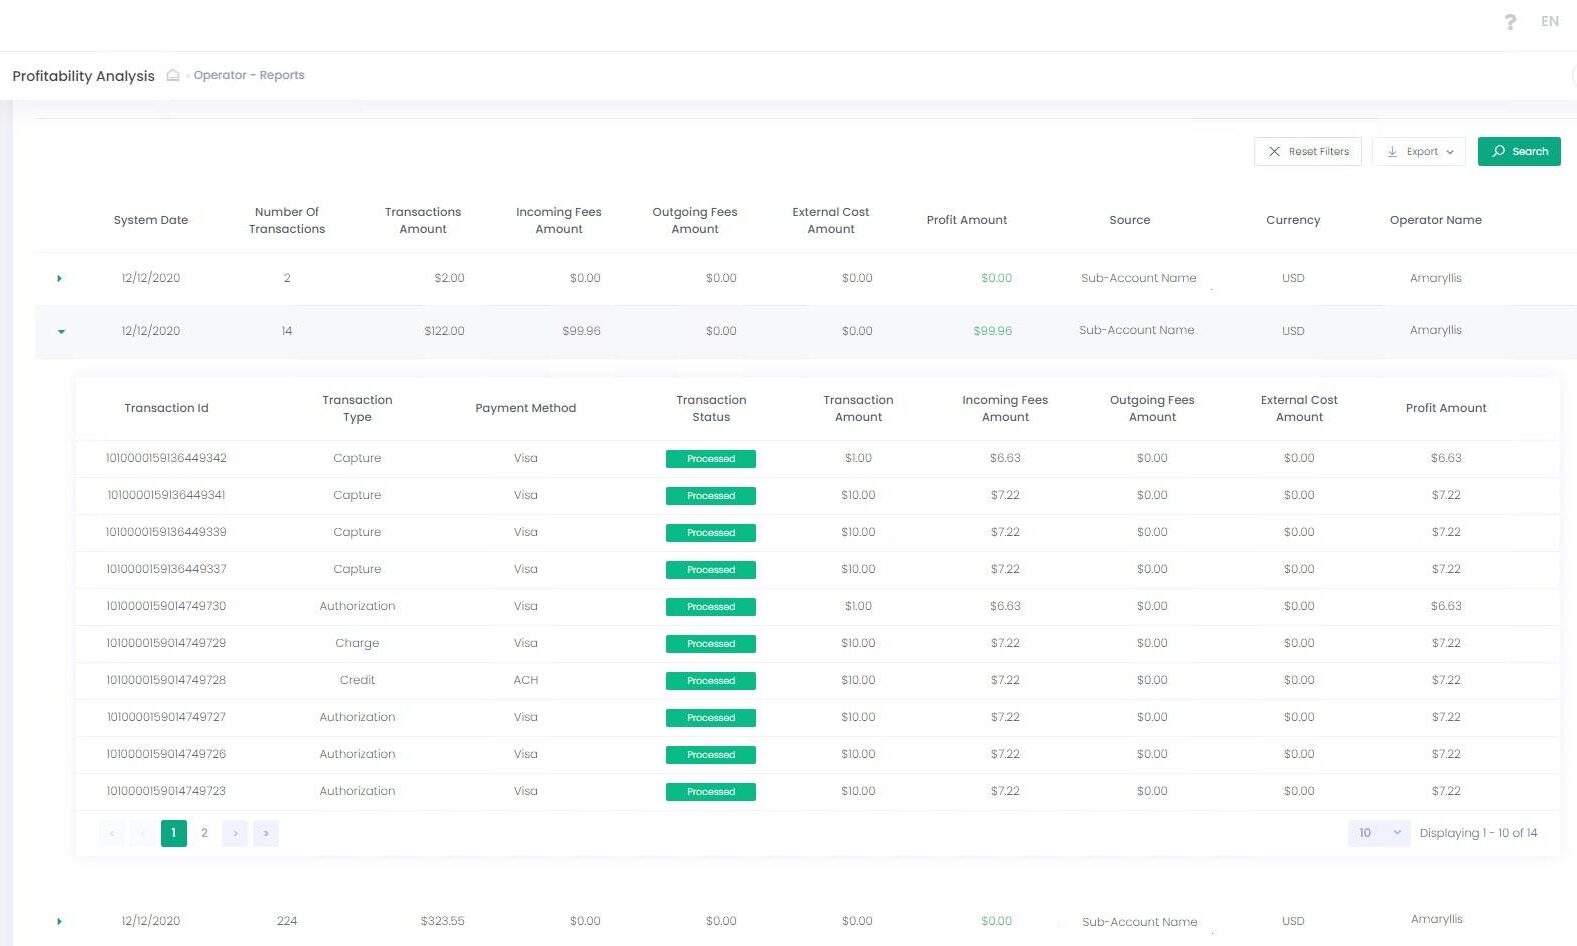 Profitability Analysis report allows to view incoming fees (fees received by entity), outgoing fees and external costs (external outgoing fees) and to display a Profit Amount.
 Rules Management screen allows viewing and sorting, adding, enabling/disabling, deleting, and editing alert rules that have been configured per system entity.
Search rules per category, Operator and/or Service Provider system entity.
Click any specific item in the grid to display available actions in Actions menu.
Rules Management screen allows viewing and sorting, adding, enabling/disabling, deleting, and editing alert rules that have been configured per system entity.
Search rules per category, Operator and/or Service Provider system entity.
Click any specific item in the grid to display available actions in Actions menu.
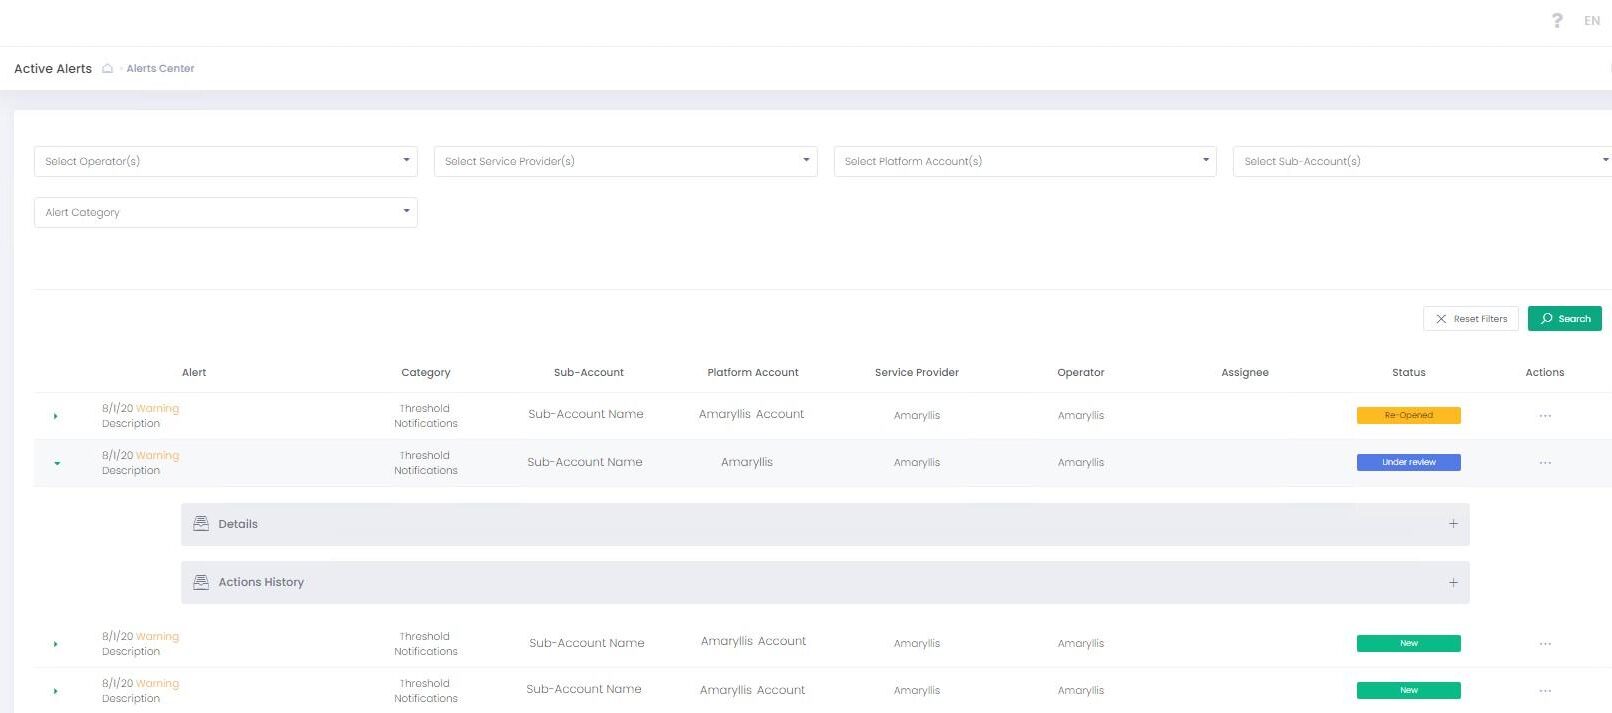 This screen displays all currently un-resolved alerts with status New, Under Review and Re-Opened.
This screen is available to Back-Office users based on their permissions level.
Information displayed on this screen depends on the Service Provider user belongs to.
This screen displays all currently un-resolved alerts with status New, Under Review and Re-Opened.
This screen is available to Back-Office users based on their permissions level.
Information displayed on this screen depends on the Service Provider user belongs to.
 This screen displays all resolved alerts with status Resolved for the specific Operator/Service Provider/Platform Account/Sub-Account. Alert Details Click any alert to display details:
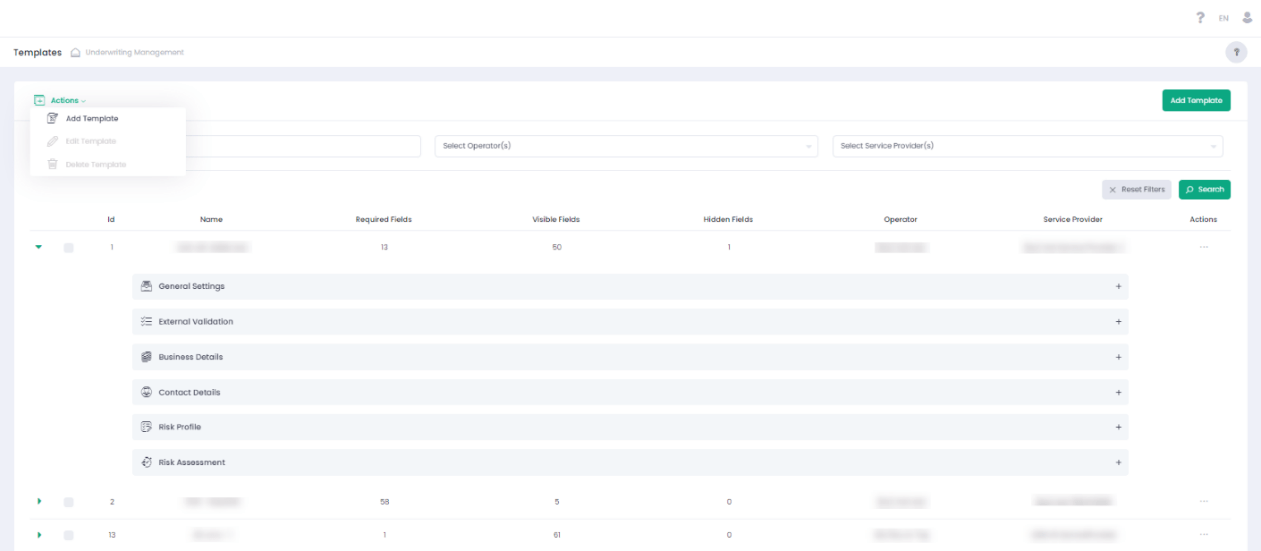 On the Templates screen authorized users can view, add/edit and manage existing underwriting applications templates. You can create templates for various purposes and subsequently assign them to different Service Providers.
Application Template Wizard allows configuring a wide range of information categories for merchant underwriting:
On the Templates screen authorized users can view, add/edit and manage existing underwriting applications templates. You can create templates for various purposes and subsequently assign them to different Service Providers.
Application Template Wizard allows configuring a wide range of information categories for merchant underwriting:

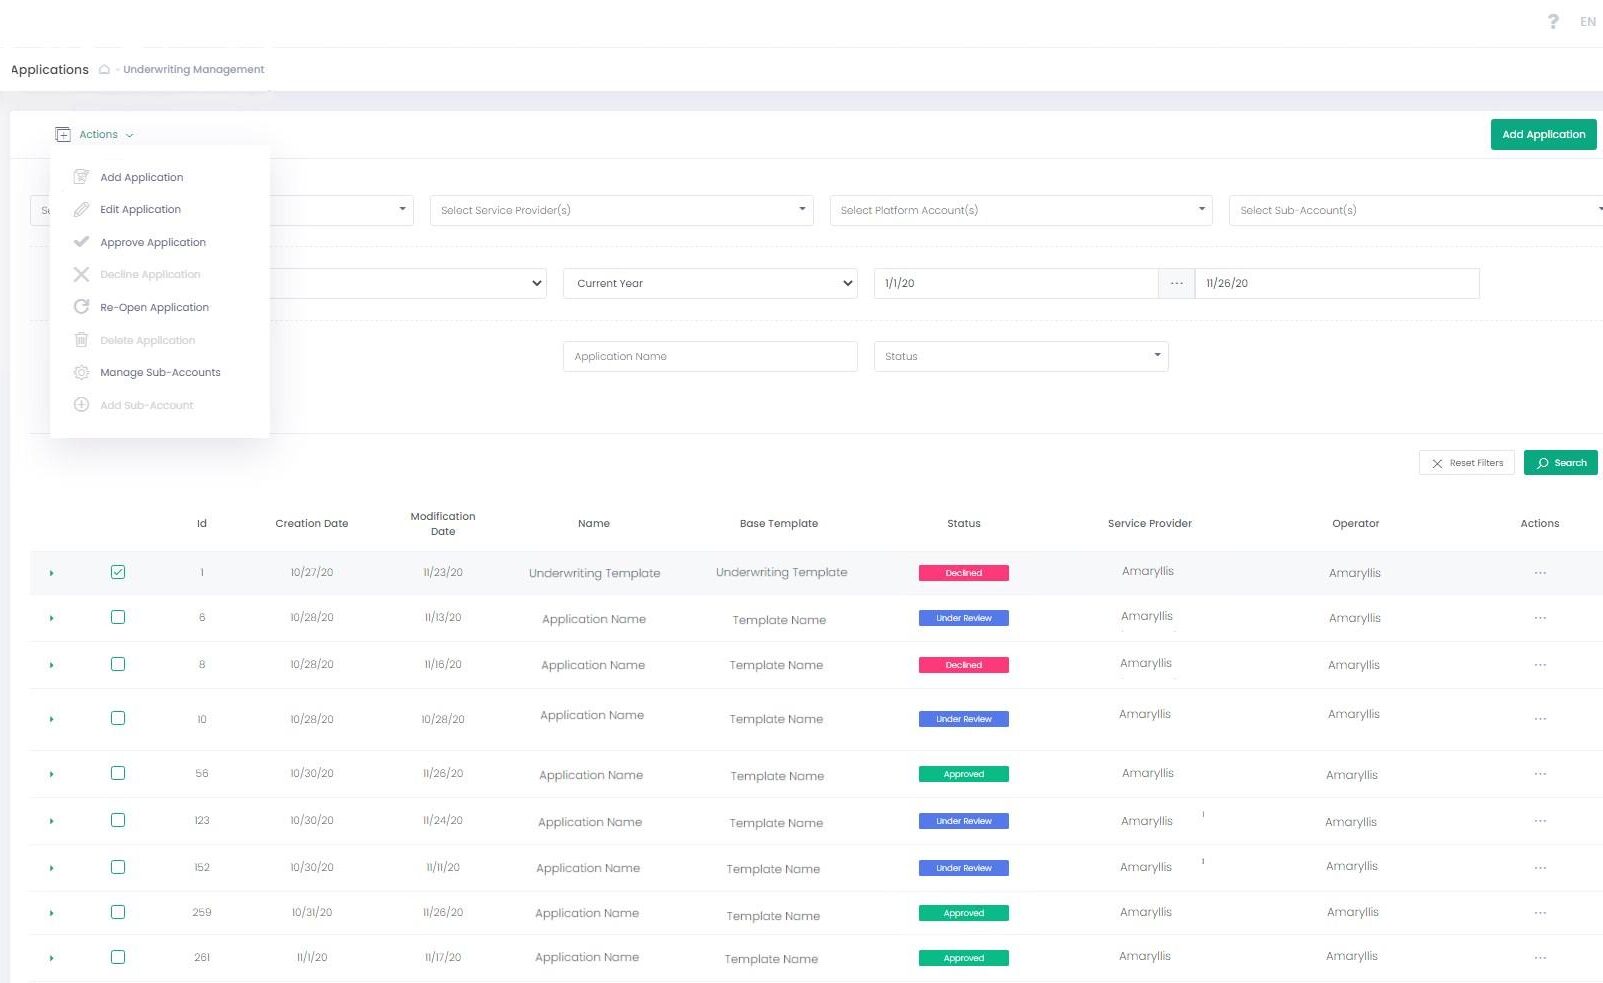

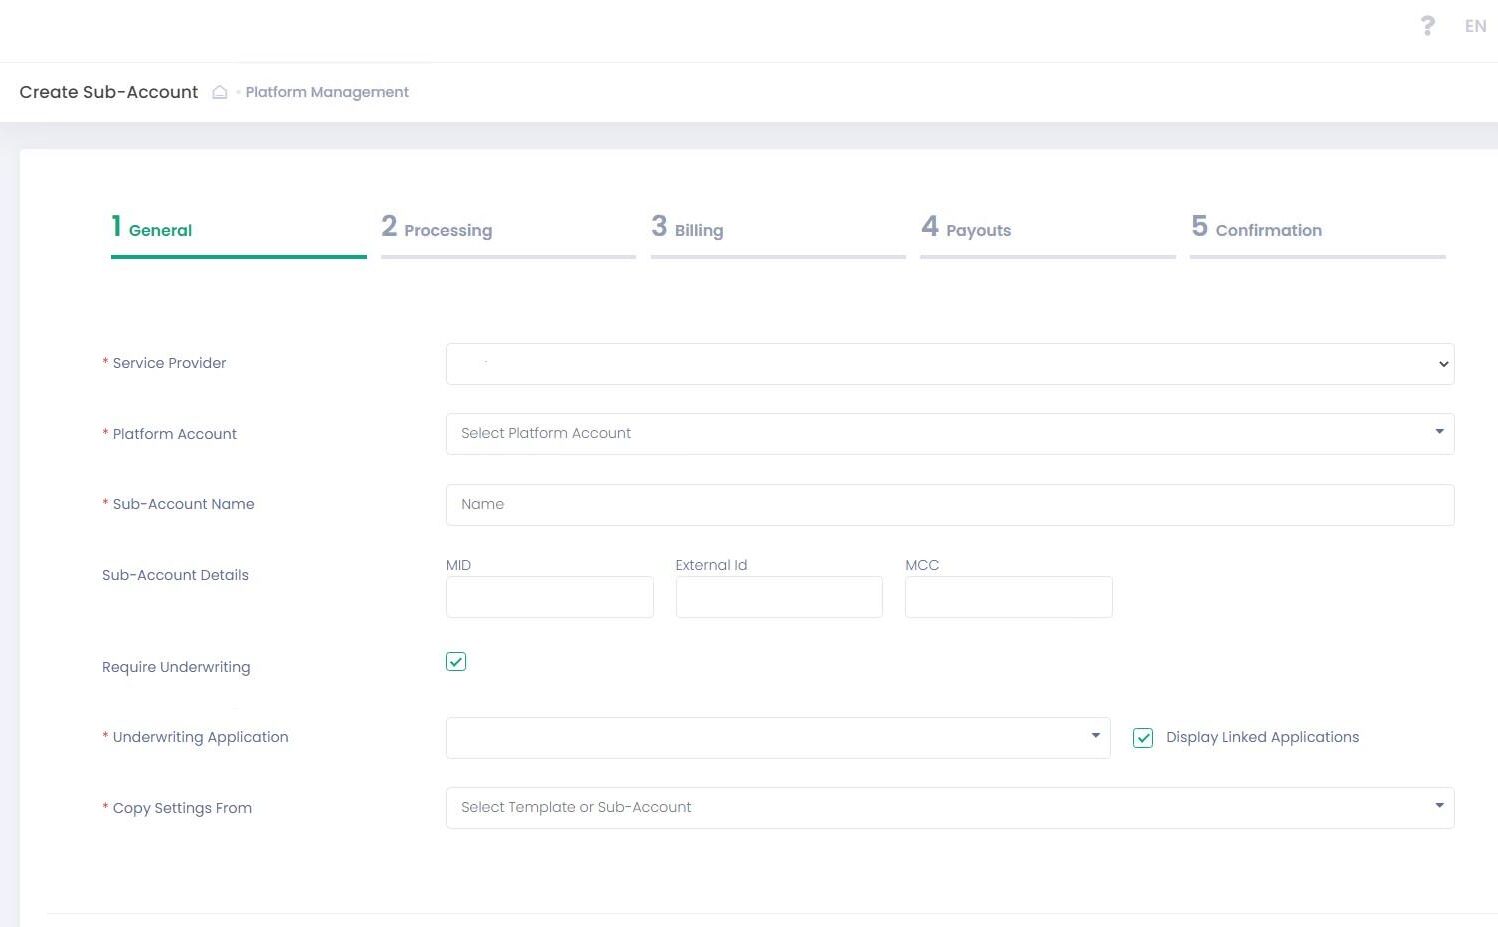 It is possible to create a new Sub-Account right from the Application screen and automatically enable a specific application for this new Sub-Account. Use Add Sub-Accounts command in the Actions Menu to open Sub-Account Onboarding Wizard. The overall flow is identical to the one described in the Sub-Accounts Management section. The only difference is that Sub-Account gets this specific application automatically attached and underwriting enabled.
To Add Sub-Account
It is possible to create a new Sub-Account right from the Application screen and automatically enable a specific application for this new Sub-Account. Use Add Sub-Accounts command in the Actions Menu to open Sub-Account Onboarding Wizard. The overall flow is identical to the one described in the Sub-Accounts Management section. The only difference is that Sub-Account gets this specific application automatically attached and underwriting enabled.
To Add Sub-Account

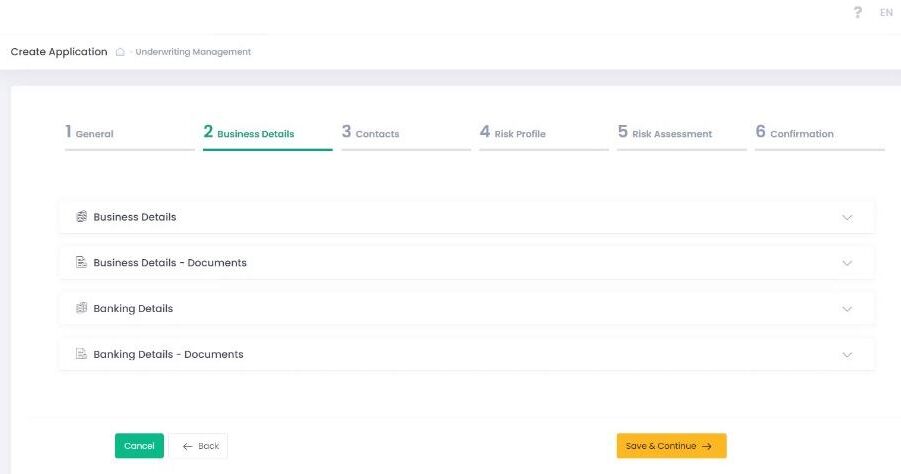 Business Details section may include business legal information, bank requisites, registration documents and more. See Templates section for more details.
In the case where external bank validation was set to PLAID, authorized users can use PLAID to support entering their bank account credentials. It provides authorized users with a secure request / response which the system can save and use for sub-accounts during onboarding providing the highest level of security handling these details.
Business Details section may include business legal information, bank requisites, registration documents and more. See Templates section for more details.
In the case where external bank validation was set to PLAID, authorized users can use PLAID to support entering their bank account credentials. It provides authorized users with a secure request / response which the system can save and use for sub-accounts during onboarding providing the highest level of security handling these details.
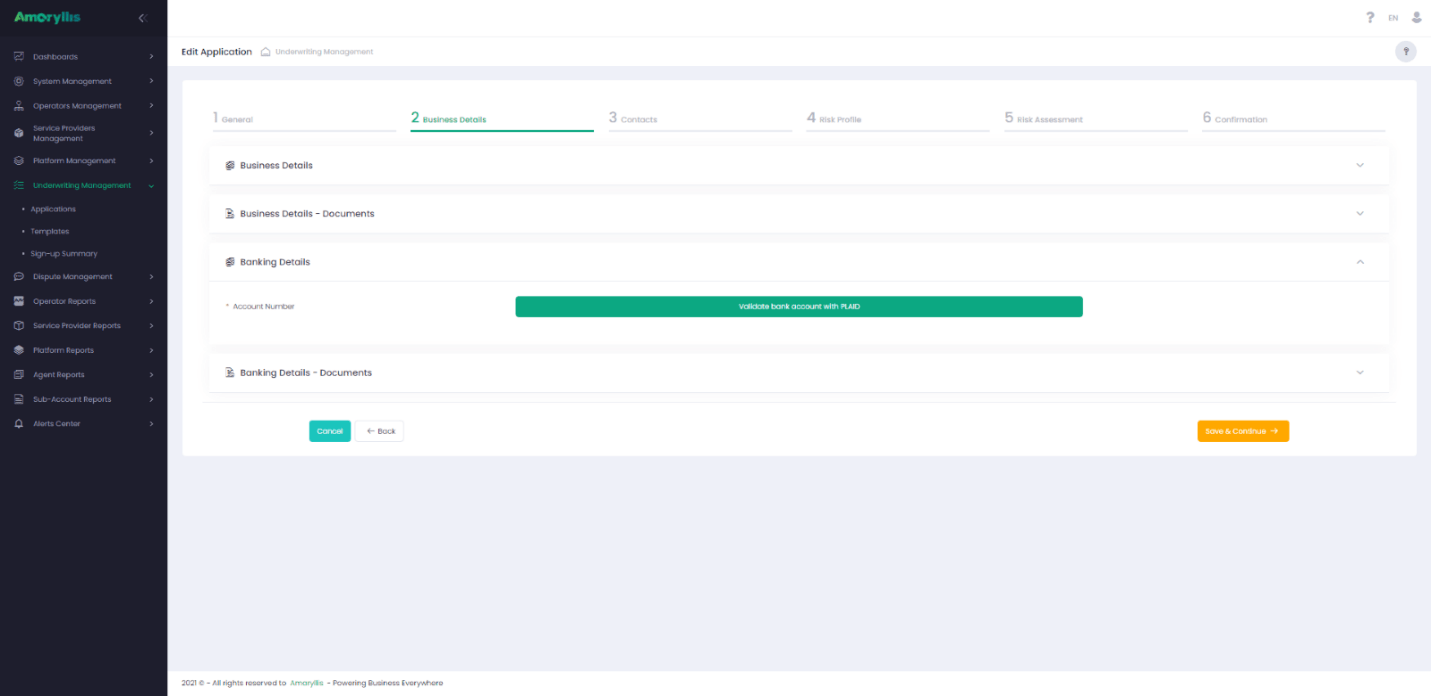
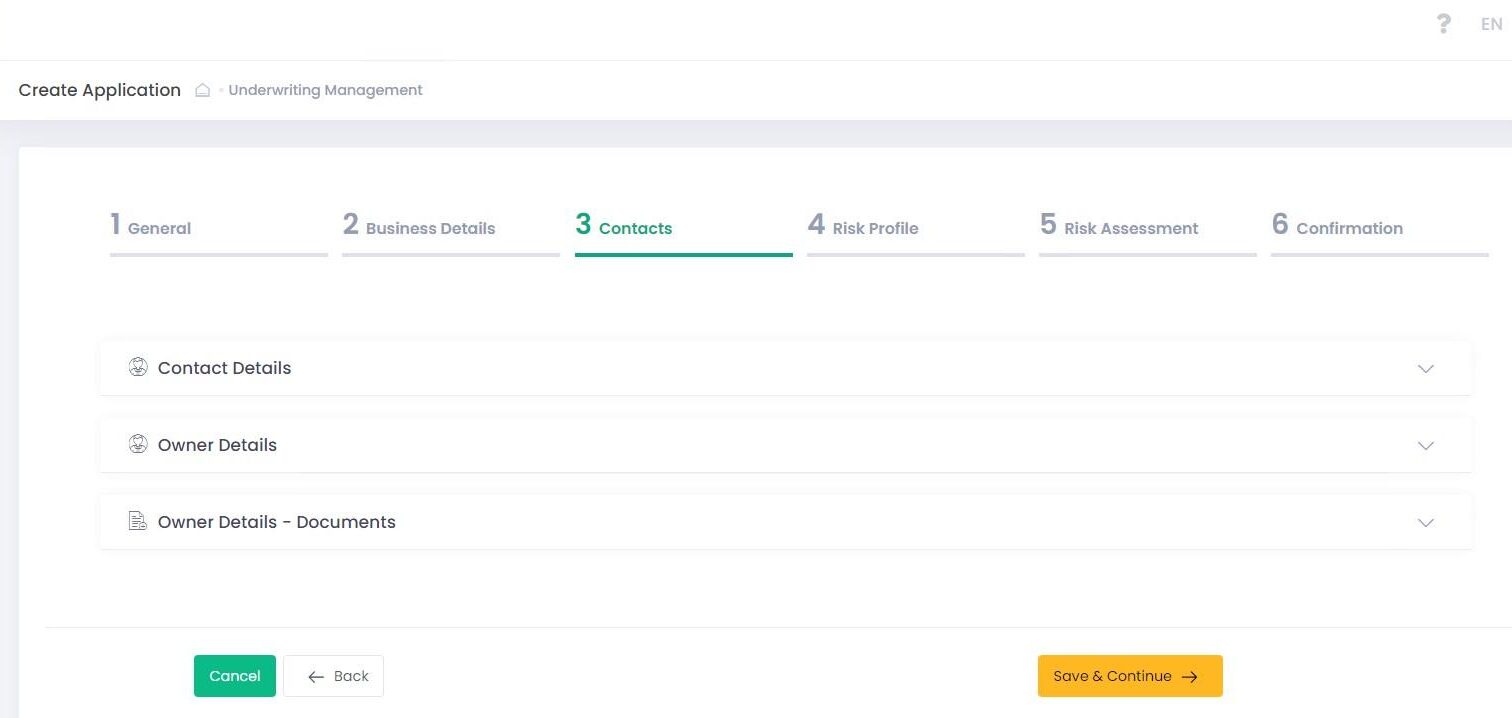 Contacts section may include business and business owner contact details and copies of identification documents and more. See Templates section for more details.
 Risk Profile section may include business industry and category, policies, compliance certificates and more. See Templates section for more details.
 Risk Assessment section may include business processing history and projections, bankruptcy details and other. See Templates section for more details.
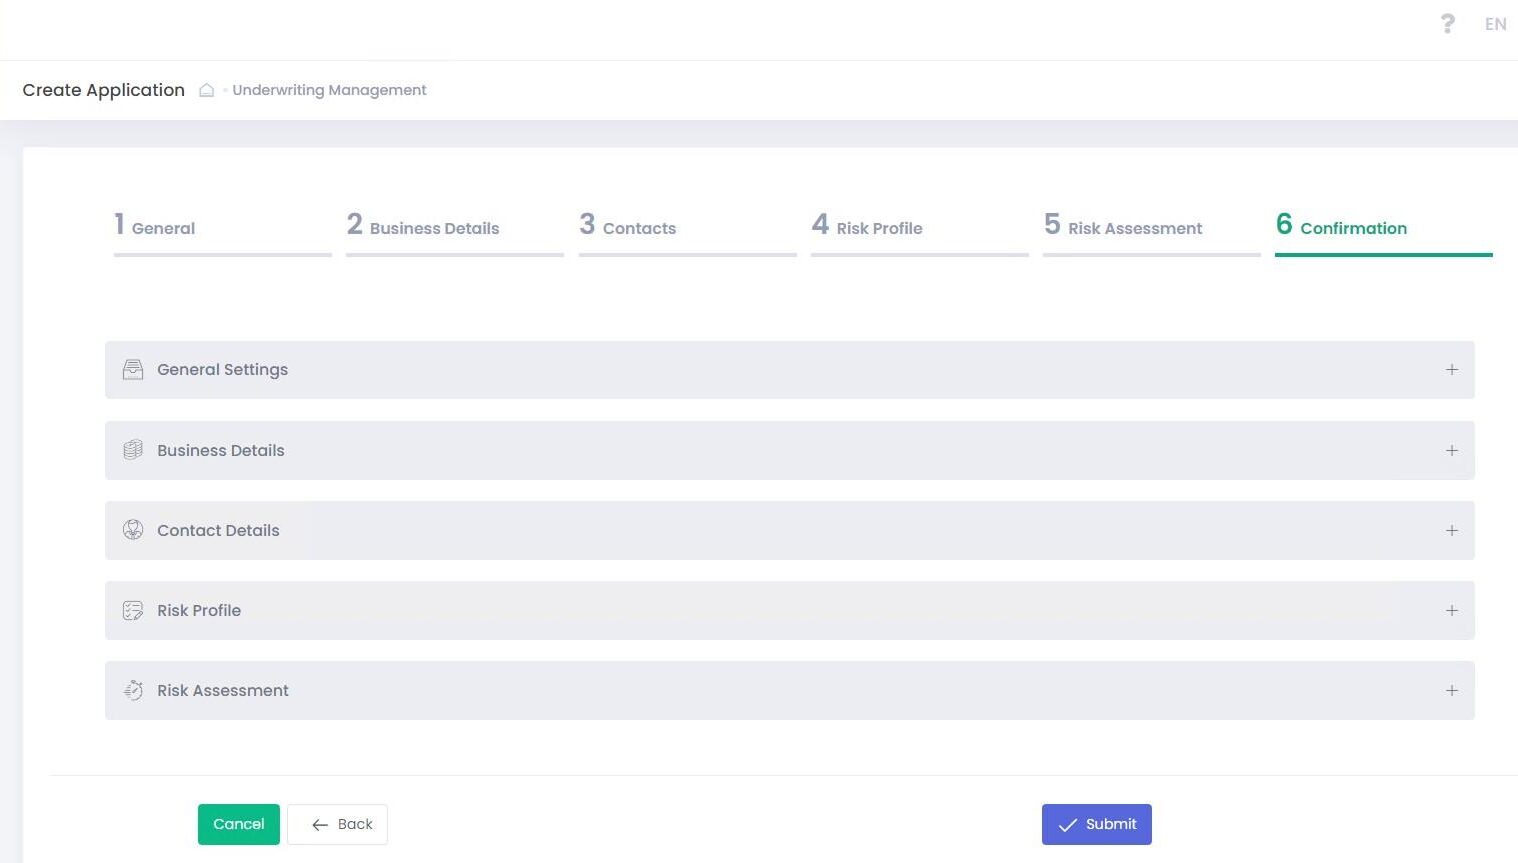 In the last step you can preview and check all the provided information and submit application.
It is possible to create a new Sub-Account right from the Application screen and automatically enable a specific application for this new Sub-Account. Use Add Sub-Accounts command in the Actions Menu to open Sub-Account Onboarding Wizard. The overall flow is identical to the one described in the Sub-Accounts Management section. The only difference is that Sub-Account gets this specific application automatically attached and underwriting enabled.
To Add Sub-Account
In the last step you can preview and check all the provided information and submit application.
It is possible to create a new Sub-Account right from the Application screen and automatically enable a specific application for this new Sub-Account. Use Add Sub-Accounts command in the Actions Menu to open Sub-Account Onboarding Wizard. The overall flow is identical to the one described in the Sub-Accounts Management section. The only difference is that Sub-Account gets this specific application automatically attached and underwriting enabled.
To Add Sub-Account
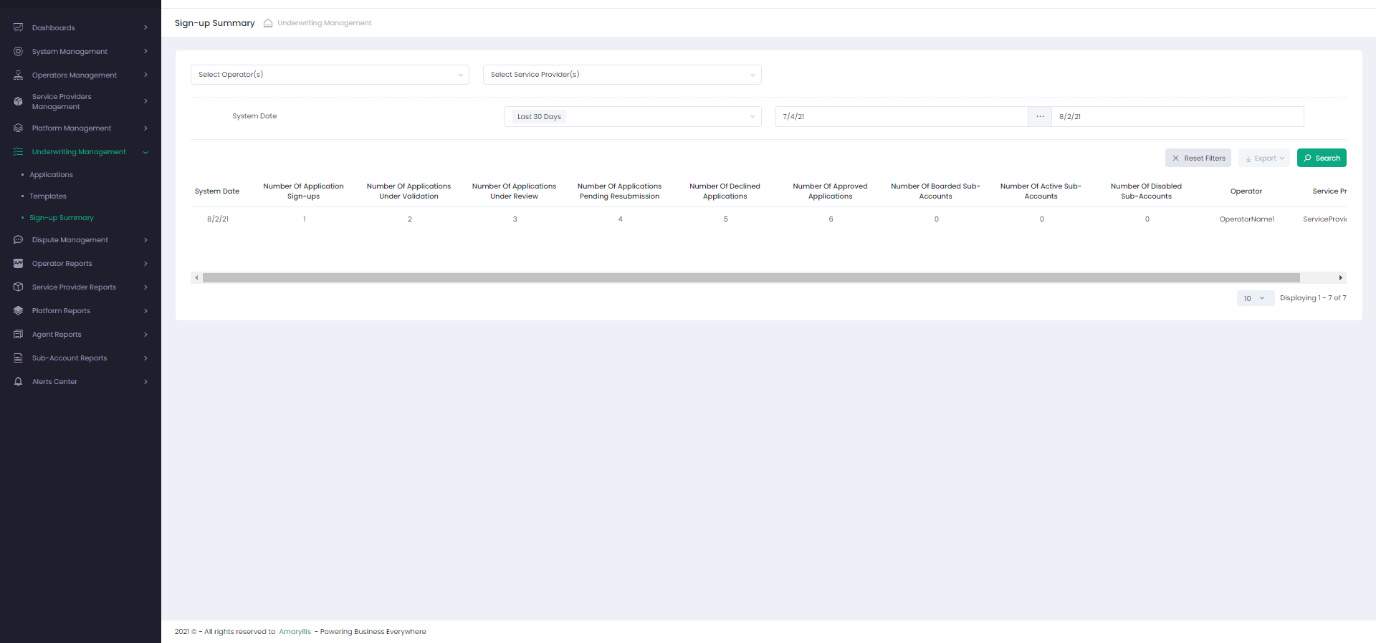 Use Sign-up Summary report to view the UMS life cycle from a UMS boarding request all the way through to an active Sub-Account.
The following steps of the UMS activities are supported by statistics and can be reviewed on daily basis:
Use Sign-up Summary report to view the UMS life cycle from a UMS boarding request all the way through to an active Sub-Account.
The following steps of the UMS activities are supported by statistics and can be reviewed on daily basis:
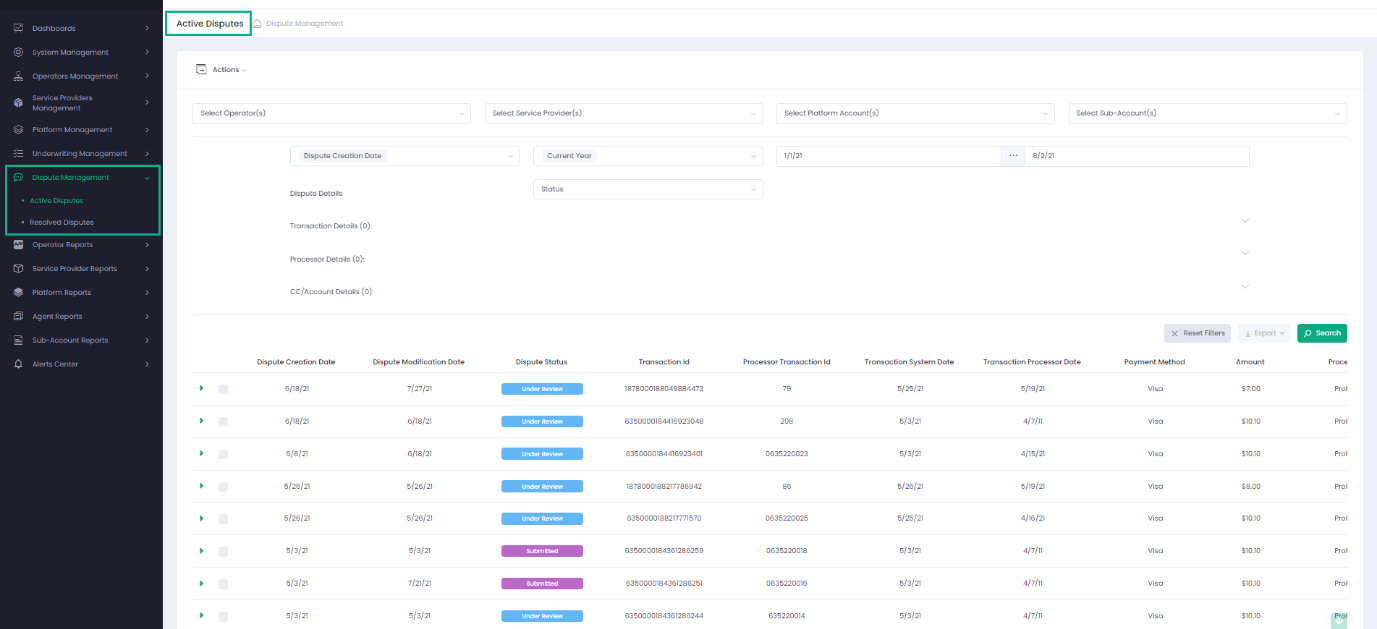
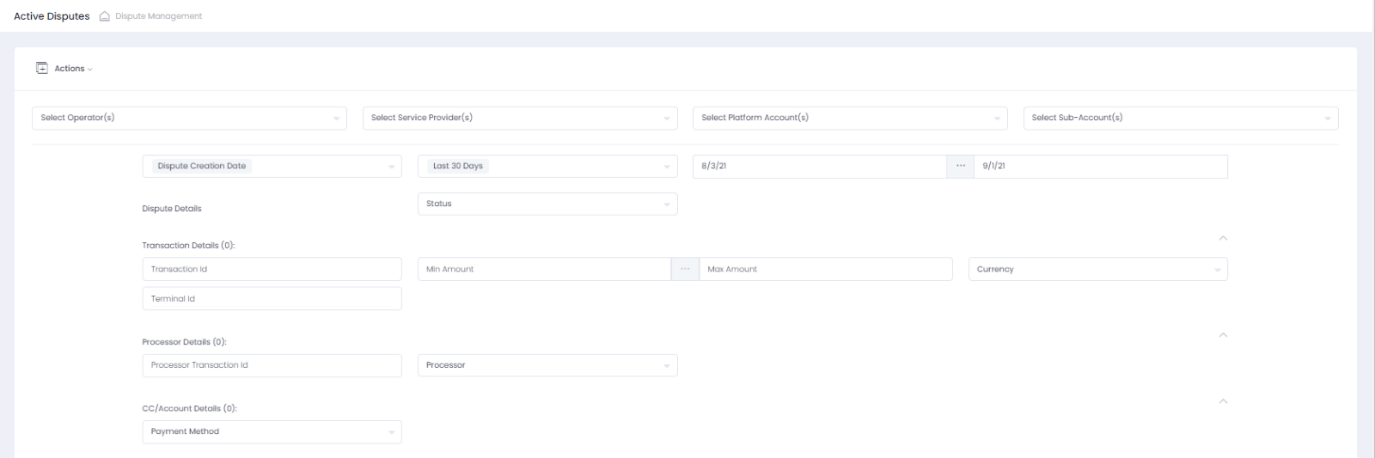
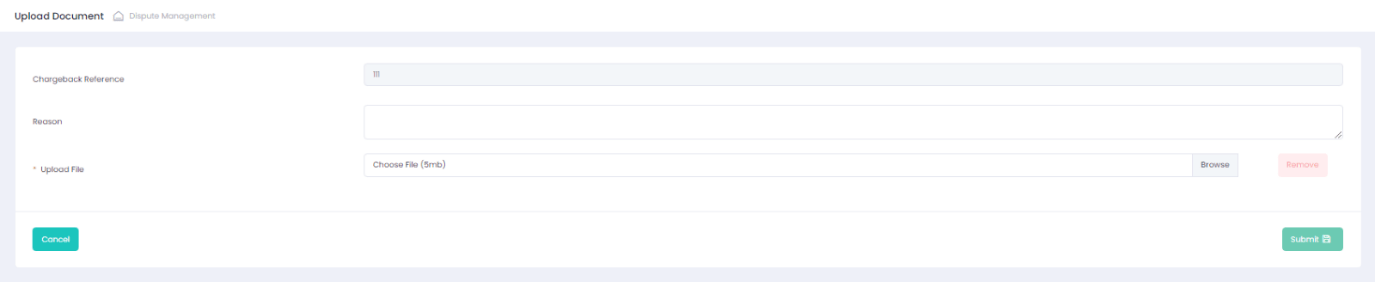 The details of the uploaded file are displayed in the sub-grid on Active Disputes page.

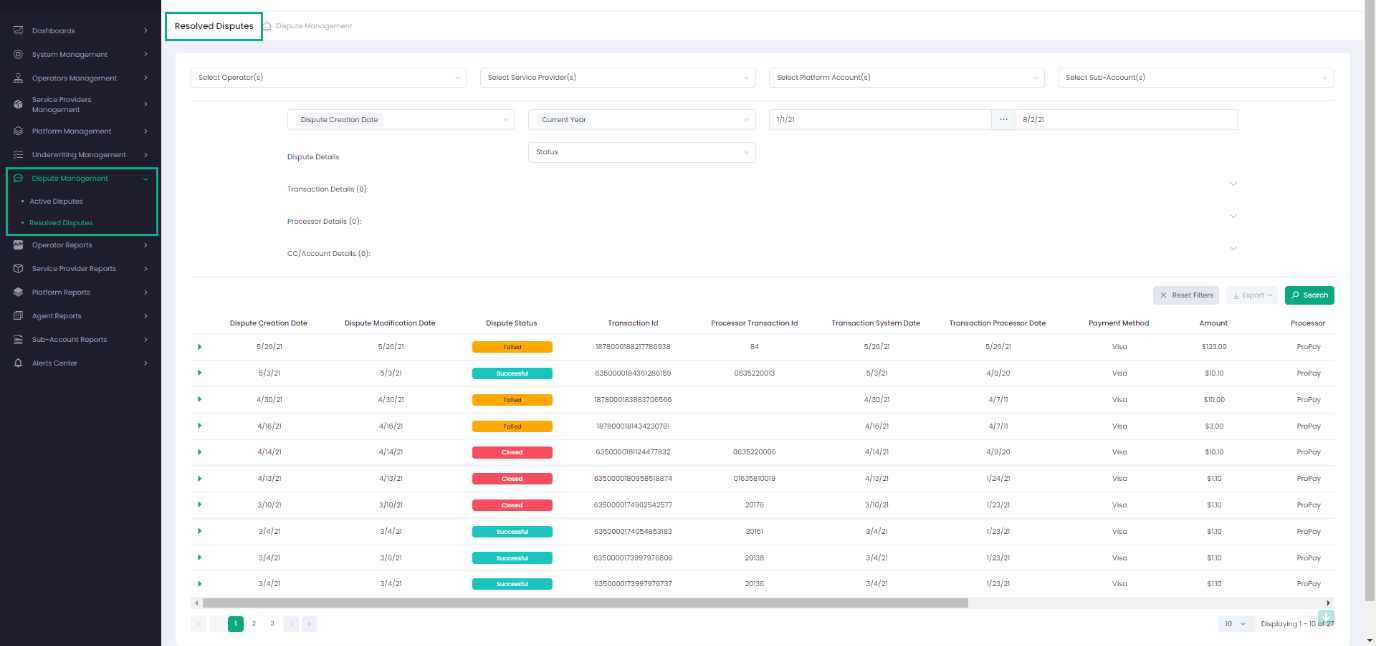
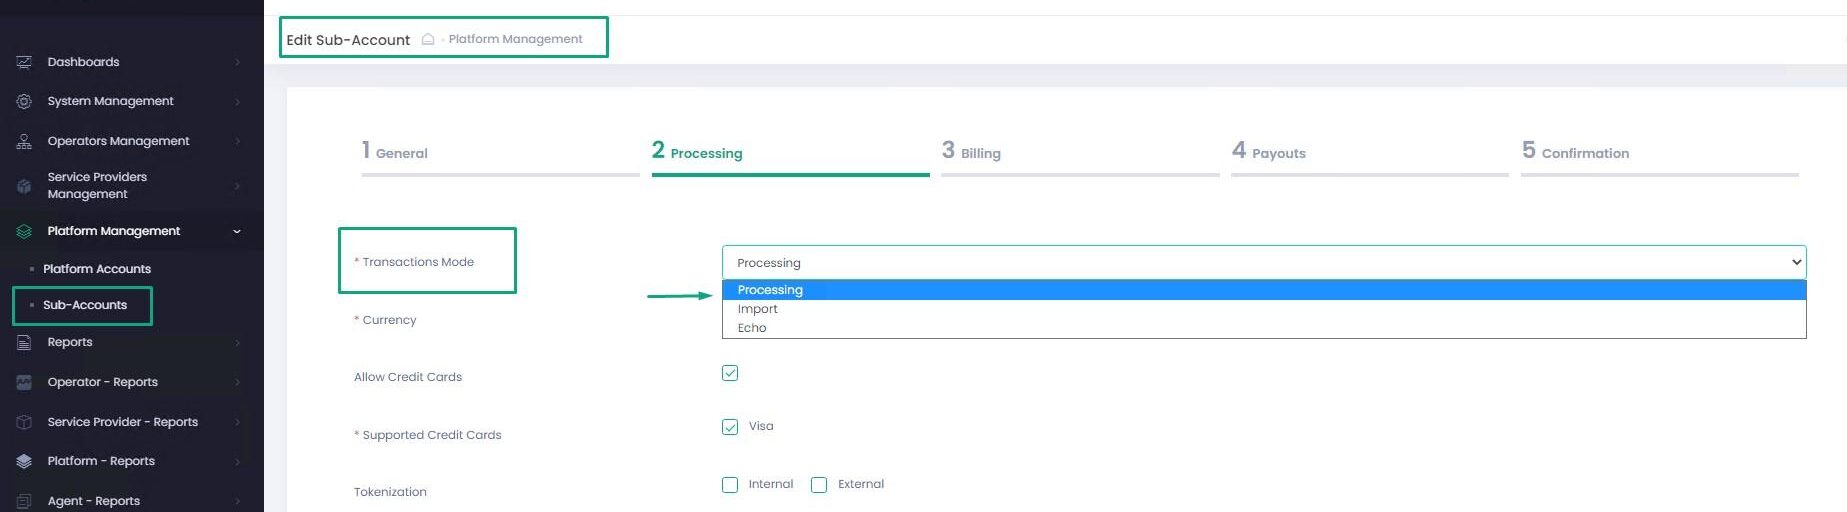 Select Processing Mode to process transactions via the System Gateway. You can process transactions via the standard Gateway API and/or manually via the Back-Office.


 Authorization transaction serves to verify the payment information and to reserve a security amount on the credit card balance until the actual charge is executed.
Authorization is a Regular request transaction type – not based on any previous transactions.
Authorization transaction can be followed by Void, Partial Void, Capture or Partial Capture transactions – see Available Actions below.
Authorizations help reduce the risk of fraudulent transactions and credit card misuse.
Authorization transaction serves to verify the payment information and to reserve a security amount on the credit card balance until the actual charge is executed.
Authorization is a Regular request transaction type – not based on any previous transactions.
Authorization transaction can be followed by Void, Partial Void, Capture or Partial Capture transactions – see Available Actions below.
Authorizations help reduce the risk of fraudulent transactions and credit card misuse.
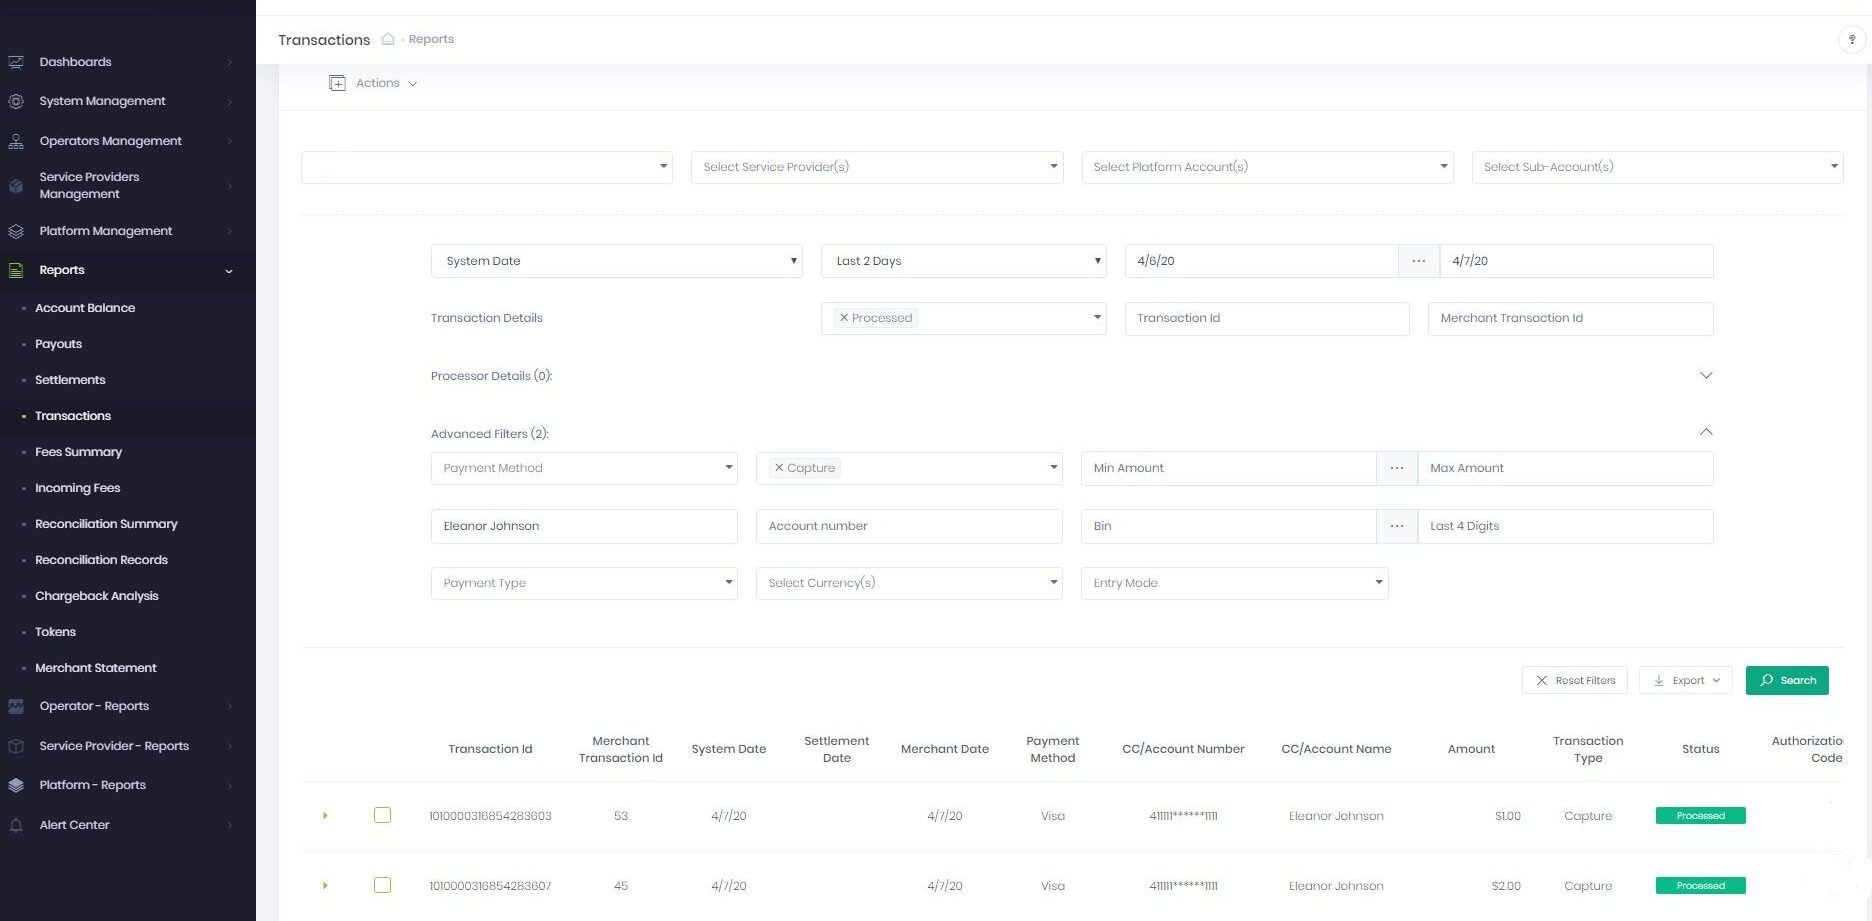 In a Deposit transaction, funds are transferred from the buyer’s bank account to the seller’s bank account after the order/service is completely fulfilled.
Deposit Transaction Types
Capture (Submit Deposit) – follows the parent (original) Authorization transaction.
Charge (Regular Deposit) – a direct funds transfer without a prior (parent) Authorization transaction.
Partial Capture occurs when only a part of the authorization transaction amount has to be deposited.
Partial Capture may be followed by a Partial Void (Cancel Authorization), where the funds that have not been deposited are to be released back to the buyer (upon Merchant’s consideration).
In a Deposit transaction, funds are transferred from the buyer’s bank account to the seller’s bank account after the order/service is completely fulfilled.
Deposit Transaction Types
Capture (Submit Deposit) – follows the parent (original) Authorization transaction.
Charge (Regular Deposit) – a direct funds transfer without a prior (parent) Authorization transaction.
Partial Capture occurs when only a part of the authorization transaction amount has to be deposited.
Partial Capture may be followed by a Partial Void (Cancel Authorization), where the funds that have not been deposited are to be released back to the buyer (upon Merchant’s consideration).
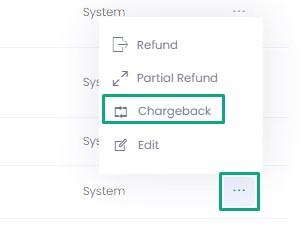 In the Back-Office user can perform the following actions on credit card Capture transactions.
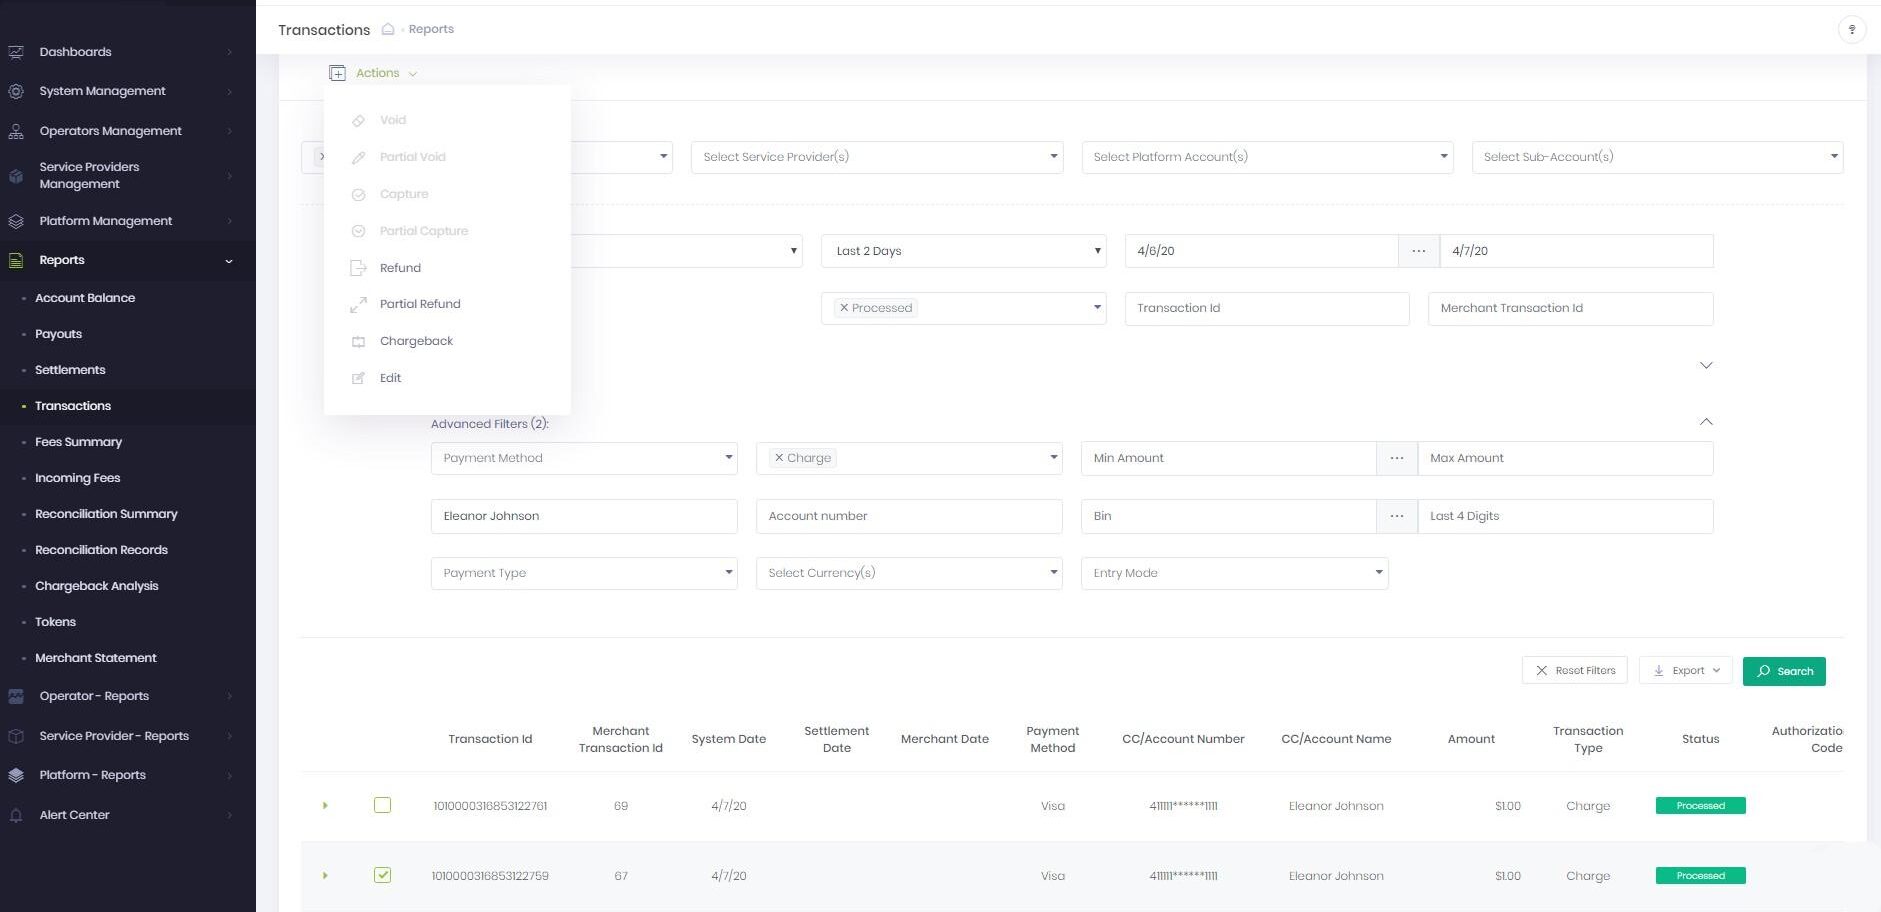 In a Deposit transaction, funds are transferred from the buyer’s bank account to the seller’s bank account after the order/service is completely fulfilled.
Deposit Transaction Types
Capture (Submit Deposit) – follows a parent (original) Authorization transaction.
Charge (Regular Deposit) – a direct funds transfer without a prior (parent) Authorization transaction.
In a Deposit transaction, funds are transferred from the buyer’s bank account to the seller’s bank account after the order/service is completely fulfilled.
Deposit Transaction Types
Capture (Submit Deposit) – follows a parent (original) Authorization transaction.
Charge (Regular Deposit) – a direct funds transfer without a prior (parent) Authorization transaction.
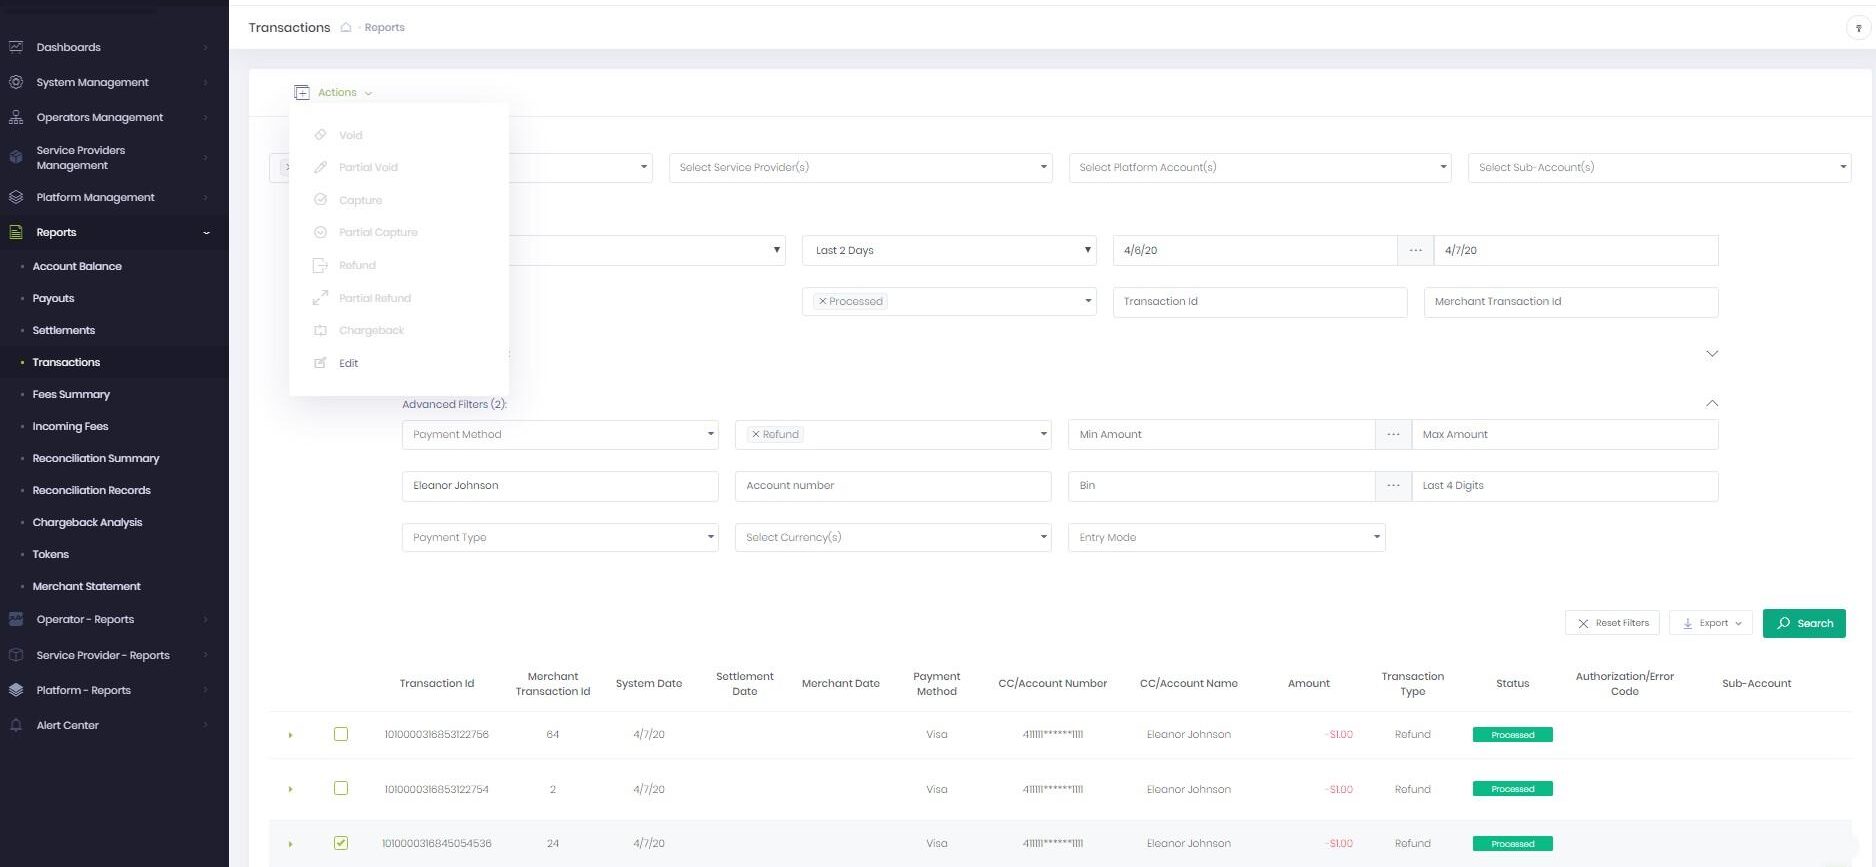 Refund transaction follows Capture, Partial Capture or Charge transactions.
Refund transaction returns funds from the Merchant to the Buyer upon the Buyer’s request.
Refund is a Submit request transaction type – meaning that it derives from the parent (original) Deposit (Capture) transaction.
Refund transaction can be Full or Partial, depending on the agreement between the involved parties.
Refund transaction follows Capture, Partial Capture or Charge transactions.
Refund transaction returns funds from the Merchant to the Buyer upon the Buyer’s request.
Refund is a Submit request transaction type – meaning that it derives from the parent (original) Deposit (Capture) transaction.
Refund transaction can be Full or Partial, depending on the agreement between the involved parties.
 The difference between Refund and Credit transaction types, is that Refund is a Submit request transaction type and is based on a previous (parent) transaction (e.g. Capture or Charge). Credit transaction is a Regular request transaction type and is not based on any previous (parent) transaction. Credit transaction in use:
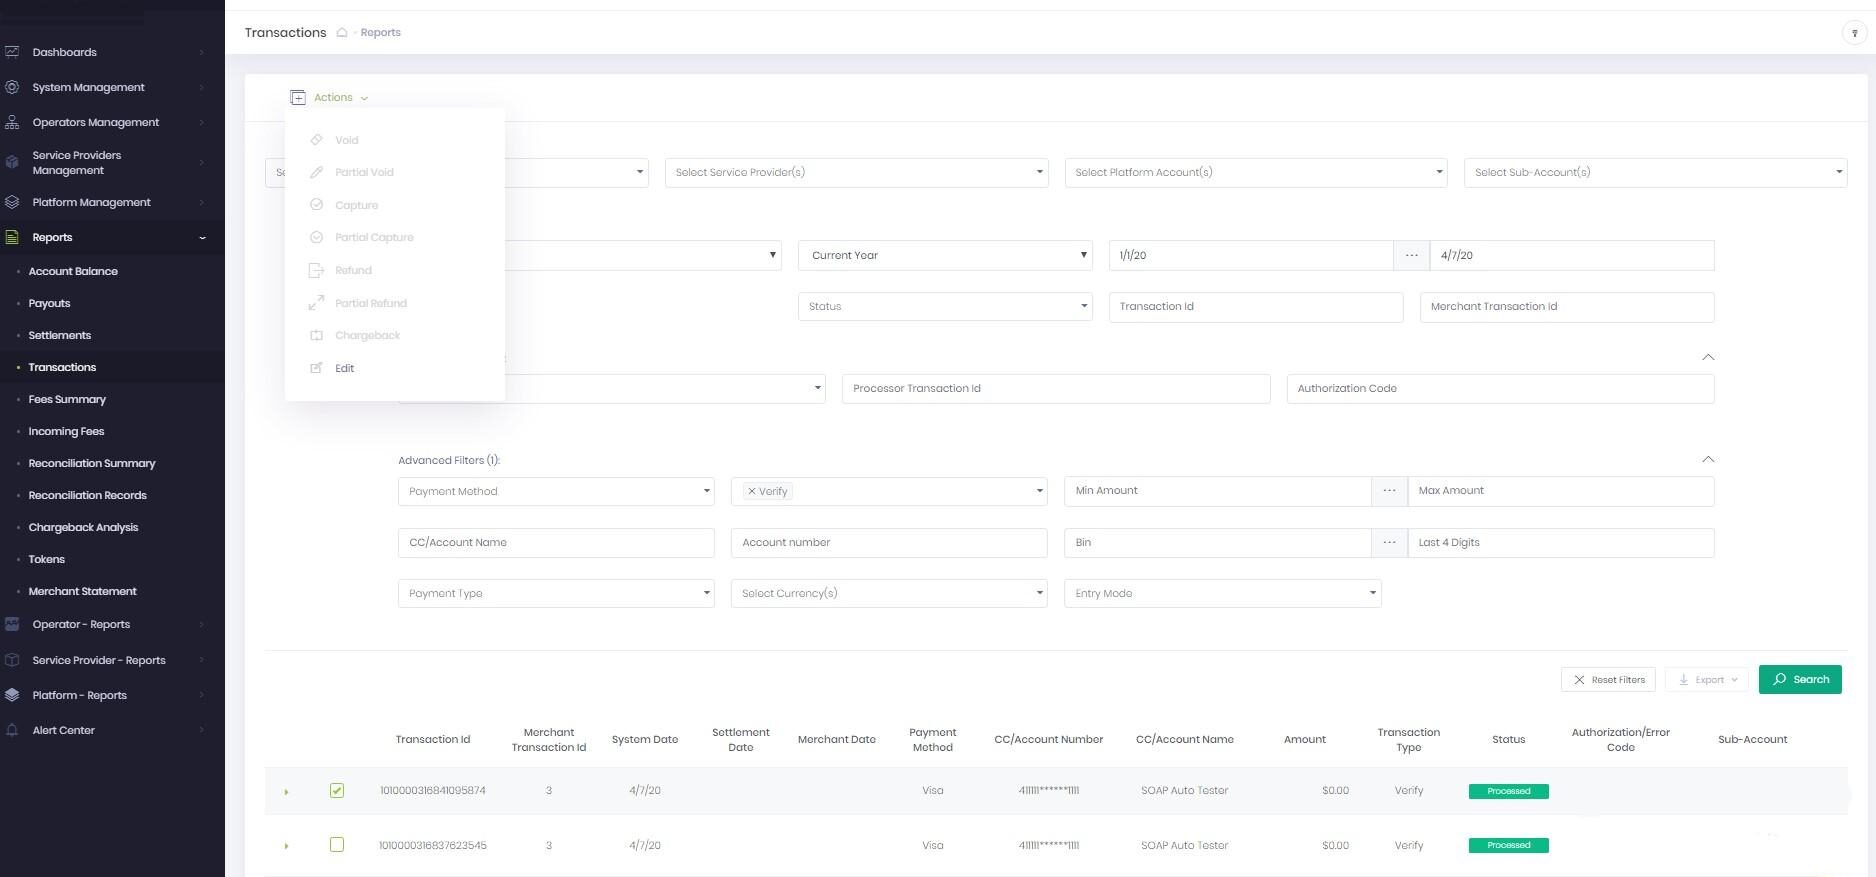 Verify (Check Payment Method) is a Regular request transaction type – meaning that it is not based on any parent (original) transaction.
Verify (Check Payment Method) transaction can serve two purposes:
Verify (Check Payment Method) is a Regular request transaction type – meaning that it is not based on any parent (original) transaction.
Verify (Check Payment Method) transaction can serve two purposes:
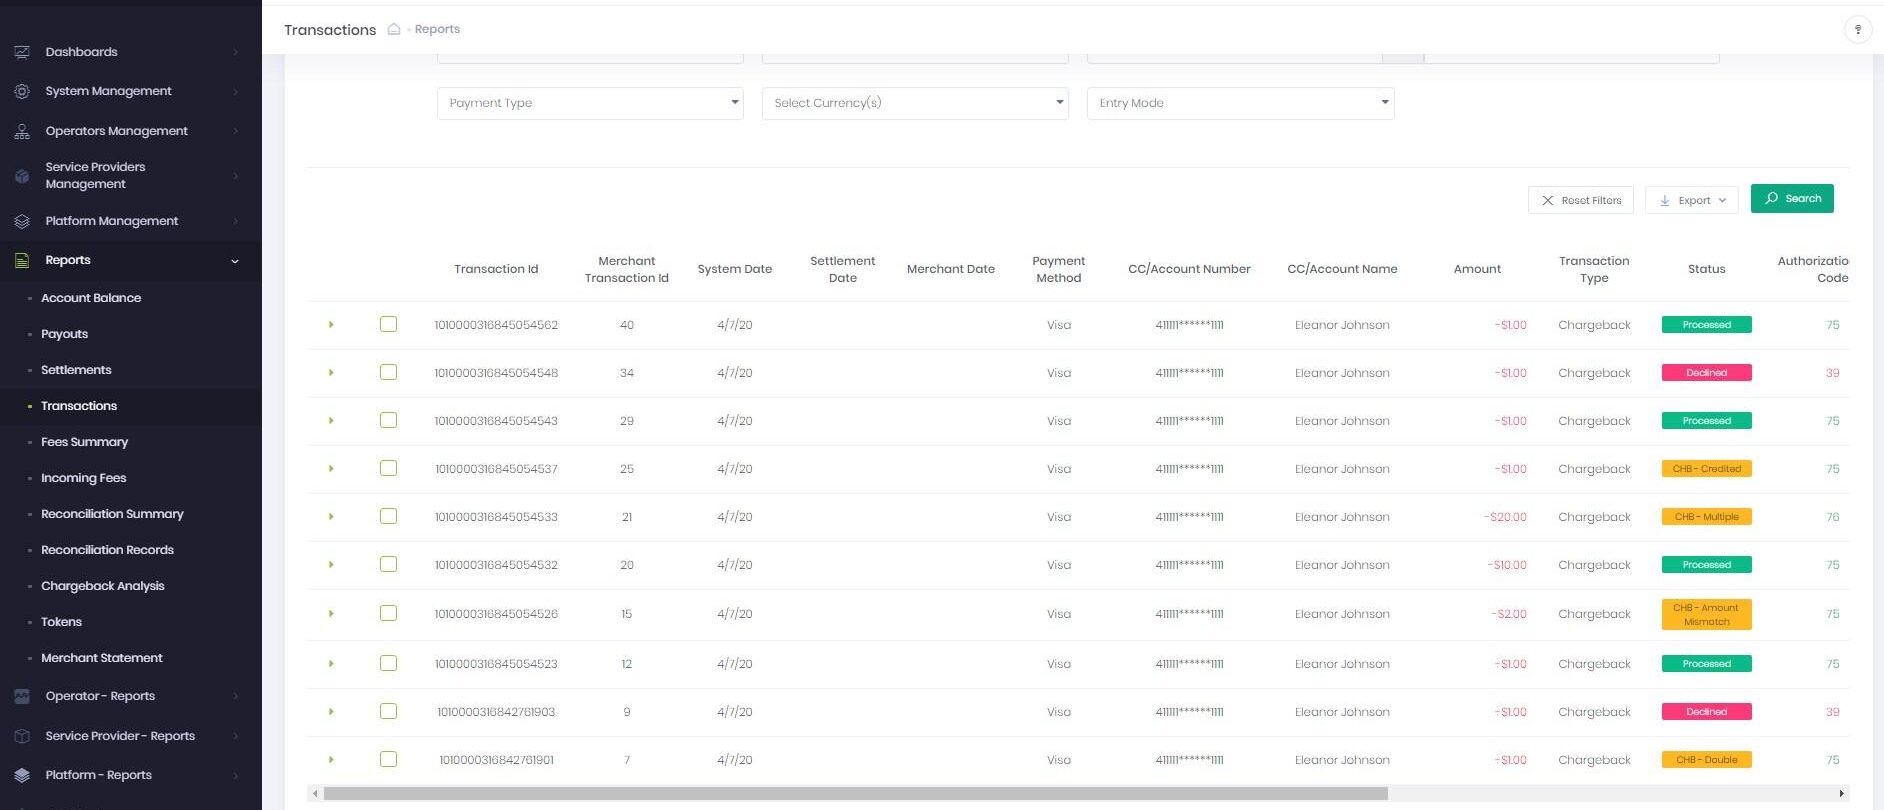 Chargeback definition: chargeback is a process initiated by the cardholder or the card issuing bank to reverse the payment transaction that has already been settled.
As a result the funds are being returned to the buyer.
Chargeback transaction is a Debit request transaction type and follows previous Capture, Partial Capture or Charge transactions.
To Process a Chargeback for Capture/Charge Transactions:
Chargeback definition: chargeback is a process initiated by the cardholder or the card issuing bank to reverse the payment transaction that has already been settled.
As a result the funds are being returned to the buyer.
Chargeback transaction is a Debit request transaction type and follows previous Capture, Partial Capture or Charge transactions.
To Process a Chargeback for Capture/Charge Transactions:
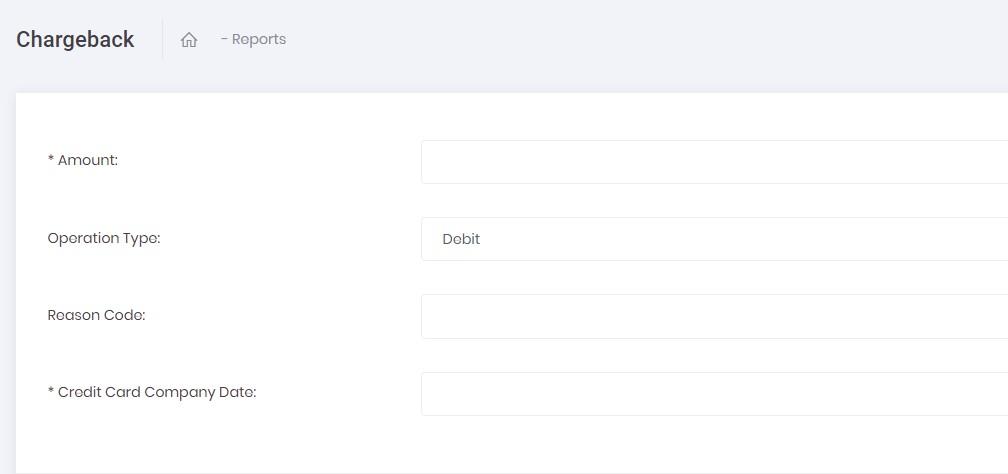

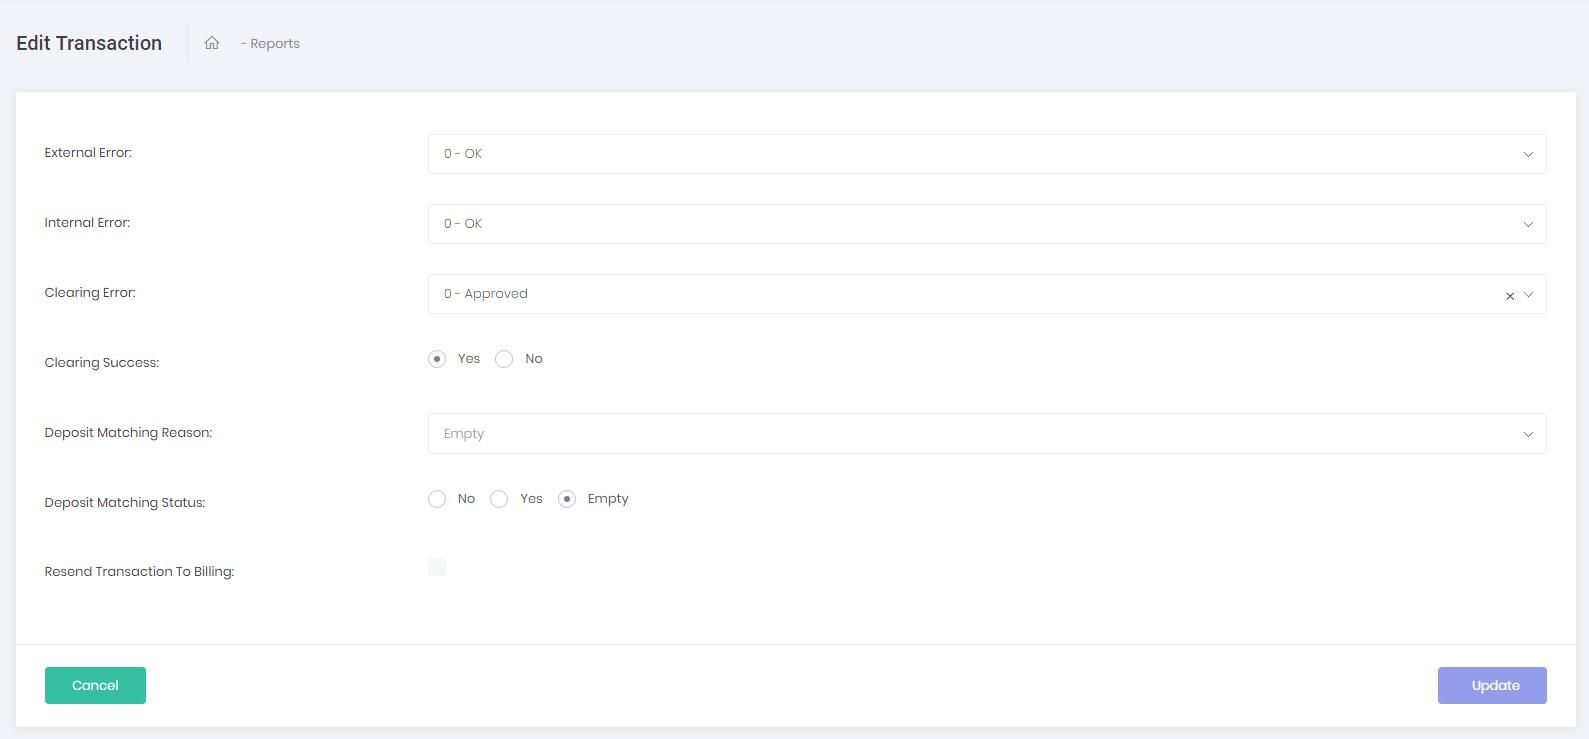 User can manually Edit transactions error and deposit matching information.
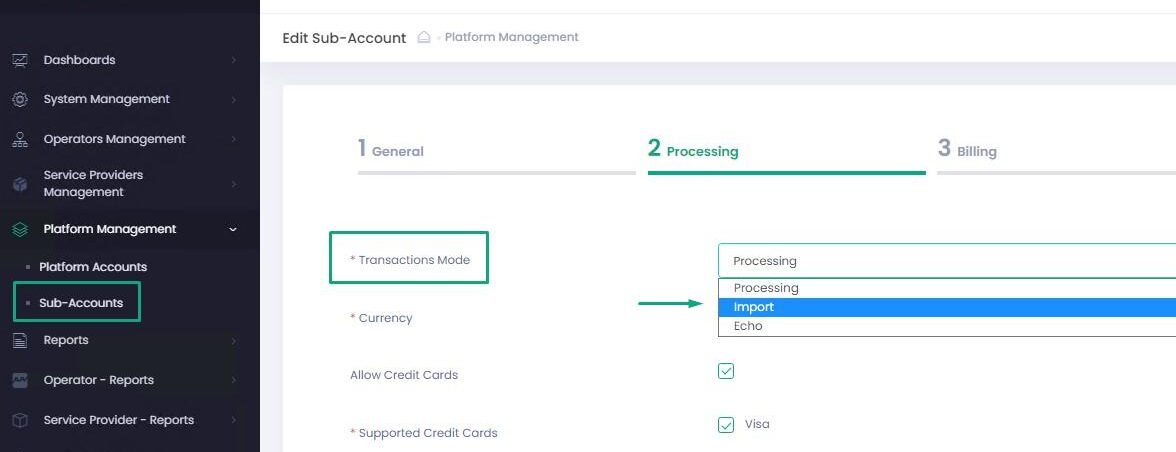 Select this Transaction Mode in case transactions are processed via the external processor. Transactions data is then imported to the System via the external API (or SFTP) to perform Billing, Reconciliation and Payout operations.
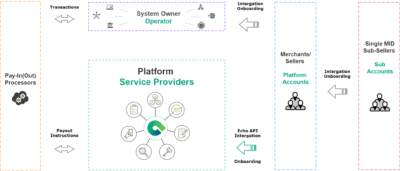
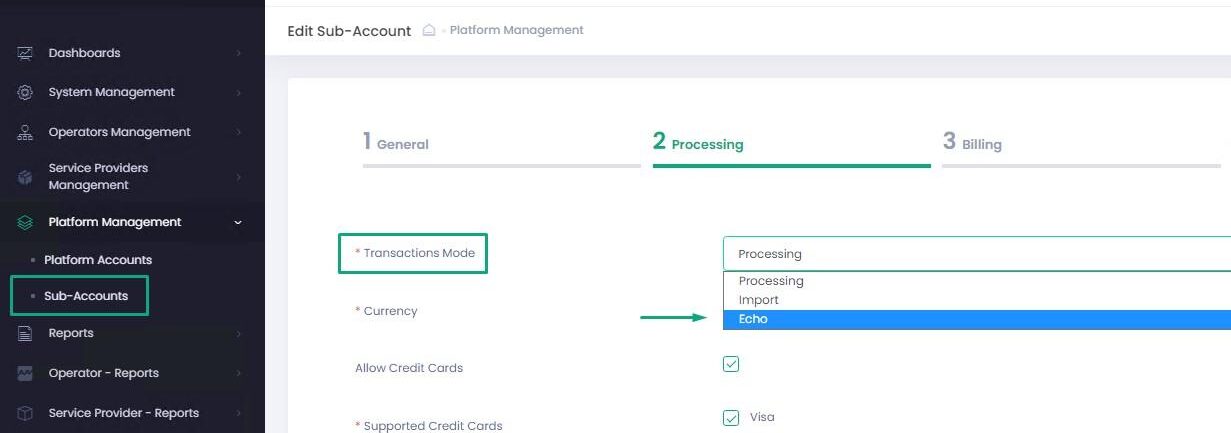 Select this Transaction Mode in case transactions are processed via the external processor. Transactions data is then injected into the System by the Merchant/Seller via the System Echo API in real time to perform Billing, Reconciliation and Payout operations.