Sub-Account Configuration
Sub-Account Onboarding Wizard
Sub-Accounts can be created via the Back-Office Sub-Account Onboarding Wizard or Management API.
Sub-Account onboarding is a five-step procedure that allows to create and/or edit Sub-Accounts. The procedure consists of the following steps:
- General
- Processing
- Billing
- Payouts
- Confirmation
Press the Save & Continue button to save settings at the current step and proceed to the next step.
Press the Back button to return to the previous step without saving settings at the current step.
Press the Cancel button to abort onboarding without saving.
Press the Submit button to save all settings and complete the onboarding procedure.
Let us configure a new Sub-Account!

- Go to the Sub-Accounts section under the Platform Management tab
- Click Add Sub-Account
- Follow the five-step Sub-Account Onboarding Wizard to create a new Sub-Account
OR
- Select at least one Sub-Account
- Select Add/Edit Sub-Account in the Actions pop-up options list
- Follow the five-step Sub-Account Onboarding Wizard to Add/Edit a new Sub-Account
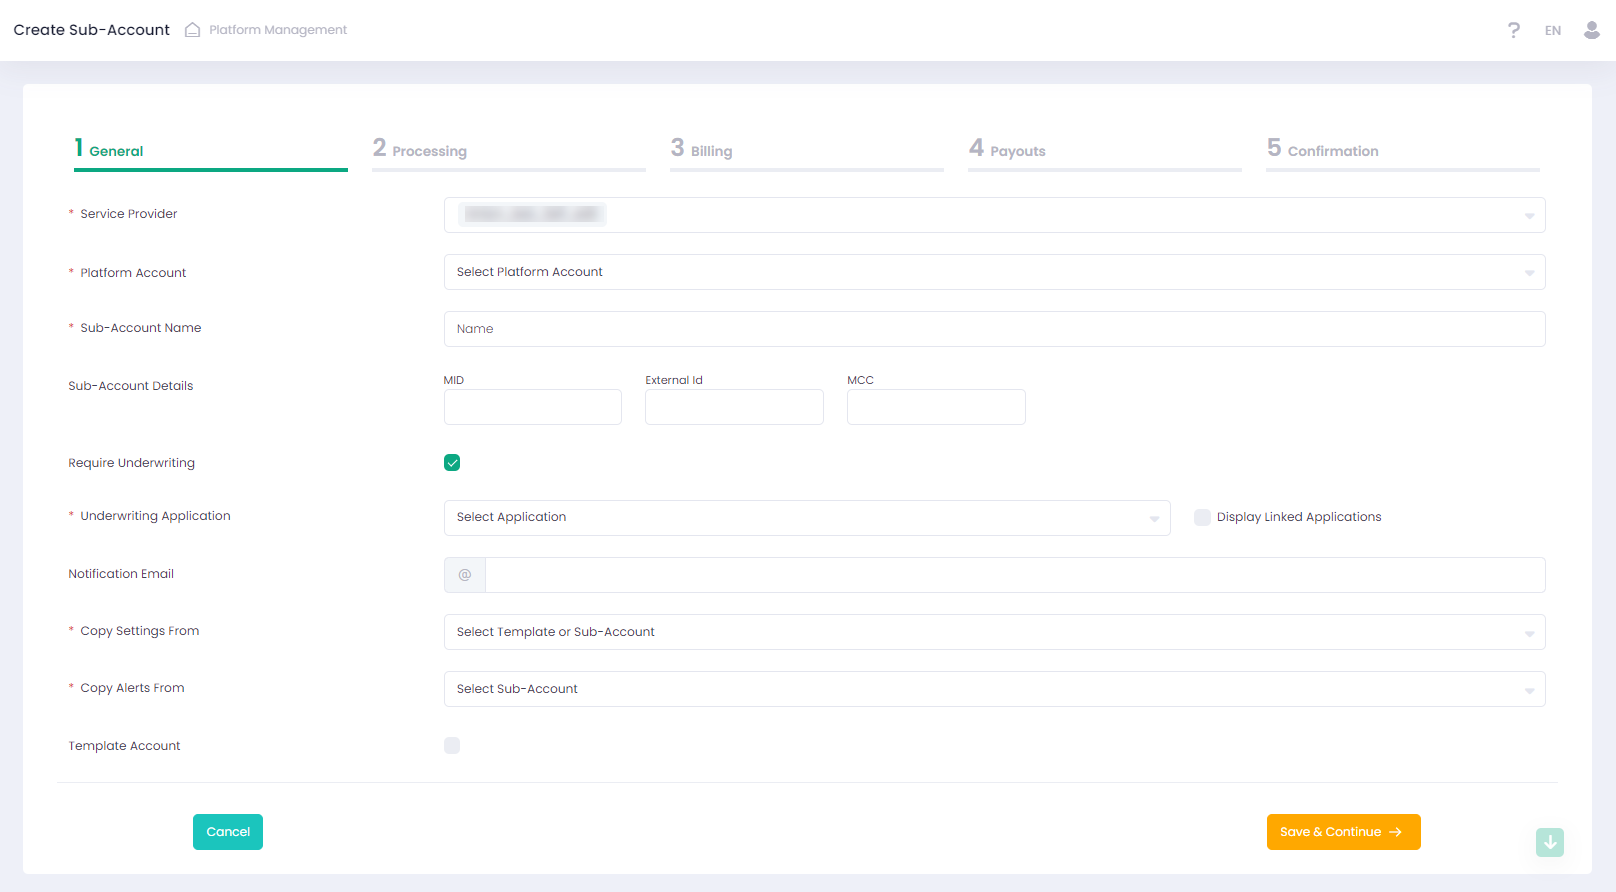
Set general Sub-Account parameters. Besides, you can determine a template Sub-Account to copy settings from.
| Name | Description | Optionality |
| Service Provider | Select a Service Provider from the list of automatically pre-loaded Service Providers | Required |
| Platform Account | The list of available Platform Accounts is preloaded automatically, based on your choice of the Service Provider | Required |
| Sub-Account Name | Enter the Sub-Account Name to be displayed in the system | Required |
| MID | Merchant Identification number | Not Required |
| External Id | Merchant external identifier | Not Required |
| MCC | Merchant Category Code | Not Required |
| Require Underwriting | Activate to enable underwriting for Sub-Account onboarding. Available in case enabled by the related Service Provider. May be configurable or not depending on the related Service Provider settings | Not Required |
| Underwriting Application | In case disabled, you can see just unlinked applications for your Service Provider. Activate to see all linked and approved applications under your Service Provider. Enter Underwriting Application name in the text box or select from the list. Payment details from the Underwriting Application are always pre-populated in the Sub-Account payout configurations in case an Underwriting Template has been selected | Optional |
| Notification Email | Enter Email to receive alerts and notifications | Not Required |
| Copy Settings From | The list of available Sub-Account templates to copy settings from is preloaded automatically based on your Service Provider selection. To skip selecting a template Sub-Account select None in the Copy Settings From drop-down list. It is enabled for the Edit form only | Not Required |
| Copy Alerts From | The list of available Sub-Accounts to copy alerts and notifications from is preloaded automatically based on your Service Provider selection. To skip selecting a Sub-Account select None in the Copy Alerts From drop-down list. It is enabled for the Edit form only | Required |
| Template Account | Activate if you want to create a template Sub-Account | Not required |
MERCHANT STATEMENT PROCESSOR DETAILS
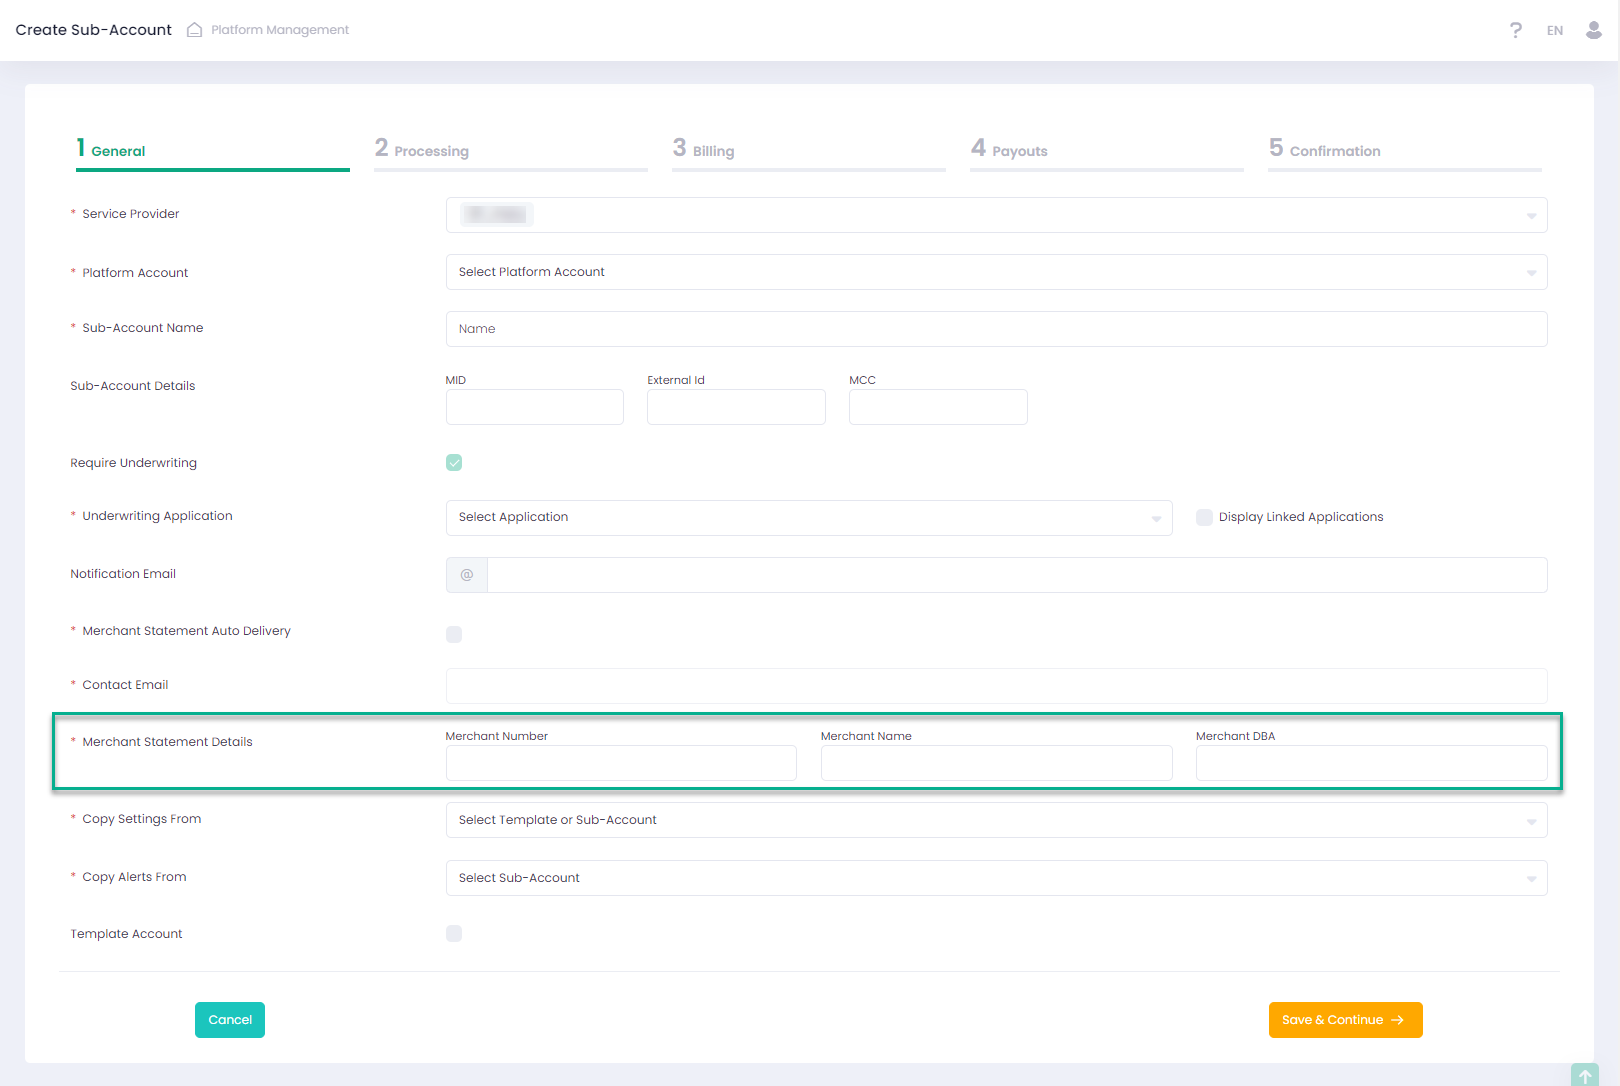
Please note that in case an Internal merchant statement report issuer has been configured for a related Service Provider, then the Sub-Account General information offers extra parameters to set Merchant Statement report delivery. In case the option of automated delivery of the report is activated, specify the following delivery parameters:
- Target email address
- Specify additional merchant identification parameters for reports:
- Merchant number
- Merchant name
- Merchant DBA
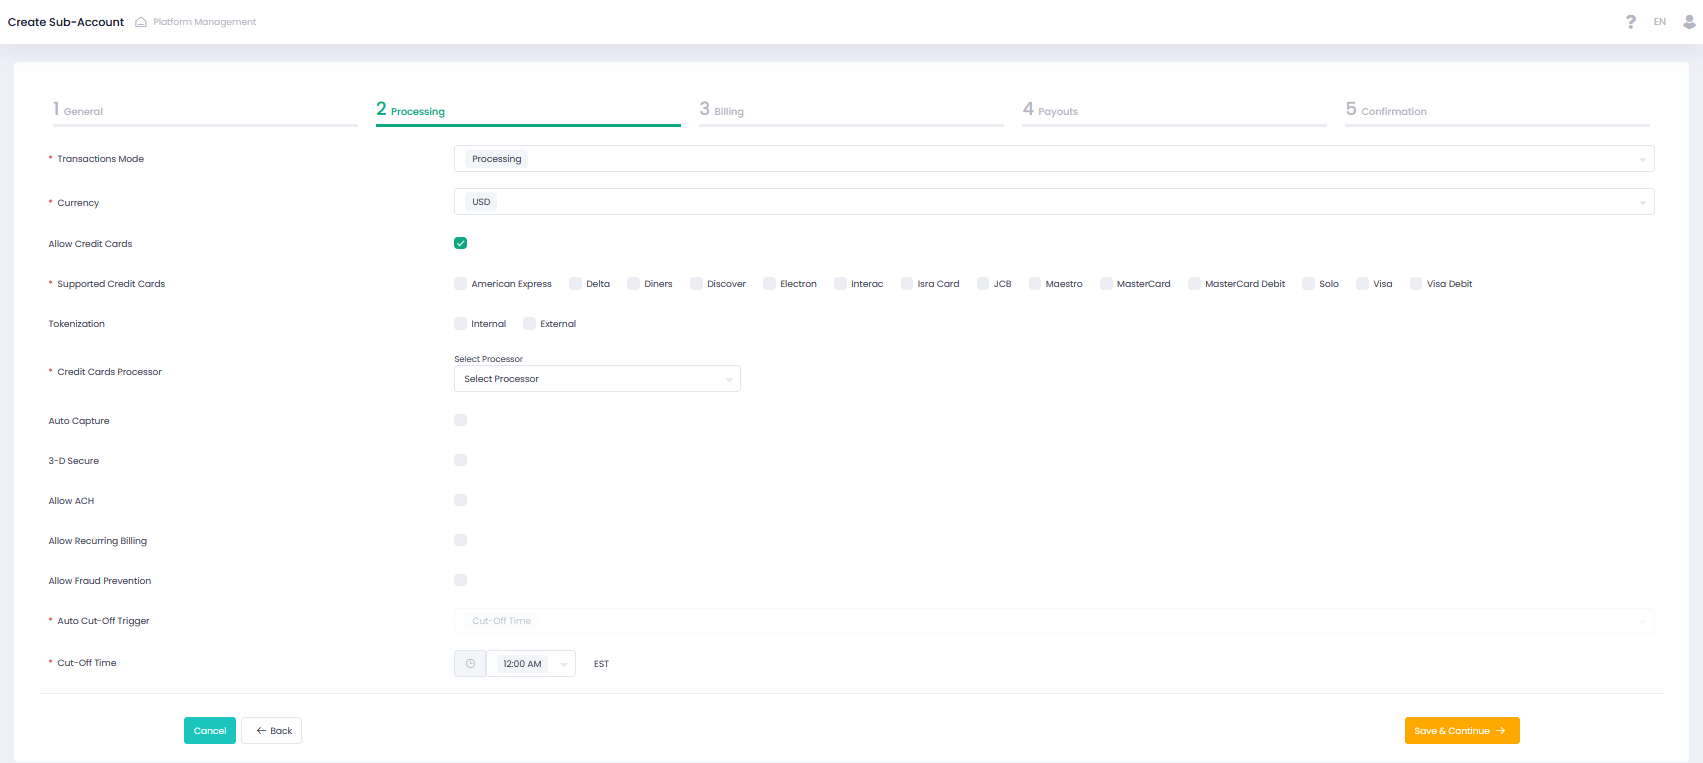
Please configure Sub-Account transactions processing options like credit card, ACH, gift cards, transaction processing mode and enable functions such as recurring billing, auto capturing, and fraud detection. The system allows you to choose an in-house transaction processing gateway or use an available external processor.


All the pre-populated values are based on the selected Service Provider and if applicable the template Sub-Account chosen. Change values you wish to override. Unchanged values will be inherited from the template that was chosen in the first step of the Sub-Account onboarding wizard.
| Name | Description | Optionality |
| Transactions Mode | Select the desired transactions processing mode:
See Transactions Processing for more information | Required |
| Currency | Select a transactions processing currency for your Sub-Account from the dropdown list | Required |
| Allow Credit Cards | A Boolean value allowing to enable credit cards processing payment method. It is required to select either the Allow Credit Cards and/or Allow ACH payment method | Optional |
| Supported Credit Cards | Required if the previous option is enabled. Choose at least one credit card type. Available credit card types are determined by the Service Provider | Optional |
| Allow Gift Cards | Activate to enable gift cards processing. Enabled for Echo and Import Transaction Modes. Requires Allow Credit Cards to be enabled. Corresponds to a Gift Card payment method. See the Transactions Report Advanced Filter Payment Method drop-down | |
| Tokenization | Choose between Internal and External tokenization options or select both | |
| Credit Card Processor | Required if credit card processing is enabled. Choose one processor from the list. Available options are determined by the Service Provider | Optional |
| Processor Parameters | Preset individually for each processor and if applicable are based on the selected template Sub-Account | |
| Auto Capture | A Boolean value allowing to enable the automated Capturing service. In case selected, Authorization transactions are deposited automatically every two hours | |
| 3-D Secure | Enables 3-D Secure, if activated | Optional |
| Allow ACH | A Boolean value allowing to enable ACH payment method. It is required to select either the Allow Credit Cards and/or Allow ACH payment method | Optional |
| ACH Processor | Required if ACH processing is enabled. Choose one processor from the list. Available options are based on the selected Service Provider | Optional |
| Processor Parameters | Preset individually for each ACH processor and are based on the selected template Sub-Account | |
| Allow Recurring Billing | A Boolean value allowing to enable recurring transactions processing. Choose at least one of the options below:
If enabled, it requires Manage Subscriptions to be also enabled | |
| Allow Fraud Prevention | Enables Fraud Detection Service, if activated | |
| Auto Cut-Off Trigger | Enable service auto cut-off. Cut-Off Time — default value | |
| Cut-Off Time | Cut-off time picker |

Billing is an optional step where you can configure commissions and fees for your Sub-Account based on your Service Provider settings. At this step you can configure regular and interchange fees, that have been preconfigured at the corresponding Service Provider level with Fee Source=Sub-Account. In case no such fees have been created at the Service Provider level, the user will see a corresponding warning message.
Fee types and names are preset by your Service Provider configuration. You can disable fees and configure fees values for the following fee types (in case enabled by the Service Provider):
ENABLING FEES ON SUB-ACCOUNTS
Interchange Fees
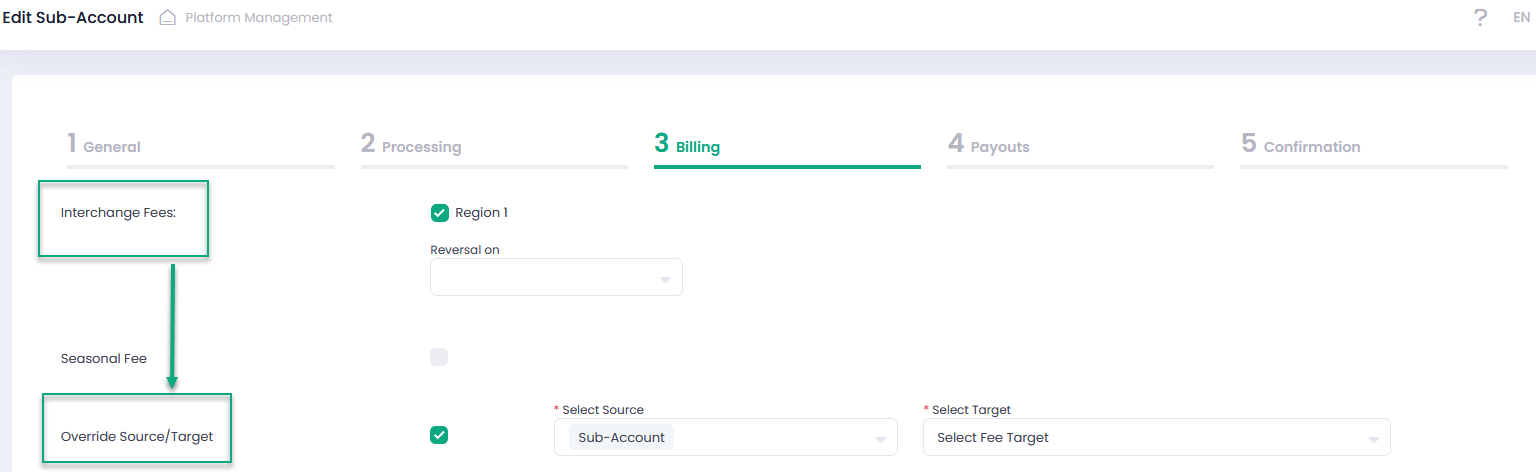
Available Interchange Fees are determined by the Service Provider. This step is optional. Activate required Interchange Fee(s) by selecting the relevant checkbox. Skip to disable processing of Interchange Fees.
Reversal of Interchange Fees: Fee Reversal allows reversal of the interchange fees if the selected Reversal On transaction type has been processed.
Set fees reversal for the selected Interchange Fees regions, select one or more options from the Reversal On drop down list.
Override of Interchange Fees
At the Billing step you can override the original Interchange Fees source/target, determined by the related Service Provider.
- Select one of the available interchange fees.
- Check Override Source/Target to enable.
You can select interchange Source/Target you wish to override from the drop-down list.
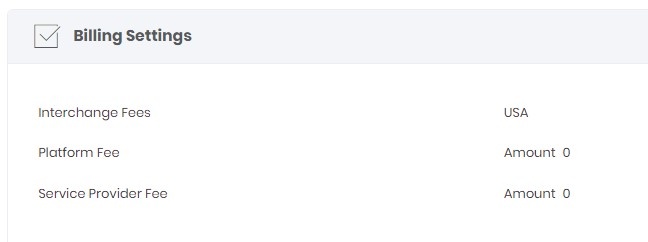
Interchange Fees activated for a Sub-Account will be displayed at the Billing step of the Sub-Account Onboarding Wizard.

Per TRX Amount and/or Percentage
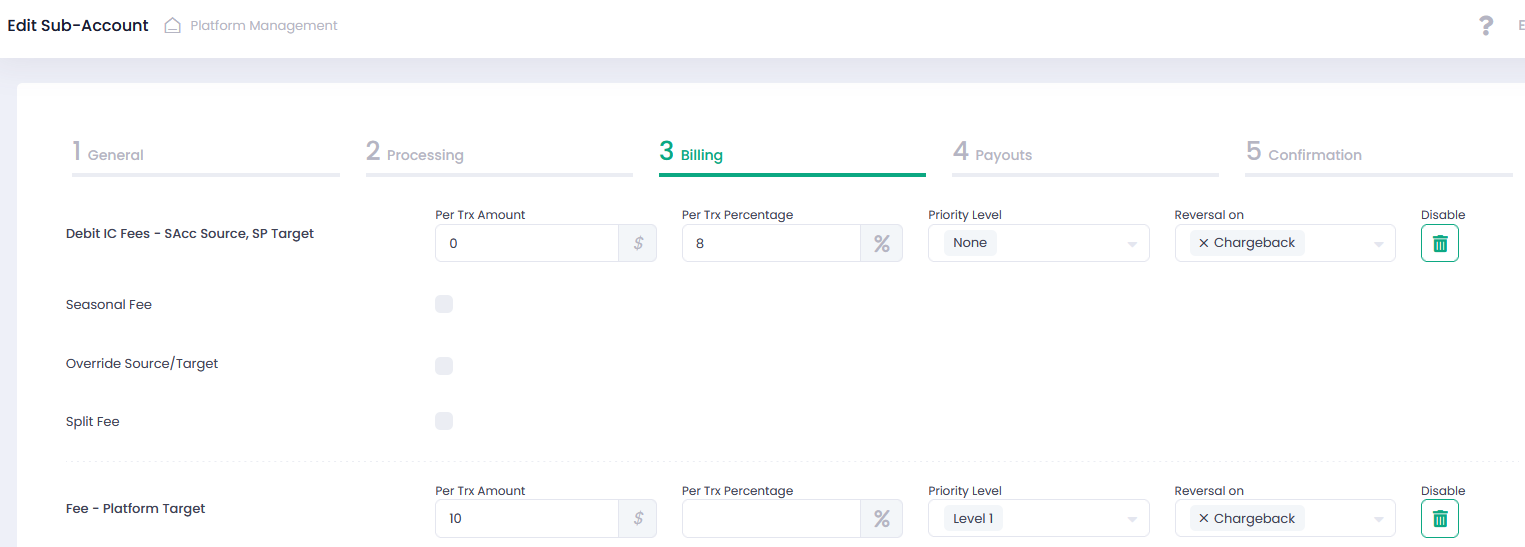
Per-Transaction Fees are fees that are calculated as a fixed and/or a percentage amount calculated for each transaction. Fee names and types are preset by the Service Provider. In the Billing section of the Sub-Account Onboarding Wizard, configure just fees values and other parameters.
Per-Transaction Fee Parameters
| Name | Description |
| Per Trx Amount | Fixed fee amount calculated for each transaction |
| Per Trx Percentage | Fee as a percentage of the transaction amount |
| Per Transaction Fees Actions | Remove — Used to remove a particular fee type from the Sub-Account billing settings |
Fees Reversal Select one of the options (Cancel, Refund, Partial Refund, Reserve Balance, or Void) in the Reversal on drop down to reverse per-transaction fees. You can enable fee reversal even for a disabled fee. In this case disabled fee is treated as enabled.
Per-Transaction fees are applied to relevant processed transactions and can be displayed in the Applied Fees in the Transaction Details in the Transactions Report. Priority Levels Fee Priority Level can be set for the Per-Transaction fee types. Priority levels are available from None, Level 1st till Level 10th
Priority Level
Priority Levels allow assigning priority levels to individual fees. Priority Levels follow the principle of hierarchy: superior levels determine what share of the total amount of applicable fees is to be assigned to subordinate levels.
Other Applicable Principles:
- Multiple fees at the same level do not affect each other.
- Fixed amount fees are excluded from the priority calculation but affect the overall fee amount — see an example below.
Fee Reversals are not affected by this functionality.
- Each Priority Level cannot have more than 100% of the total fee amount.
- There can be a Level 2 priority even if Level 1 has 100% (In this case Level 2 will not have any effect).
- Each fee target can be assigned just ones to the same Priority Level, but different Fee Targets can be at the same Priority Level.
- A specific Fee Value can be split an unlimited number of times but only up to 10 Priority Levels.
- In case of a Partial Refund, the partial contra is set based on the relative amount.
Example Transaction amount is $100:
- Fee Level None — 5% -> Fee amount is USD 5
- Fee Level 1 — 7% -> Fee amount is USD 7
- Fee Level 2 — 10% -> Fee amount is USD 9.3 (10% of 93(=100-7))
- Fee Level 3 — 3% and $5 -> Fee amount is USD 7.511 (3% of 83.7(100-7-9.3) =2.511 + 5)
- Fee Level 4 — 10% -> Fee amount is USD 7.6189 USD (10 % of 76.189(100-7-9.3-7.511)
- Fee Level 4 — 20% -> Fee amount is USD 15.2378 USD (20 % of 76.189(100-7-9.3-7.511)
- Fee Level 5 — 10% -> Fee amount is USD 5.33323 USD (10 % from 53.3323(100-7-9.3-7.511-7.6189 -15.2378)
The Billing Amount parameter is included into the Back-Office reports to determine transaction billing amount. This parameter indicates base calculation amount for fees:
- None — Billing Amount = Transaction Amount
- Priority Level 1 — Billing Amount = Transaction Amount
- Priority Level 2 — Billing Amount = Billing Amount Level 1 — Fee Level 1 …
BuyRate
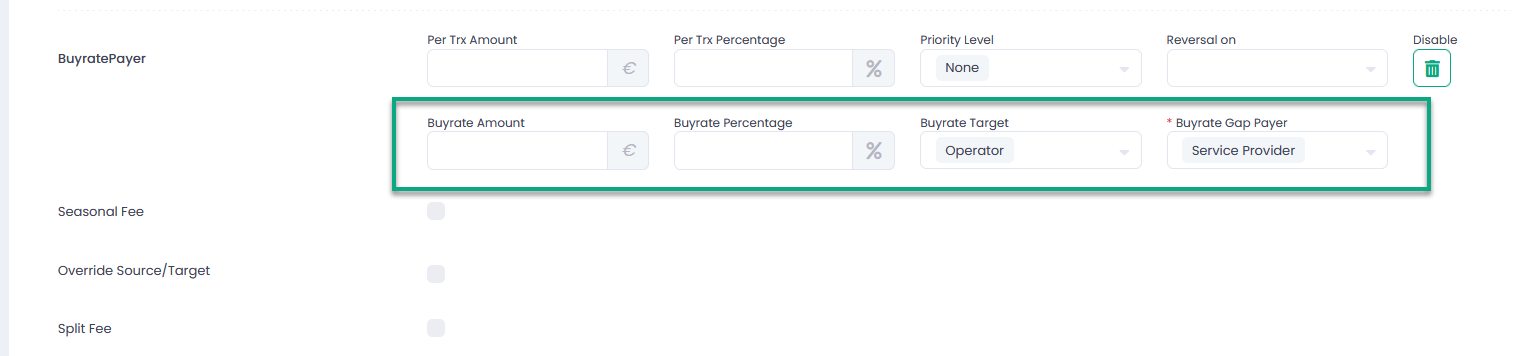
Use Buyrate to configure Buyrate fee value for a Buyrate Target and a Total fee value. If Buyrate Amount/Percentage is less than fee TRX Amount/Percentage, Fee Target receives the difference ([total]-[buy-rate]). Otherwise, in case the Buyrate exceeds the Fee, an additional parameter will be added ‘Buyrate Gap Payer.’ This parameter configures the entity that will pay the difference in case the Buyrate exceeds the Fee.
Example:
Fee TRX Amount = 5$. From Sub-Account to Platform
Buyrate Amount = 8$. From Sub-Account to Agent
Buyrate Gap Payer – is Service Provider
Fee result after funds transfer:
- 5$ will be charged from Sub-account to Agent \\ Buyrate fee is equal to fee TRX Amount
- 8 – 5 = 3$ will be charged from Service Provider to Agent \\ Remaining part of Buyrate fee that must be written off from Buyrate Gap Payer. If Gap payer is NONE – gap part of Buyrate will be not processed.
Buyrate functionality is available for Per-Transaction Fees, Fee On Top Of Fees, Sliding Scale Fees.
To create a Buyrate:
- Enable Buyrate for a specific Fee; Buyrate is available for Per Transaction Fees, Fee On Top Of Fee, and Sliding Scale fees. Buyrate is disabled for Scheduled Fees.
- Specify Buyrate Amount or Buyrate Percentage.
- Select Buyrate Target from the list of available targets — depends on your specific configuration.
- Select Buyrate Gap Payer from the list of available values.
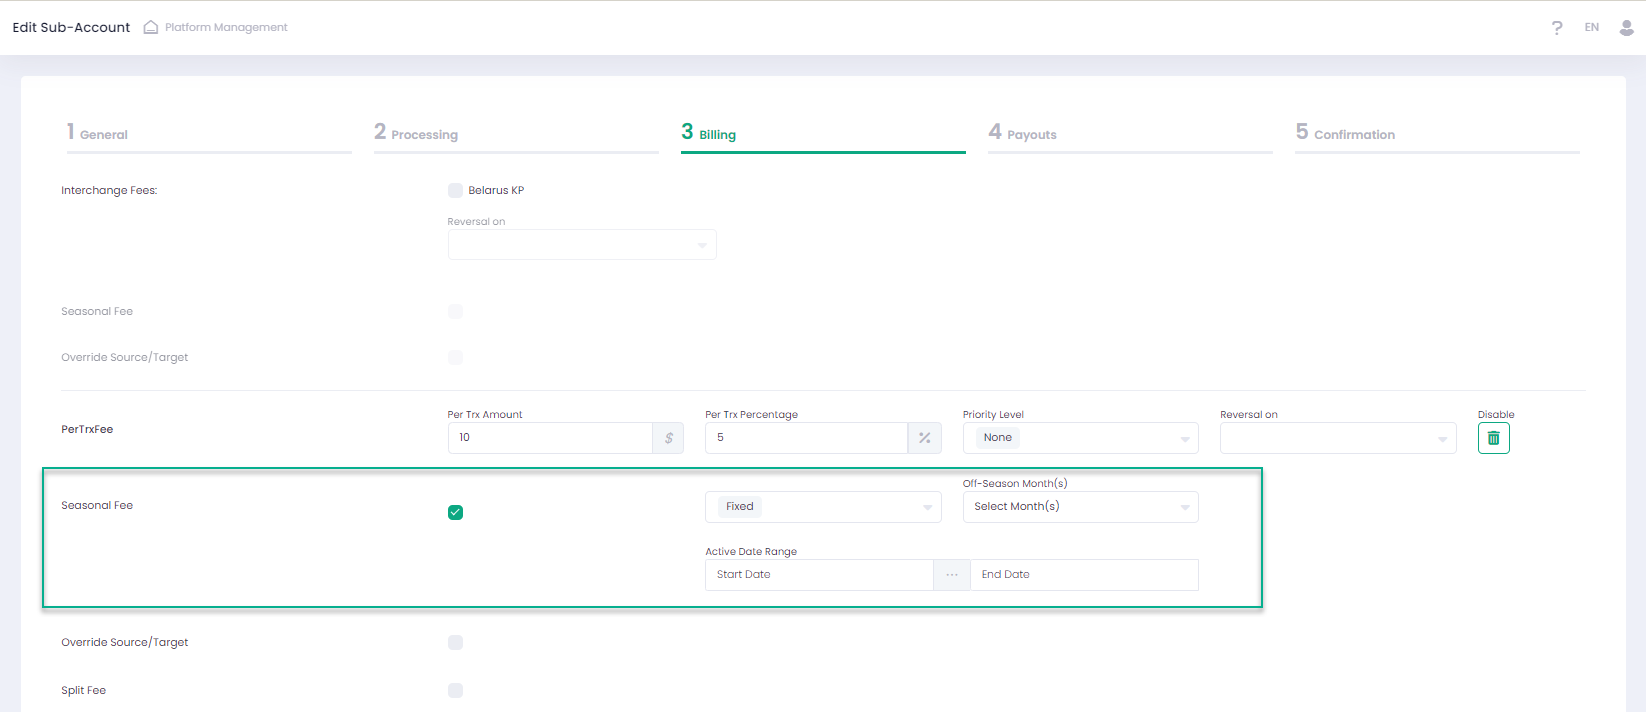
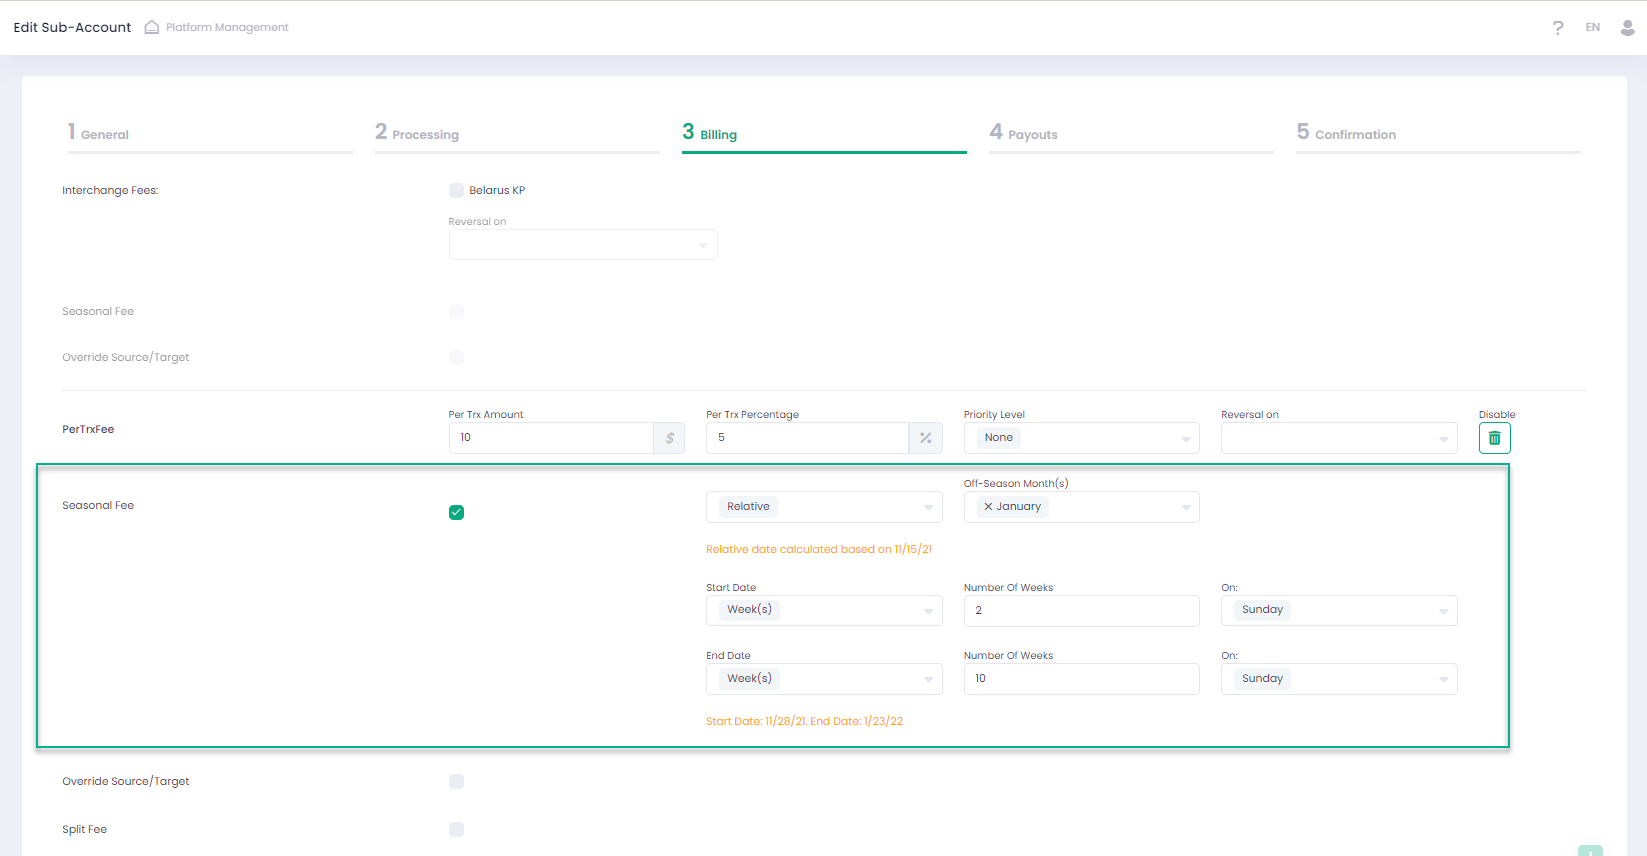
Seasonal Fee
Use Seasonal Fee option to set active and inactive period for individual fees.
- Activate Seasonal Fee checkbox for a specific fee you wish to enable this option for
- Choose Fixed or Relative period for Seasonal Fees. In case of Fixed period the Fee will apply for a fixed period, and for a Relative period the fee will be applied only after a specified period upon Sub-Account creation, the start and end date of the relative period is provided after the data is entered
- Use Date Picker to set Active Date Range
- Use Date Picker to set Off-Season Months — selected months must be within the set Active Date Range
Fixed Fee
Relative Fee
Seasonal Fee option is enabled for all fee types, including Interchange Fees. This feature is optional and in case skipped, fees are always active. Seasonal Fees settings are displayed in the Sub-Account Billing Details at the Onboarding Confirmation step and in Sub-Account Details on the main Sub-Account screen.
Override Source and Override Target
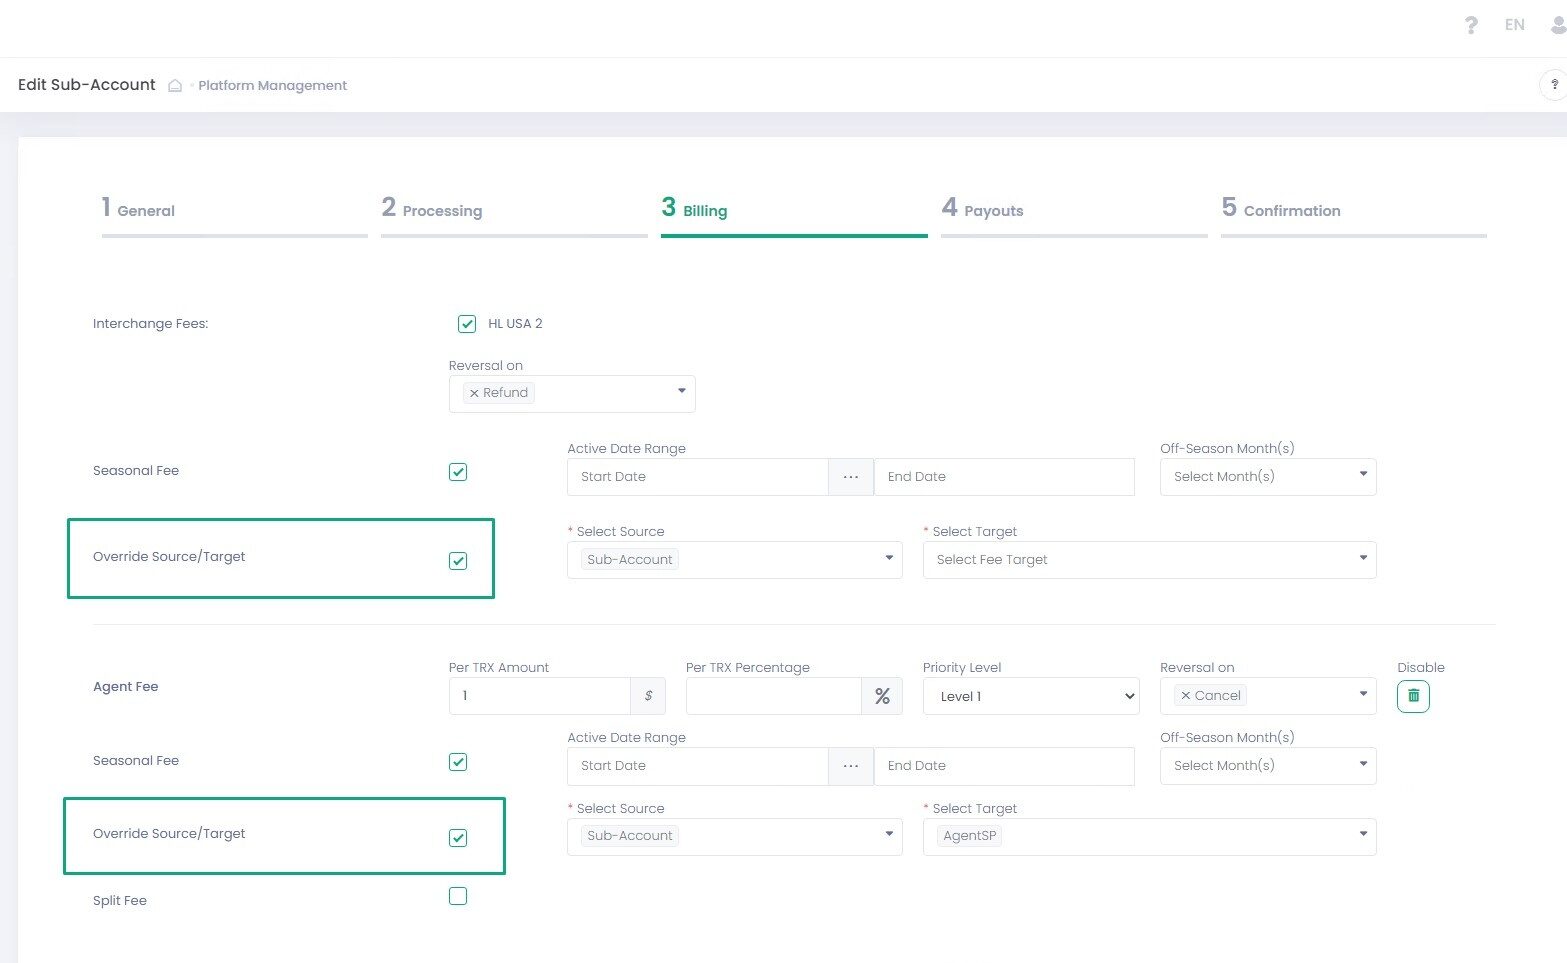
Override Source/Target allows overriding default Fee Source and Fee Target for all types of fees. Set values can be viewed in the Sub-Account Billing Details. Available Fee Source and Fee Target options depend on your specific configuration. This feature is disabled in case Fee Target = Reserve Balance has been configured on a Service Provider/Fees and Residuals level for a specific Sub-Account fee.
Split Fee

When the Split Fee option is selected, the Fee amount can be divided between multiple targets and even based on priority levels. Split Fee functionality is enabled for Per-Transactions fees, Fee On Top Of Fee, and Sliding Scale fees. Split Fee is NOT available for Scheduled Fee and Fees with Target Fee Reserve Balance.
To split Fee Amount:
- Activate Split Fee for a particular fee. The set Fee Target value is displayed as the default Split Fee Target at the First Priority Level.
- Set Percentage Amount for the First Level. Priority Levels and Fee targets are disabled at the First Level, the default Fee Target applies for this level.
- Click the Add icon to add another split level. You can add more than one split level.
- At each new split level set Percentage Amount, select Fee Target and Priority Level. Fee Target available options depend on your specific configurations.
- Click the Remove icon to remove a specific level.
In case a Split Fee has been activated, the billing amount for the reports is the Fee Amount based on the Priority Level and the Percentage Amount also based on the Priority Level. Split Fee details are displayed in the Sub-Account Billing details and at the Confirmation Onboarding step.
Scheduled Fee
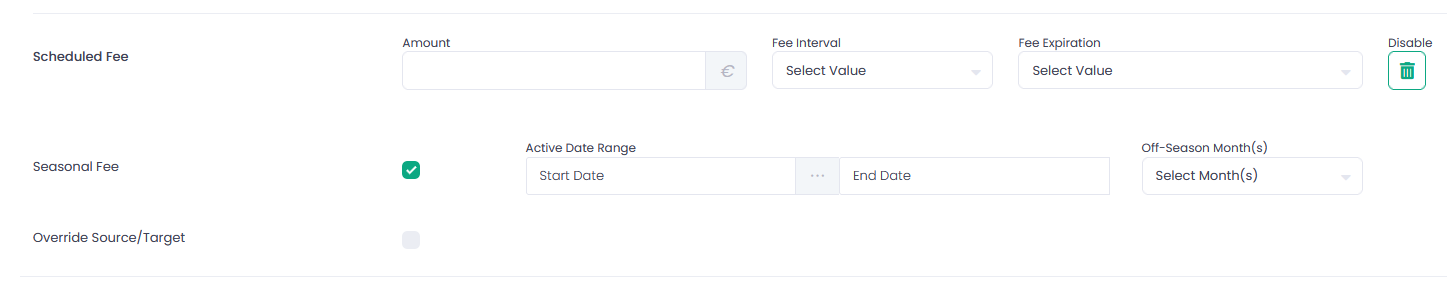
Scheduled Fees allow configuring a fee with a preset amount calculation, a specific interval and duration. You can configure amount, interval, and a fee expiration.
Scheduled Fee Parameters
| Name | Description |
| Fixed Amount | Fixed fee amount calculated for each transaction |
| Scheduled Fees Interval |
|
| Scheduled Fees Expiration |
|
Scale Range Fee
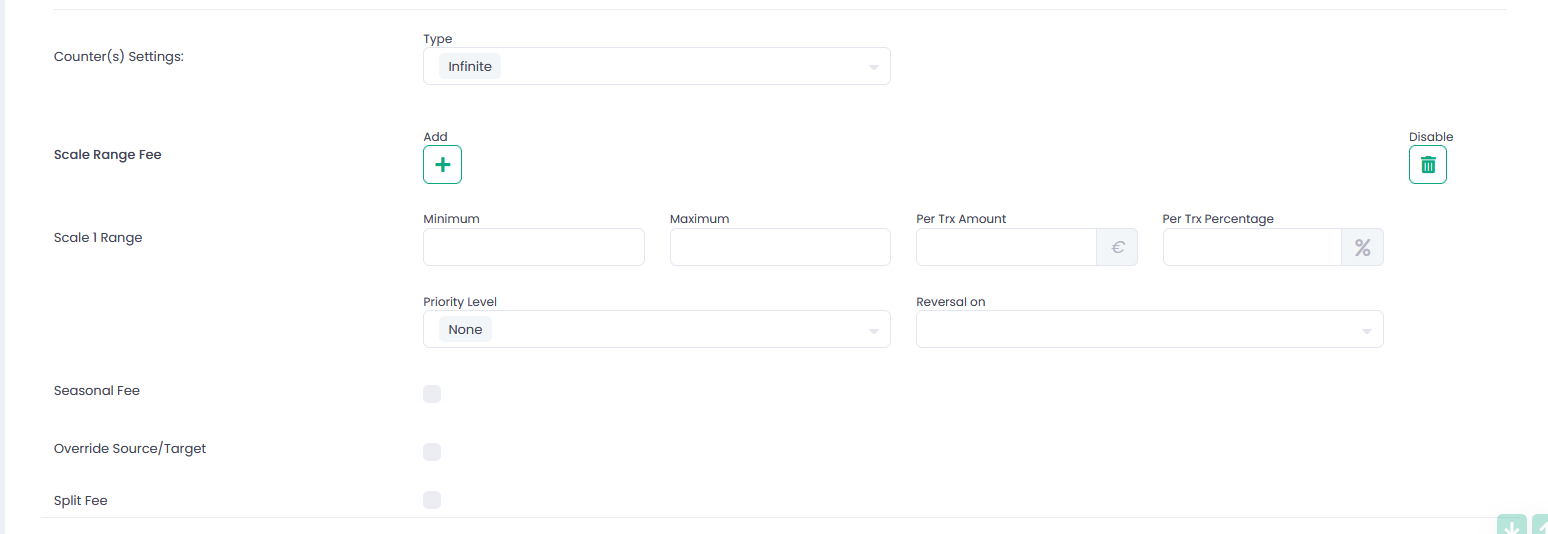
Scale Range Fees allow configuring an amount of fees based on the transaction counts. You can preset several scale ranges to determine fees amounts.
Scale Range Fee Parameters
| Name | Description |
| Minimum | Enter a minimum transaction count |
| Maximum | Enter a maximum transaction count |
| Per Trx Amount | Enter a Fee amount per transaction |
| Per Trx Percentage | Fee as a percentage of the transaction amount |
Scale Range Fee Counter is available for the Scale Range fee type. Fee Counter determines when to reset Scale Range transactions counter. To enable Fee Counter set Period and Number: e.g., Week 2 — the transactions counter will be reset every two weeks. The counter resets on the last day of the selected period (Week, Month, Year).
Scale Range Fee Counter Reset Parameters
| Name | Description |
| Week | Select for a weekly counter reset. Enter number of weeks. |
| Month | Select for a monthly counter reset. Enter number of months. |
| Year | Select for an annual counter reset. Enter number of years. |
| Infinite | Select to enable an endless counter. |
Fees Reversal
Select one of the options (Cancel, Refund, Partial Refund, Reserve Balance, or Void) in the Reversal on drop down to reverse a Scale Range Fee. You can enable fee reversal even for a disabled fee. In this case disabled fee is treated as enabled.
Reversal is disabled for fees with Fee Target=Reserve Balance in case there is no Release date set for such fee.
Payouts is an optional step where you can configure your Sub-Account payout instructions.
The Payout details section is split into several sections:
- Payout Configuration
- Card-On-File Configuration
- Payout (ACH Bank) Details
- Payout Scheduler
- Payout and Reserve Management
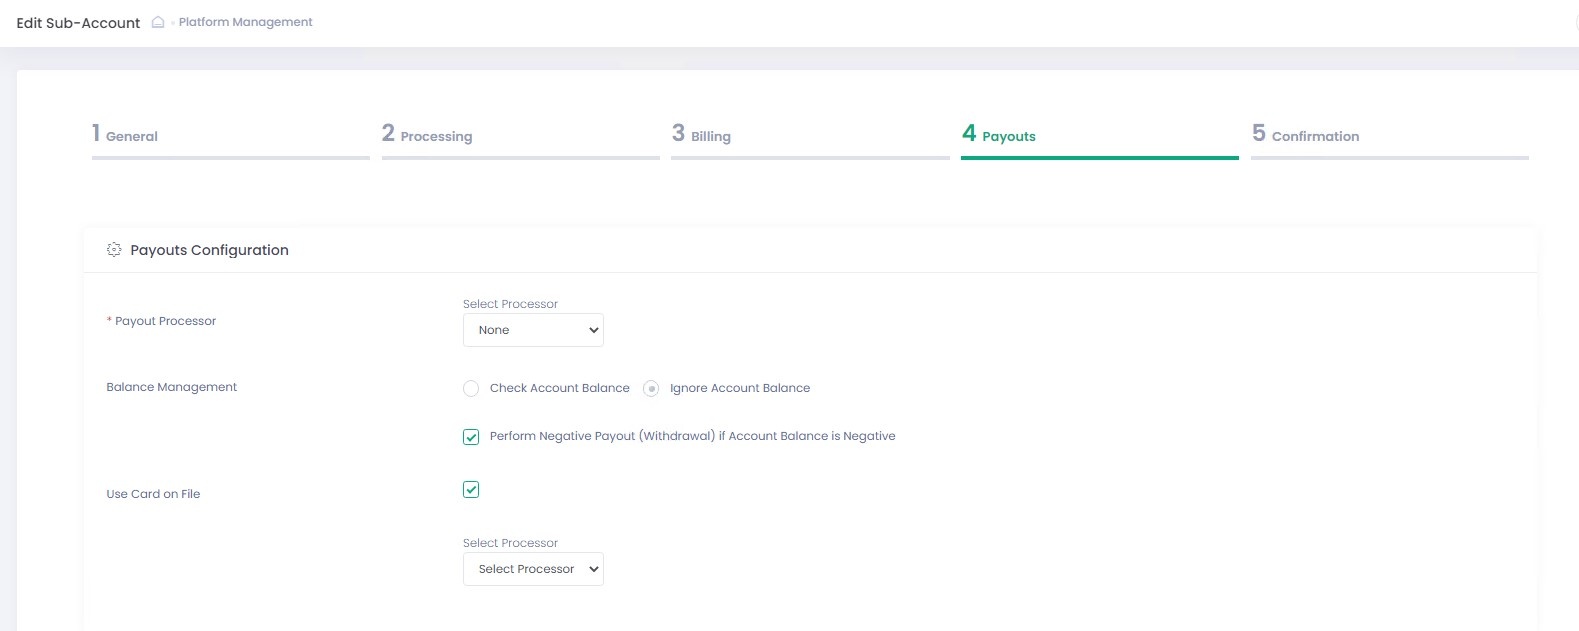
Payout Configuration
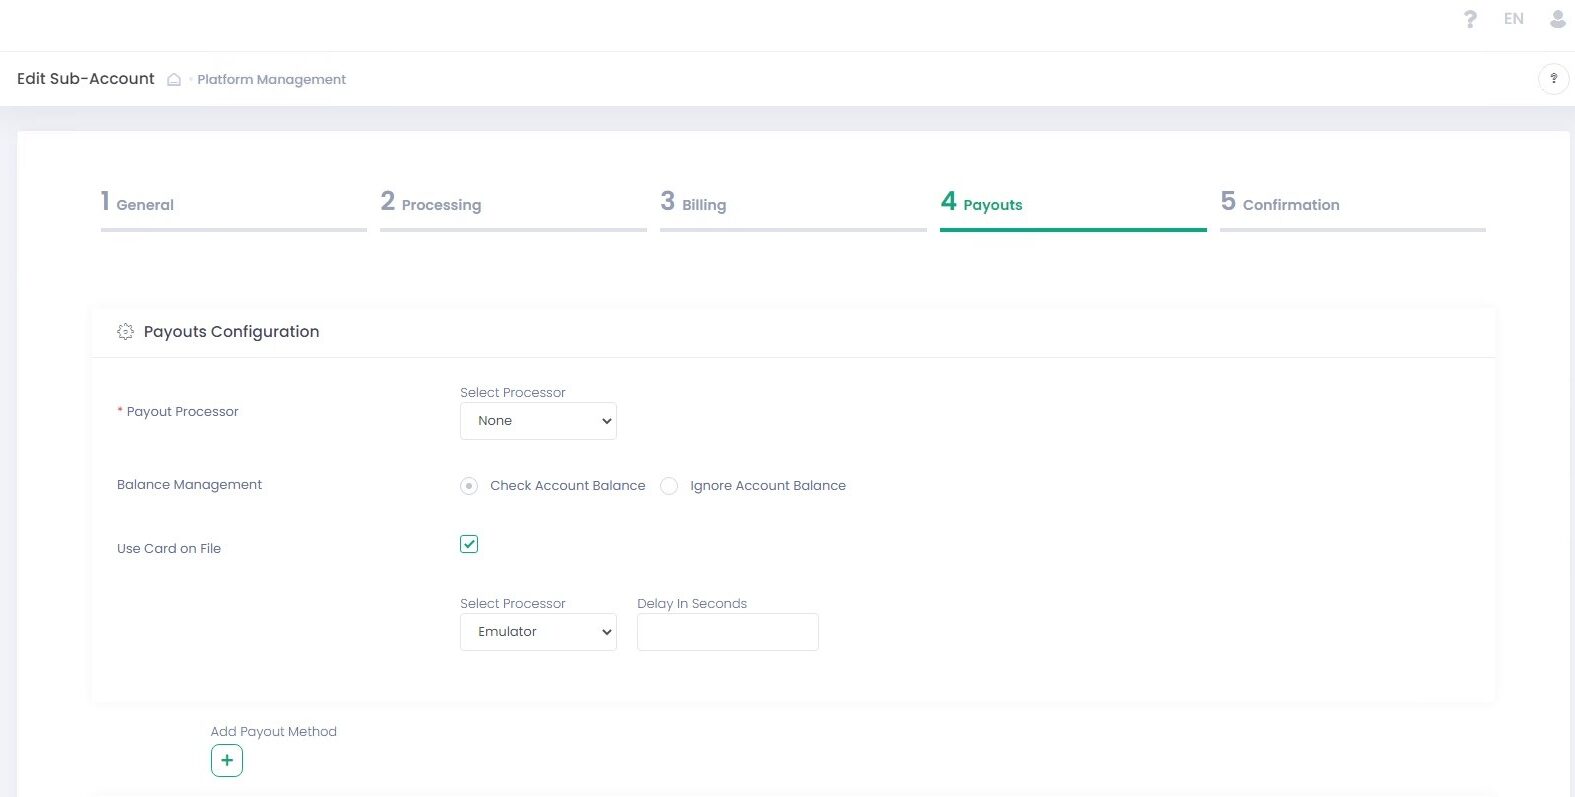
Configure manual and automated payout options, payout processor and its parameters in this section. Use Balance management to configure Negative Payouts.
Payouts Configuration Details
| Name | Description |
| Payout Processor | Select a Payout processor from the drop-down list or select None to enable manual payouts. Available options are based on the selected Service Provider. External payouts processor is disabled if manual payout (None) option is selected. Manual payouts are manually approved in the Back-Office Payouts report |
| Processor Parameters | Populated individually for each Payout processor and are based on the selected template Sub-Account |
| Balance Management | Balance Management allows configuring payout actions based on the balance value |
| Check Account Balance | Select to enable account balance check prior to the payout. In case enabled, negative payouts are disabled |
| Ignore Account Balance | Select to ignore account balance value for processing payouts. Required to enable negative payouts |
| Perform Negative Payout (Withdrawal) if Account Balance is Negative | In case selected together with Ignore Account Balance and the returned account balance calculated amount is negative – negative payout transaction is processed |
| Use Card On File | In case selected, negative payouts for this Sub-Account will be processed according to the configured Card On File instructions in the first place. In case of a failure of such operation, negative payout is processed via ACH as usual |
| Select Processor | Select a processor for Card On File negative payout instructions. Choices are based on your Service Provider settings |
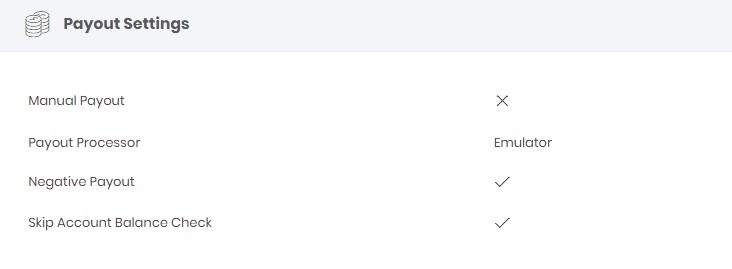
In case Negative Payouts are enabled for a Sub-Account, it will be displayed at the Confirmation Onboarding step in the Payout Settings tab.
Card-On-File Configuration
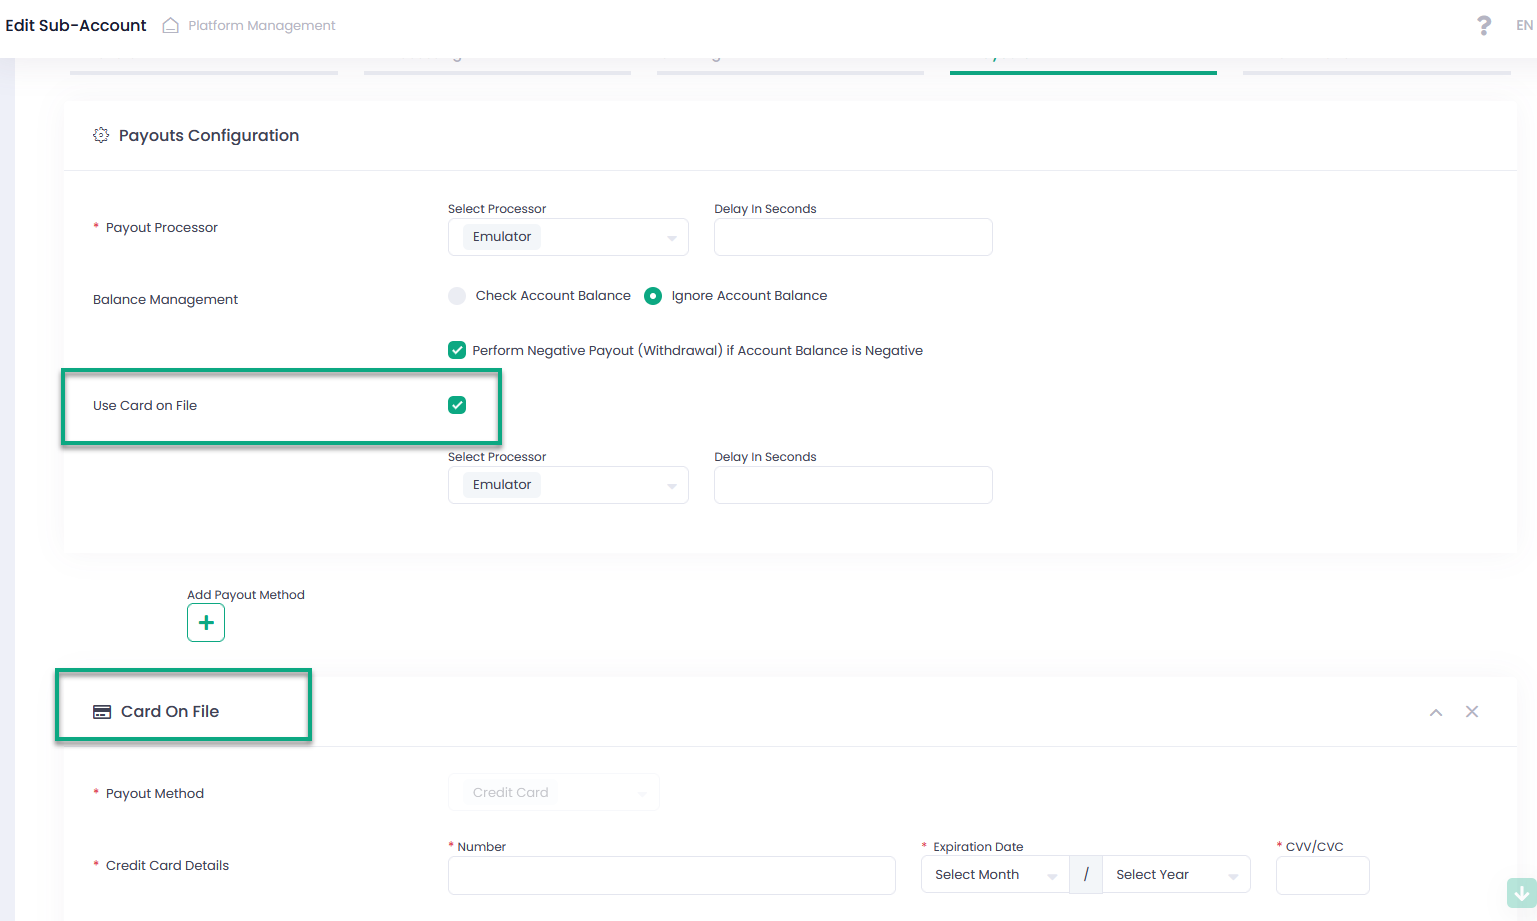
Use Card On File to process negative payouts using the provided credit card instead of the default ACH payment method. Card On File is optional and in case activated and configured together with negative payouts, Payout Tool processes negative payouts based on the provided in Card On File instructions and the negative payout payment method changes to Credit Card; otherwise, the payment method is ACH and Payout Tool processes negative payouts as usual.
To create Card On File Instruction for Negative Payouts:
- In Payout Configuration select Ignore Account Balance and Perform Negative Payout (Withdrawal) if Account Balance is Negative
- In Payout Configuration activate Use Card On File and select a Card On File Processor
- At the bottom of the page click Add Card On File to create a new Card On File Instruction:
- Payment Method is Credit Card by default and disabled for editing — required
- Credit card number — required
- Credit card expiration date — required
- CVV/CVC number — required
- Name On Card — required
You can create card-on-file instructions even for Sub-Accounts without payout configurations, negative payouts and/or account balance management being enabled. In this case, once credit card details are entered and submitted, the system performs credit card pre-authorization and tokenization. This allows using preauthorized credit cards for making on-demand payouts.
Payout (ACH Bank) Details
It is possible to create one payout configuration per currency type.
Available Actions:
| Add Payout: use to add an additional payout |
| Edit Payout Method Name: use to edit an existing payout name |
| Hide/Show: use to hide/show a payout configuration |
| Remove: use to delete a payout configuration |
| Name | Description |
| Payment Method | Select a Payment Method for the payout from the drop-down list |
ACH Details All fields are required. Displayed in case ACH is selected |
|
Payout Scheduler
The Payout Scheduler enables you to configure the Time Schedule for Payouts you want to apply to your Sub-Account.
| Name | Description |
| Payout Scheduler Automated Payout Interval Options |
|
| Payout Scheduler Automated Payout Expiration Options |
|
Payout and Reserve Management
You can preset payout amount calculation mode and time range to create a rolling reserve according to your risk management policy. There are 4 Payout Types you can choose from:
- Fixed — Set a fixed payout amount
- Percentage — Rolling Reserve Payout amount is calculated as a percentage from the Account Balance
- Past Date — The payout amount is calculated as an Account Balance on a specific date, considering the preset reserve capacity
- Past Interval — Payout amount is calculated from the total amount of daily settlements, incoming fees, adjustments, reserve balance release, on-demand payouts, and cancelled payouts transactions for the specified time range
CONFIGURING TWO-STEP APPROVAL FOR PAYOUTS
Enable Two-step approval to have an option to manually approve or decline suspicious payout transactions.
| Name | Description |
| Two-Step approval (semi-automated payout) | Select to enable an additional manual payout confirmation via the Back-Office. Use to add a manual payout approval for automated payouts processed with an external processor or to add an additional manual approval for manual payouts |
| Scheduler state | Select to enable/disable payout scheduler |
Check all information to be sure that your Sub-Account is configured according to your requirements. If you need to change any information, return to the corresponding steps. Otherwise, press the Submit button to finish configuring your Sub-Account.
Your Sub-Account has been created!